Wednesday 25 July 2012

How I Captured my First Aurora Australis

How I Captured my First Aurora Australis

Your D800 is in the mail

On Sunday 15th of July 2012 I went to a friend’s house to borrow his camera. I had a photo shoot the next day and I had nothing decent to shoot with. My newly ordered Nikon D800 was in the mail… apparently. And I had sold my trusted D3X a few days before. D’oh!

Tonight is the night

I had warned my friend. “Tonight could be a good night for an aurora… are you cool with me picking up the camera this evening ?”. “Sure no problem” he said. After a good chat about the merits of Canon vs Nikon (he is a Canon guy), I say thanks and start to leave. As I step outside I look towards the southern Tasmanian sky and sure enough, the aurora is happening. A greenish glow is dancing gently over the horizon. “Are you sure you don’t want to grab some shots… I don’t mind waiting”. He hesitates a bit, I insist and soon enough we setup tripod and camera on his deck, watching in awe what turns out to be the most active aurora in recent years.

Borealis and australis

An aurora happens when charged particles are carried by solar winds and hit the earth’s atmosphere. The particles transfer their energy to the molecules of oxygen and nitrogen. When these excited molecules return to their stable state they release light (mostly green and red). This is what we see when we see an aurora. When it hits the north pole it is called aurora borealis, when it hits the south pole it is called aurora australis. If the aurora australis is strong, it can be seen not only at the south pole but also at lower latitudes such as Tasmania and New Zealand.

How to photograph an aurora

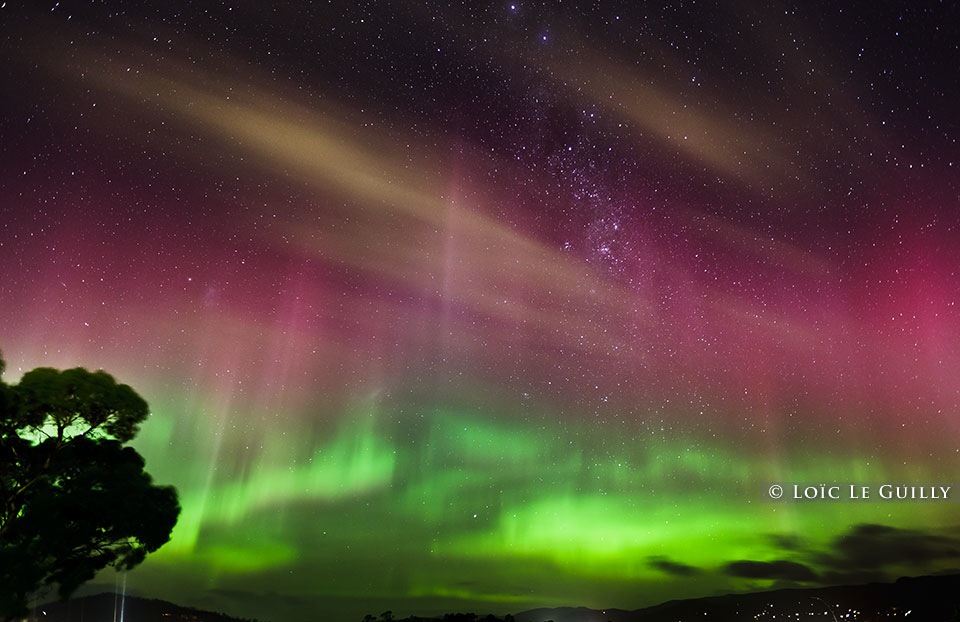
My friend started shooting and the results on the camera screen were pretty exciting. The camera sensor and a long exposure reveal a lot more light and colour that can be seen by the naked eye. He kindly offered me to shoot a few frames. I decided to go for it with a 30 second exposure at 3200 iso, 16mm rectilinear lens wide open at f2.8. This can be too bright for really active auroras but I wanted to capture as much of the Milky Way as possible. The first shot I took is the one you see below (straight out of the camera). When I checked the image on the camera the green of the aurora looked very bright but I knew it wasn’t completely overexposed. But the upper red glow was recorded very nicely. Some low drifting clouds added a nice movement to the shot.
_about_aurora-australis-Tasmania-1825-preprocess.jpg

Post processing in Lightroom

_about_basic.png
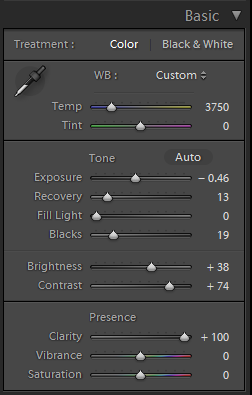
I was very excited by the shot I got but I knew I could improve it in Lightroom (I had shot in raw format as I always do). This is a what I did :
  • crop and straighten
  • white balance – In my experience long exposures introduce a yellow tinge to night photographs. I took the white balance from daylight (5500K) to 3750K.
  • exposure – I reduced the overall exposure by half a stop. I also applied another -1 stop to the green part of the aurora (with the adjustment brush).
  • contrast – Long exposures at night tend to give flat images. I increased the overall contrast of the image (blacks to 19, contrast to 74, curve to medium contrast). I also pushed the local contrast (clarity to 100). That setting alone revealed the “curtain” of the aurora really well. Finally I increased the contrast further to the top third of the image to darken the sky.
And this is the final result.
_about_aurora-australis-Tasmania-1825.jpg
And here is another image made from 2 shots stitched together in PTGUI. This one was 20 seconds at 3200 iso.
_about_aurora-australis-Tasmania-1828-Panorama-master.jpg
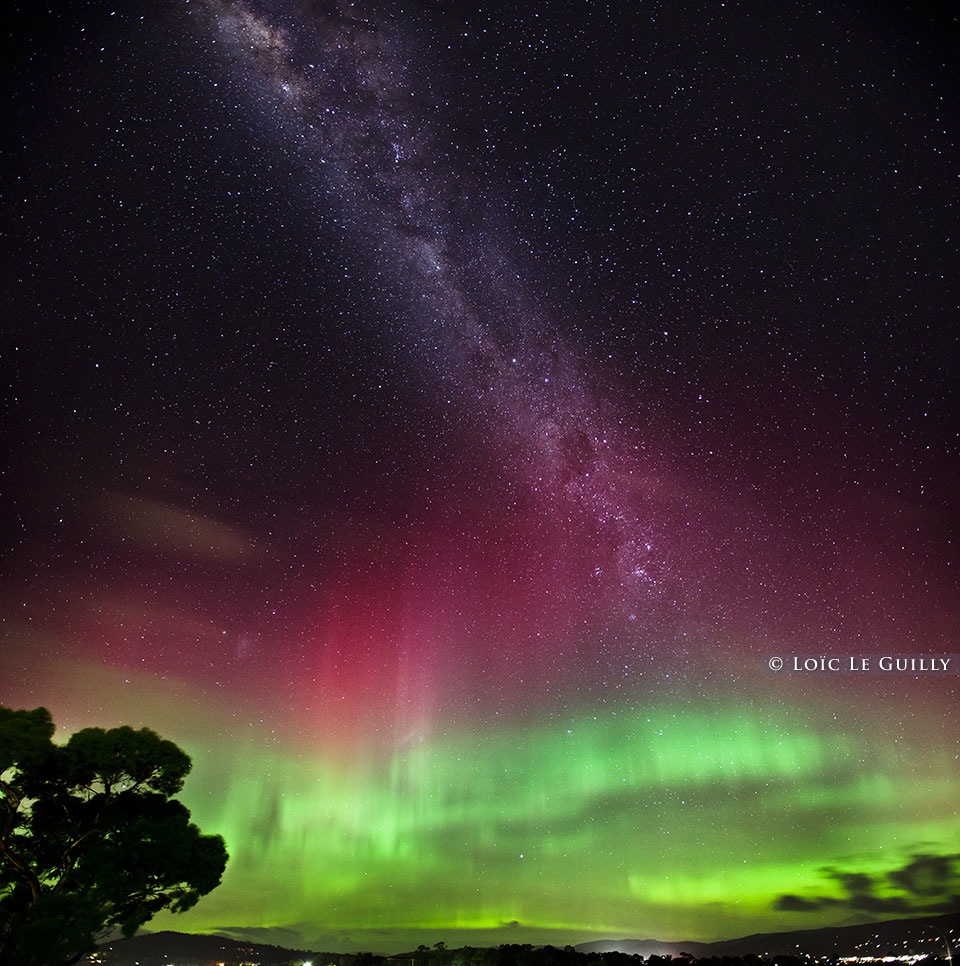
Not bad for a first night with an aurora.

How to know when an aurora might be coming ?

Personally I use the Facebook group Aurora Australis Tasmania. Its members are very knowledgeable and helpful. There is another Facebook group which is less Tasmania specific, Aurora Australis.

Final tips for photographing an aurora australis

  • a clear night
  • a spot looking south and ideally away from city lights (to avoid light pollution and flare)
  • a tripod + camera + wide angle lens (ideally f2.8 or faster)
  • use a remote trigger with mirror lock to reduce camera shake (if no remote than use timer on camera)
  • ideally shoot in raw format for better quality
  • noise reduction off (if shooting raw) to save time
  • manual focus to infinity (test on a clear night before hand to avoid disappointment)
  • iso 1600 to 3200 (or more if your camera can handle)
  • exposure 10 to 30 seconds (longer exposures will start to show stars as trails rather than dots)
  • these settings will depend on the brightness of the aurora so experiment, adjust and shoot lots of images !
Photographing an aurora is a truly exciting experience. I have read that 2013 should be a good year for auroras so keep an eye out and be ready !

Read more:
How I Captured my First Aurora Australis

Friday 20 July 2012

Panasonic announces the Lumix G5 | Photo Answers

 
Panasonic announces the Lumix G5

Panasonic has added to its range of Compact System Cameras (CSC) with the Lumix G5. This effectively replaces the G3, sitting at the higher end of the company’s CSC line-up, and is styled much like a traditional D-SLR, with a pronounced grip and a selection of manual inputs for creative shooting. The G5 includes what Panasonic say is a newly designed Micro Four Thirds sensor with a 16.05Mp resolution producing pixel dimensions of 4608x3456, which constitutes a pretty modest increase over its predecessor (at 15.8Mp and 4592x3448), though it’s arguable whether any more resolution was necessary. In other areas, however, advances are more marked. Its ISO range now reaches a maximum 12,800 ISO (versus the G3’s 6400) and thanks to the new Venus Engine VII processor, its frame rate has advanced to six frames per second from the previous four. Elsewhere the free-angle LCD screen has been uprated to a 920k dot resolution and features a handy Touchpad-AF control allowing you to change AF point position by dragging your thumb across the screen without taking your eye from the viewfinder. There’s also a new function lever on the top plate, which can be used to set the focal length of Power Zoom lenses or control shooting functions. We were lucky enough to preview the camera at its launch and it looks to be a solid evolution of the G series line-up. You can expect a full review in the October issue of Digital Photo.

For more details, see Panasonic’s official release below… 

18th July, 2012– Panasonic has today launched the LUMIX G5, a truly revolutionary digital single lens mirrorless camera. Offering outstanding image quality delivered by state-of-the-art technology, full creative control, and a wide range of shooting options provided by the LUMIX G system, the LUMIX G5 will help you take your photography to the next level.

Setting a new standard in system camera image qualityThe LUMIX G5 demonstrates the true potential of Mirrorless System Camera image quality. The newly designed 16.05-megapixel Live MOS Micro Four Thirds Sensor means images will be cleaner than ever, while the incredible processing power of Venus Engine VII FHD maximises the potential of your images and videos. With the perfect balance between the sensor and image processer, the LUMIX G5 provides an ISO range of 160 – 12,800, allowing stunning image quality even in low-light situations.

Boasting a high speed AF system ‘Light Speed AF’, you’ll never miss the perfect moment with the LUMIX G5. A wide range of AF modes are available, including multiple-area AF, Face Detection, and AF Tracking meaning the LUMIX G5 can lock onto any subject and keep it in focus even if it moves. Additionally, the LUMIX G5’s rapid burst shooting capability - at six Frames per Second (FPS) at full resolution or up to 20 FPS in reduced resolution - can capture multiple shots of fast-moving subjects with stunning clarity.

The quality advances of the LUMIX G5 are not restricted to still photos. The sensor and Venus Engine enhancements mean that the camera can record in Full HD 1080/50p, with stereo sound, producing professional movie quality with minimal noise. With outputs in both AVCHD progressive and MP4, the LUMIX G5 provides wide compression and compatibility options. The long recording times, instant access controls, advanced AF system and LUMIX G lenses specifically designed for movie shooting, means the LUMIX G5 is the perfect option for capturing beautiful movies with ease.

Putting you in control of your creative photographyThe LUMIX G5 provides high precision digital processing functions in a compact, classically designed and easy-to-grip chassis. Its intuitive automatic shooting modes, full range of advanced features, and innovative user interface give you the power to maximise your creativity.

With a choice of using either the Electronic Viewfinder (EVF) with eye sensor, or the high resolution, 3.0-inch free-angle LCD to compose your shots and movies, you can capture the moment as the situation demands. Meanwhile, the revolutionary touch control shooting - including full-area touch focusing where the focus can be set immediately to the subject, or to the background, by just one touch of the large LCD screen even when using the EVF – gives you the control to compose and create stunning images.

Be part of the LUMIX G MicrosystemAs part of the LUMIX G system, the LUMIX G5 will provide you with access to the world’s largest range of Micro Four Thirds lenses and accessories, making sure you have the right set-up to capture every moment. These include Panasonic’s new LUMIX G X VARIO 12-35mm lens, offering F2.8 brightness throughout its entire zoom range.

Key Features
•         A new standard in digital single lens mirrorless camera image quality: With a new 16.05-megapixel Live MOS sensor; the Venus Engine VII FHD image processor; and an ISO range of up to 12,800, the LUMIX G5 provides stunning image quality, even in low-light situations.
•         Never miss the perfect moment: With highly precise, light speed Auto Focus and six FPS burst shooting at full resolution, you’ll never miss the perfect shot
•         Capture your memories with Full HD Movie capability: The LUMIX G5 offers Full HD recording in full stereo in both AVCHD (1080p at 50 FPS) and MP4 (1080p at 25 FPS) formats - widening your editing and storage management options
•         Creative control: The LUMIX G5 lets you capture great photos from the very first shot with iA+ (Intelligent Auto Plus) mode. Auto Focus can be set with one touch, Face Recognition will remember the settings for your friends and Intelligent Scene Selector will automatically switch to the appropriate mode according to the subject touched. New features on the camera, such as the Function Lever allow you to intuitively control power zoom lenses; zoom into an image when in playback mode; and navigate the user interface
•         You choose how to shoot: With the in-built Electronic Viewfinder you can frame the perfect portrait with your eye close to the camera, while the 3.0-inch free-angle touch LCD screen means you can take shots from above your head and below your feet with perfect clarity
•         Classic design: Compact, easy-to-grip and with a classic design, the LUMIX G5 is designed to be your companion on all of your photographic adventures
Read more:
Panasonic announces the Lumix G5 | Photo Answers

Friday 13 July 2012

Top Tip for Portraits | Quick Tips

 by
Matt Bennett

Get the very best portrait results with this top focusing tip!

Portrait
Portrait
When shooting a portrait, it’s best to focus as close to the subject’s eyes as possible. If this means focusing and recomposing your shot, definitely do so.
This is particularly vital when using a shallow depth of field, resulting from a wide aperture like f2.8 or f1.4.
A tack sharp mouth, nose or ear, but slightly soft eyes, will always spoil a portrait.
Read more:
Top Tip for Portraits | Quick Tips 

Tuesday 10 July 2012

5 Rules on Composition to Create More Compelling Photographs tutorial

Overview on Composition
So what is composition? Composition is what guides our eyes through a photograph and gives importance to the subject in relation to the rest of the photo. Composition through flow, direction, and visual balance, helps drive the story behind your image and grabs your viewer’s attention. It is one of the most important components of photography, or any visual art for that matter, and can turn an ordinary scene to something special.
And unlike many other photographic principles such as focus or exposure that have benefited from technological advancement, each photograph still requires you to personally decide on the overall composition.
10 hakone gardens wedding photography 5 Rules on Composition to Create More Compelling Photographs
(All images by Lin and Jirsa Wedding photographers and processed with SLR Lounge’s Lightroom 4 Preset System)


Here are 5 principles of composition that can help you make more dynamic images:
1. The Rule of Thirds
When starting out, it is natural to place your subject at the center of the frame. However, in a photograph having your subject placed dead center often leads to a boring composition. Doing so, makes our photographs look predictable.
The Rule of Thirds is one of the most popular compositional techniques. The Rule of Thirds divides your scene into a 3×3 grid with equal size rectangles. To follow this rule, compose your subject in one third of the frame or on the line. This creates a more dynamic and pleasing composition since it gives more emphasis to your subject and their environment. In regards to the photo below, our eyes go immediately to the children who are the primary subjects of the photograph.
Also be aware of the direction that your subject is looking or moving towards. Generally, it is better for them to look or move into the frame.
02 hakone gardens wedding photography1 5 Rules on Composition to Create More Compelling Photographs
The same holds true when you’re taking a landscape photo; it’s more interesting to put either the landscape or sky in two thirds of the frame to give it more importance. Placing the horizon in the middle of the frame makes for a uninteresting composition where neither the sky nor landscape is emphasized.
10 laguna beach portrait session 5 Rules on Composition to Create More Compelling Photographs
Using the Rule of Thirds provides balance to the photograph by using the two thirds section of the frame to compliment the one thirds section of the frame where the subject is placed.
2. Leading Lines
Leading lines are diagonal lines that naturally exist in a scene which help the viewer’s eyes move from one direction to another. The lines are created from converging perspectives as seen through the camera. They should be framed in a way that draws the viewers eyes towards the primary subject as they can draw your eyes away from the subject when used improperly.
17 saint cecilia catholic church taglyan cultural complex wedding 5 Rules on Composition to Create More Compelling Photographs
3. Reduce Clutter
Clutter is pretty much anything in the photograph that takes your attention away from your primary subject. This can be anything from a Styrofoam cup, a busy tree branch, or any busy details on a focused background that doesn’t help enhance the scene.
This of course doesn’t mean that you can nor should you only shoot against a plain background. The first image of the couple in the bamboo forest works well because the repeating lines are relatively uniform in direction. Were they not, then it would lead to a busy and cluttered background.
Shallow depth of field is another great way to reduce clutter and give visual weight to your subject.
11 hakone gardens wedding photography 5 Rules on Composition to Create More Compelling Photographs
4. Contrasting Colors
Another way to make your subject stand out is by using contrasting colors. Examples of this include vibrant vs muted colors, warm vs cool colors, and dark vs light colors. The last one, light and dark, is especially important because our eyes tend to move from darker colors towards lighter colors.
02 hyatt regency huntington beach wedding photographer 5 Rules on Composition to Create More Compelling Photographs
5. Creative Framing
Framing your subjects is a great way to isolate your subject is to use framing. This can be done with either defocused foreground objects or solid color shape elements. Just make sure that what you are using to frame is not so overly busy that it fights for attention.
08 laguna beach engagement photographer 5 Rules on Composition to Create More Compelling Photographs
10 viceroy engagement photographer 5 Rules on Composition to Create More Compelling Photographs
Conclusion
These composition guidelines are not set-in-stone rules, but by knowing them, you will have a better understanding on what makes a photo compelling and also when breaking away from standard composition rules can work for you.
Read more:
5 Rules on Composition to Create More Compelling Photographs tutorial

Monday 9 July 2012

The Basics of Nature Photography from a National Geographic photographer (VIDEO) - Imaging Resource

Nature-photography
 We've shared photography tutorial videos with you recently on how to photograph a hamburger and how to shoot a steaming hot cup of coffee in the studio. Now, here's a how-to discussion on a completely different topic: The Basics of Nature Photography by National Geographic photographer Michael Melford.
In this seminar-style video, which was shot for the B&H Photo and Video store, Melford shares anecdotes and tips on how he captured his stunning images of nature and wildlife for National Geographic Traveler and other publications. (Melford has published numerous photo essays and books for National Geographic, National Geographic Traveler, LIFE magazine, and publications.)
First, a word of warning about the video. At over an hour and half, it's rather long, but we think it's worth it. So grab yourself a cup of coffee (or a cool drink), and sit back and enjoy.
Read more:
The Basics of Nature Photography from a National Geographic photographer (VIDEO) - Imaging Resource

Sports DSLRs Go Robotic for 2012 Olympics tutorial

 
image003 Sports DSLRs Go Robotic for 2012 Olympics


From Brian Smith’s photo of Greg Louganis hitting his head on the diving board in the 1984 Olympics to Michael Phelp’s 1/100 sec win over Milorad Cavic in the Beijing Olympic 100m Butterfly, the Olympic Games have always a source of breathtaking images.
This year, the news agency Reuters is stepping up the ante by introducing remotely-controlled robotic-camera sytems, each equipped with the Canon 1D-X. These cameras can be installed on the rafters or on rails alongside the track prior to the matches and allow perspectives that would be very difficult for regular photographers to access.
fifthphotofabrizio Sports DSLRs Go Robotic for 2012 Olympics
Read more:
Sports DSLRs Go Robotic for 2012 Olympics tutorial

All About Depth Of Field—07/09/12 | DPmag.com


Depth of field is something you learn about in week one of an introductory photo class. Although it's simple in principle, it can also be fairly complex. It's that dichotomy that makes it equal parts understandable and baffling. Here are some tips that will help you take control over depth of field and use it to make better pictures.

- Depth of Field Defined
The depth of field in an image is defined as the area that is suitably in focus. In reality that means that when you focus on a given spot, the area in front of it and behind it will fall off gradually from sharp to not sharp. That means more than just a single point is suitably focused, it covers an area. The greater the area in focus, the greater the depth of field.

- How aperture affects depth of field
F/stop affects depth of field simply: the bigger the opening, the shallower the depth of field. The smaller the opening, the deeper the depth of field. This axiom is used regularly by photographers whether they want to isolate part of a scene and make it the only thing in focus, or whether they want to ensure a subject is tack sharp from foreground to back.
Read more:
All About Depth Of Field—07/09/12 | DPmag.com: Sawalich

Sunday 8 July 2012

What is a teleconverter?

What is a teleconverter? A teleconverter is an add-on optic that sits between the camera body and a compatible lens. Popular options include 1.4x, 1.7x and 2.0x, which reduce the maximum available aperture by one, 1.5 and two stops respectively.
Teleconverters give the effect of using a lens with an increased focal length. A teleconverter also decreases the intensity of the light reaching your camera’s sensor.
Using a teleconverter with one of your existing lenses can be an inexpensive way of achieving longer focal lengths without investing in an expensive telephoto lens. However, because the teleconverter magnifies the image circle to zoom into a scene, any aberrations will in turn be more visible (to learn more, see What is chromatic aberration: free photography cheat sheet).
Below is a short guide on how to use a teleconverter with your camera and tripod.
How to use a teleconverter: step 1
01 Fit the converter
Check that your lens and teleconverter are compatible – if they’re not the right fit, you might damage both of them. Mount the lens on the teleconverter, switch off your camera and mount the teleconverter and lens onto it.
How to use a teleconverter: step 2
02 Attach to a tripod
A tripod collar centralises the weight of the camera and lens. For portrait-orientation shots, loosen the tripod collar’s locking screw. Rotate the lens and camera within the collar, rather than using the tripod head’s swivel facility.
How to use a teleconverter: step 3
03 Use Shutter Priority
Switch to Shutter Priority (S) mode and set a fast shutter speed to minimise motion blur as well as camera-shake. The Auto ISO function will be handy as it increases the sensitivity as necessary in dull lighting conditions.
Read more:
What is a teleconverter?

How to cross process photos in Photoshop | Digital Camera World

Photoshop Effects: how to cross process photos in Photoshop
Despite its origins in traditional film photography, the cross-processed look is still hugely popular with photographers who want to give their images a creative edge. Typically, the characteristics include skewed colours, increased saturation, and enhanced contrast. In this Photoshop tutorial we’re going to show you how to cross process photos digitally and add a black-edged border to a raw image.
We’ll start by tweaking the colours, tones and saturation in the Basic tab, and then we’ll move to the Split Toning tab to add one hue to the shadows and another to the highlights. To add a black border we’ll use the Graduated Filter tool from the main menu bar.
We’ll also show you how to save your setting as a preset, so if you want to apply the style to future images, you’ll be able to do so with a single click.
Photoshop Effects: how to cross process photos in Photoshop: step 1
01 Crop the image
To make the image slightly squarer choose the Crop tool on the top menu bar, select a 4 to 5 aspect ratio from the drop-down menu, and mark out a new frame. This is editable, so you can go back and alter your crop should you change your mind.
Photoshop Effects: how to cross process photos in Photoshop: step 2
02 Tweak the colour
For initial colour tweaks in the Basic section, move the Temperature slider to 6000 and Tint to -50. To boost the intensity of the colours set Vibrance to +70 (which only affects the less-saturated colours) and Saturation to about +30.
Photoshop Effects: how to cross process photos in Photoshop: step 3
03 Boost the contrast
Set the Blacks slider to about +40, Brightness to +50, Contrast to 95, Clarity to +30 and Exposure to +0.75. Remember that these tweaks will vary from image to image, so if you’re using your own, you’ll need to experiment with the figures.
Photoshop Effects: how to cross process photos in Photoshop: step 4
04 Apply split-toning
In the Split Toning panel set the Highlight Hue to about 220, Highlight Saturation to 95%, Shadows Hue to 15, and Shadows Saturation to 50%. Move the Balance slider to about –30. These settings are subjective, so experiment with the sliders.
Photoshop Effects: how to cross process photos in Photoshop: step 4
05 Make a border
To make a black border around the image, select the Graduated Filter tool from the menu bar, then enter an exposure of –3.0 and a Saturation of –100. Click just outside the frame and draw a line inwards a few millimetres into the image, then repeat for the other three sides.
Photoshop Effects: how to cross process photos in Photoshop: step 6
06 Save your settings
Once you’ve finished, go to the drop-down menu at the top right of the ACR window and select Save Settings. You’ll then be able to access the same settings using the Apply Presets. This will make repeating the process much easier, and it can be really useful for batch processing, tooRead more:
How to cross process photos in Photoshop | Digital Camera World

British Journal of Photography Unveils iPhone App, Offers First Editions Free


If you keep up with the world of photography, chances are you have at one point or another read The British Journal of Photography; if it’s one of your main reads you may even have their popular iPad app. And now you’ve been given a smaller, more portable option, because the magazine has officially released its first iPhone app, an app that the creators say will “change your expectations about how a magazine should look on an iPhone.”
The app is only in its third day of existence, so there are probably still some kinks left to work out, but you have to give the magazine credit: rather than shrinking the iPad version, the app has been redesigned from the ground up to work seamlessly on the smaller iPhone screen. The iPhone version also handles editions differently than the iPad app or the magazine itself. Instead of waiting for a quarterly edition of BJP on your iPad, you can now subscribe to the iPhone version and get news, a full-length feature, and a “weekly bite” every week.
Here’s a short video introduction:
Read more:
British Journal of Photography Unveils iPhone App, Offers First Editions Free

Friday 6 July 2012

How to retouch photos: pro techniques in 10 easy steps

| Photoshop Tutorials | Tutorials | 04/07/2012 11:17am
No Comments
How to retouch photos like a professional: a quick and easy 10-step Photoshop tutorial
With fashion and portrait retouching, the devil really is in the detail; you might want to enlarge the eyes a little, remove a few spots, lighten the skin, or even reduce the size of the feet! It’s all work that requires you to get up close and personal, not something you can accomplish with a quick sweep of the brush at 50% zoom. And this is what makes the use of layers and layer masks crucial when you retouch photos: if you make a mistake, you can easily delete or edit the layer and have another go.
Do that same work on the original background layer and you might find, 20 minutes down the line, that you’ve got a wonky arm, one eye bigger than the other and skin that looks like a Botox accident.
It’s not until you see all the elements working together that you can really decide whether something looks right or needs a little tweak here and there – which is easily done when everything sits on separate layers.
In this Photoshop tutorial we’ll cover subtle body slimming and reshaping, skin smoothing and colouration, and background lightening, all on different layers, as well as hopefully give you some new Photoshop tips along the way. All you’ll need for this project is Photoshop CS or above and about 30 minutes.
Our start image
1 Start Instant slimming
We’re going to start with an old trick to slim our model a touch – not that she needs it, but just to show you how it’s done. Open your start image and duplicate the original Background layer by pressing Ctrl-J.
How to retouch photos like a professional: step 1
Next press Ctrl-T to initiate a Free Transform. In the options bar at the top of the screen type 97% in the Width box and hit Enter twice.

How to retouch photos like a professional: step 2
2 Crop out the left edge
We need to crop out the left edge of the shot, where the chair now looks skewed – the right side is fine because it’s just white background. Press C for the Crop Tool, zoom in using Ctrl and + and line up the bottom-left edge so you don’t lose more than you have to before extending the crop around the picture. When you’re happy, hit Return.

How to retouch photos like a professional: step 3
3 Select the rear
Next we’ll slim down a part of the model’s body. Switch to the Lasso Tool (L) and draw a rough selection freehand around her back and bum, as shown. Float this selection to a new layer by pressing Ctrl-J and then go to Filter > Liquify. Adjust the brush size until it’s about one-sixth of the size of the selection.

How to retouch photos like a professional: step 4
4 Liquify the body
Now carefully work down the edge of the dress, using your mouse to drag inwards from the very edge of the clothing towards the body. Try to get the back looking straight and uniform, switching to a smaller brush to iron out little kinks if required. Hit Enter when you’re happy.

How to retouch photos like a professional: step 5
5 Check the joins
Zoom in close to check that any reshaped fabric creases and patterns line up with any areas of the dress that we didn’t liquify. You can blend those that don’t by adding a layer mask, clicking it to target the mask and brushing over the join with a soft-edge black brush. Next zoom in to 200% and hold down to the spacebar to drag over to the face. Add a new layer (Layer > New > Layer).

How to retouch photos like a professional: step 6
6 Clean up the skin
Switch to the Spot Healing Brush (J), and make sure the tool is set to Sample All Layers in the options bar at the top. Now work around the face clicking on blemishes, using a brush size just slightly bigger than the blemish at hand in each case. Switch to the Clone Stamp Tool when near edges of the mouth and nose to avoid blurring the features. In the options bar, set the Sample menu to Current And Below.

How to retouch photos like a professional: step 7
7 Smooth out rough areas
Add a Curves adjustment layer and drag a point in the shadows sector upwards to lighten the shadows on the skin. Click OK, target the layer’s mask and press Ctrl-I to hide the effect. Tap D, then X if need be to set the foreground colour set to white, and use a soft brush to paint over the neck to lighten the shadows.
To smooth the skin a touch, target Layer 3, then press Ctrl-Alt-Shift-E to create a new layer that merges all of the existing layers. Go to Filter > Blur > Gaussian Blur and set Radius to 3 pixels. Hit OK, then add a mask to this layer by clicking the “Add layer mask” button at the foot of the Layers palette.

How to retouch photos like a professional: step 8
8 Paint in this smoothing
To turn the mask black and hence mask out your new blurred layer, click the mask thumbnail to target the mask and then press Ctrl-I. Now tap X if need be to set the foreground colour to white. Using a soft-edged brush of around 50 pixels in size, paint onto areas of the skin that look a little rough, to effectively cut a hole in the black mask and reveal the smoothed skin, avoiding facial features or areas of detail.

How to retouch photos like a professional: step 9
9 Lighten the skin
We want to tone down the model’s tan too, so add another Curves adjustment layer, then reshape the curve roughly as shown above. Click OK, target the mask and then press Ctrl-I to conceal this adjustment. With the foreground colour set to white, use a soft-edged brush to paint over the skin, cutting a hole in the mask to apply the Curves adjustment to these areas. Avoid painting over the red dress!

How to retouch photos like a professional: step 10
10 Finish Adjusting skin colour
Holding down the Ctrl key, click the Curves layer’s mask to load it as a selection. With the selection active, add a Selective Color adjustment layer: the layer’s effect will be limited to the same areas. Choose Yellows from the dialog’s Colors menu and set Yellow to –100% and Black to +100%. Click OK and save the image as a PSD to preserve all the layers so you can revisit them later if you want to tweak them.

Using Layers
Because using Adjustment Layers and layer masks is so crucial to advanced portrait retouching, we created this handy cheat sheet to better illustrated what we did and how all the layers fit together when you retouch photos.
Click on the infographic to see the larger version, or drag and drop it to your desktop to download it. And if you find this useful, you might like some of the other infographics in our ongoing photography cheat sheet series.
How to retouch photos like a professional: a quick and easy 10-step Photoshop tutorial

Read more:
How to retouch photos: pro techniques in 10 easy steps 

5 Rules on Composition to Create More Compelling Photographhs

Overview on Composition
So what is composition? Composition is what guides our eyes through a photograph and gives importance to the subject in relation to the rest of the photo. Composition through flow, direction, and visual balance, helps drive the story behind your image and grabs your viewer’s attention. It is one of the most important components of photography, or any visual art for that matter, and can turn an ordinary scene to something special.
And unlike many other photographic principles such as focus or exposure that have benefited from technological advancement, each photograph still requires you to personally decide on the overall composition.
10 hakone gardens wedding photography 5 Rules on Composition to Create More Compelling Photographs
(All images by Lin and Jirsa Wedding photographers and processed with SLR Lounge’s Lightroom 4 Preset System)


Here are 5 principles of composition that can help you make more dynamic images:
1. The Rule of Thirds
When starting out, it is natural to place your subject at the center of the frame. However, in a photograph having your subject placed dead center often leads to a boring composition. Doing so, makes our photographs look predictable.
The Rule of Thirds is one of the most popular compositional techniques. The Rule of Thirds divides your scene into a 3×3 grid with equal size rectangles. To follow this rule, compose your subject in one third of the frame or on the line. This creates a more dynamic and pleasing composition since it gives more emphasis to your subject and their environment. In regards to the photo below, our eyes go immediately to the children who are the primary subjects of the photograph.
Also be aware of the direction that your subject is looking or moving towards. Generally, it is better for them to look or move into the frame.
02 hakone gardens wedding photography1 5 Rules on Composition to Create More Compelling Photographs
The same holds true when you’re taking a landscape photo; it’s more interesting to put either the landscape or sky in two thirds of the frame to give it more importance. Placing the horizon in the middle of the frame makes for a uninteresting composition where neither the sky nor landscape is emphasized.
10 laguna beach portrait session 5 Rules on Composition to Create More Compelling Photographs
Using the Rule of Thirds provides balance to the photograph by using the two thirds section of the frame to compliment the one thirds section of the frame where the subject is placed.
2. Leading Lines
Leading lines are diagonal lines that naturally exist in a scene which help the viewer’s eyes move from one direction to another. The lines are created from converging perspectives as seen through the camera. They should be framed in a way that draws the viewers eyes towards the primary subject as they can draw your eyes away from the subject when used improperly.
17 saint cecilia catholic church taglyan cultural complex wedding 5 Rules on Composition to Create More Compelling Photographs
3. Reduce Clutter
Clutter is pretty much anything in the photograph that takes your attention away from your primary subject. This can be anything from a Styrofoam cup, a busy tree branch, or any busy details on a focused background that doesn’t help enhance the scene.
This of course doesn’t mean that you can nor should you only shoot against a plain background. The first image of the couple in the bamboo forest works well because the repeating lines are relatively uniform in direction. Were they not, then it would lead to a busy and cluttered background.
Shallow depth of field is another great way to reduce clutter and give visual weight to your subject.
11 hakone gardens wedding photography 5 Rules on Composition to Create More Compelling Photographs
4. Contrasting Colors
Another way to make your subject stand out is by using contrasting colors. Examples of this include vibrant vs muted colors, warm vs cool colors, and dark vs light colors. The last one, light and dark, is especially important because our eyes tend to move from darker colors towards lighter colors.
02 hyatt regency huntington beach wedding photographer 5 Rules on Composition to Create More Compelling Photographs
5. Creative Framing
Framing your subjects is a great way to isolate your subject is to use framing. This can be done with either defocused foreground objects or solid color shape elements. Just make sure that what you are using to frame is not so overly busy that it fights for attention.
08 laguna beach engagement photographer 5 Rules on Composition to Create More Compelling Photographs
10 viceroy engagement photographer 5 Rules on Composition to Create More Compelling Photographs
Conclusion
These composition guidelines are not set-in-stone rules, but by knowing them, you will have a better understanding on what makes a photo compelling and also when breaking away from standard composition rules can work for you.
Read more:
5 Rules on Composition to Create More Compelling Photographs tutorial