Balancing Originality & Orthodoxy in Children’s Photography |  |
- Balancing Originality & Orthodoxy in Children’s Photography
- Interesting Photo of the Day: The Mighty Matterhorn
- Newborns to Seniors: The Technical Aspects of Portrait Photography (Video)
- Watch the Painstaking Process Behind a Product Photoshoot (Video)
| Balancing Originality & Orthodoxy in Children’s Photography Posted: 12 Apr 2014 11:35 PM PDT If you took your child to a photo shoot as recently as 1995, you’d expect to dress them in their stuffy “Sunday best.” Not anymore. Now they could be wearing animal costumes, fairy wings, cowboy hats, crowns, balloons, you name it. Something happened in the mid-nineties, and the rest is history.  “Untitled” captured by Abbie Pepple (Click image to see more from Pepple.) Australian-born photographer Anne Geddes happened. In 1996, Geddes debut book Down in the Garden made it to the New York Times Bestseller List, and to date, she’s sold multiple millions of books and calendars. Revolutionizing children’s photography, she smashed the traditional ideas of the day and aimed for images that captured the unique personality of the children she photographed. And she used all sorts of props to achieve this. While it is important for every photographer to discover, develop, and deploy their own unique photographic style, creative photography that draws out a child’s uniqueness is surely Geddes’ lasting legacy–the raison d’être of children’s photography. Whether one prefers novelty or simplicity, black-and-white or color images, or studio-lighting or natural-lighting, creativity for the sake of creativity is not the end-goal. Photographic images that capture the child’s character and spirit are. Props are merely tools for moving toward this lofty aim. Selecting PropsScouring the Internet and craft markets for original and en vogue props is vital to stimulate a photographer’s creativity. A new hat or bonnet or blanket or posing pod can trigger an entire new collage of images bursting with creative expression. And fortunately, there are so many good vendors dedicated to providing the best props for child photography. However, a good photographer constantly reminds herself that creativity is, in itself, not the end-game. Use any and all tools necessary, but seek to capture the individual beauty of the child you’re photographing.  “Untitled” captured by Anders Ruff Custom Designs Orthodoxy vs. OriginalityThis brings up the balance required between originality and orthodoxy. Orthodoxy, in this context, refers to the essential conventions of the craft–etiquette, skill, technique–necessary for every photographer to capture the personality of the subject photographed. Originality speaks of the creativity behind personalizing the photographic image itself–the art. Both are crucial, and both speak to the caliber of the photographer. However, too often originality can be to the detriment of orthodoxy. The photographer can be tempted to aim for an eye-pleasing, ego-tickling image that speaks more of her own originality than the subject’s personality. It goes without saying that it’s never an issue of “either/or” but “both/and.” We want both orthodoxy and originality–the craft well grafted and the art off the charts. We want to capture the beauty of the subject in all his or her glory, and create a product that grabs the attention and pleases the eye. However, we don’t want to compromise on orthodoxy in the name of originality.  “Innocent Child” captured by Gagan Dhiman (Click image to see more from Dhiman.) Why does this happen? For various reasons, I guess. The photographer can become too familiar with his craft. Doing the right things right can become boring and old hat. Or she could be swept up with prevailing trends and fads, forgetting what’s essential. Alternatively, he could get lazy, leaning too heavily on post-process editing rather than the work required in the photographic session itself. Or, in the competitive world of portrait photography, she might prioritize originality over orthodoxy to stay on the cutting edge. Whatever the reason might be, it behooves the professional photographer to keep a healthy balance between orthodoxy and originality–our craft and our art. At the end of the day, we’re not just artists who can do as we please–in our own time, of course, we can–but integrity and pride, and the customer, matters, too. If I take away the bells and whistles, the frills and tassels, does my work stand up on its own?  “Summer Girl” captured by Jennifer Moore (Click image to see more from Moore.) Fads and TrendsFor children’s photographers committed to doing the essentials right while making sure the unique personality and beauty of their subject is captured, the sky’s the limit when flexing the creativity muscles. But then there’s still negotiating between trends and fads that litter the photography world, which too often swamp orthodoxy in the name of originality. A fad is something that has a brief moment in the spotlight but fades away relatively quickly. Trends are more enduring; some last forever, other trends morph into better versions of themselves. A fad might become a trend, and naturally, fads might differ from continent to continent, from one photographer’s niche to another. Here are a few trends and fads that spring to mind: Newborn on a platter? In the drawer? In the stork’s cloth? In a tiny bed? On a little chair? Box or crate? A bucket? Fake flooring? Fake backdrops? A host of props? Newborn with a big flower on her head? Hats and hoods? Or a crown? Or Dad’s favorite football team? The froggie pose? Other composite poses? Images of just the feet or hands? A baby in a flower pot? Tea cup? Antique carriage? Victorian furniture? Bee costume? Fairy costume? Pirate costume? Angel wings? Puffy skirts? Cake smash? Colorful candy? Colorful blankets, balloons, or umbrellas? Phew! My head’s spinning.  “Portrait Promo Baby” captured by Ron Werntz (Click image to see more from Werntz.) Some are clearly fads that have, thankfully, had their moment and passed away with common sense. Others have prevailed as popular trends. All of them get our creative juices flowing, and as artists, photographers wisely keep their eyes open for ideas–even if your experiment with a fad on your daughter’s doll remains for your eyes only. In this age of digital photography, it’s easy to point, shoot, and go wild, sifting out the good from the terrible later. George Bernard Shaw humorously alluded to this when he quipped, “A photographer is like a cod, which produces a million eggs in order that one may reach maturity.” Of course, with editing software available, you can then doctor that one image in a host of different ways. My daughters do this kind of thing, and derive tons of delirious delight from the process. And occasionally, they strike gold. However, if you’re after great photographs, a little more attention is necessary. The legendary landscape photographer, Ansel Adams, explained: “You don’t take a photograph, you make it.” There’s a difference between being snap happy and being happy with what you snap. Great photographs require concentration, creativity and commitment, a good mix of orthodoxy and originality. Thinking through the set-up pre-shoot, drawing from your experience while improvising during the shoot, and selective editing post-shoot are all vital ingredients for a great photograph. I’m certainly not suggesting that a great photograph requires a solemn face and clinical loss of humor. French photographer, Henri Cartier-Bresson, considered by many to be the father of modern photojournalism, said it best when he said, “For me, the camera is a sketch book, an instrument of intuition and spontaneity.” About the Author: Go to full article: Balancing Originality & Orthodoxy in Children’s Photography |
| Interesting Photo of the Day: The Mighty Matterhorn Posted: 12 Apr 2014 05:00 PM PDT At 4,478 meters tall, the Matterhorn, known in various languages as Mont Cervin and Monte Cervino, is not only one of the Alps’ tallest peaks, but also one of its deadliest. Over 500 climbers have died trying to reach its summit since the late 19th century. Visually, it’s one of the world’s most striking mountains for its knife-life protrusion from the earth:  The Matterhorn rises out of the Italian-Swiss Alps. (Via 500px. Click for larger image.) This shot was captured by photographer Bertrand Monney, who has a penchant for high-resolution otherworldly landscapes, both natural and man-made. Part of what makes this photo so awesome is its dark rocky foreground against an almost delicately light background–the interplay between textuality and light makes the composition way more interesting than if he just shot for the spiky mountain itself. Of course, the reflecting pool helps, too, as does every ounce of detail visible on the mount itself. Go to full article: Interesting Photo of the Day: The Mighty Matterhorn |
| Newborns to Seniors: The Technical Aspects of Portrait Photography (Video) Posted: 12 Apr 2014 02:40 PM PDT Beth Jansen‘s journey into photography is a familiar one. What started out as a hobby for capturing great pictures of her family and making a little extra money on the side escalated into a successful portrait photography business. But Jansen isn’t “just another mom with a camera.” Combining artistic vision with innate fashion sense regarding colors, patterns, textures, and the like, Jansen has created a vibrant, trendy style of portraiture that is all her own. In the following video, Jansen speaks about how to successfully shoot portraits for clients of all ages and shares compelling insight about the necessity of staying inspired, owning and marketing one’s style, and mastering the technical aspects of one’s chosen niche: Stay Inspired or Burn OutPhotographers are artists, and if anything is collectively true about all great works of art, it’s that they were created with deep passion. Unfortunately, many artists who try to take their art into the business sphere end up resenting their crafts. Jansen understands this first hand and highlights the importance of maintaining a sense of creativity and inspiration to prevent burn out. Perhaps the easiest way to ensure that you love your work is to figure out what you love and incorporate that into your art. Jansen found a way to infuse her photography with three of her passions: fashion, art, and design. She styles the clothing and appearance of each one of her clients and then keeps a weather eye out for naturally-occurring and complementary patterns, textures, and colors in the locations selected for the shoots. She also prefers to shoot on location rather than in her home studio so that every photo shoot is a brand new adventure. 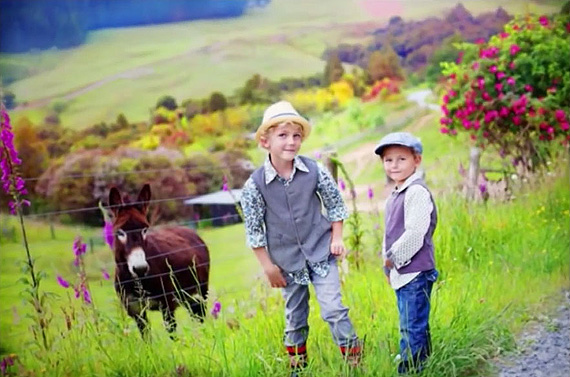 “When you get that new, fresh shot, it re-inspires you,” said Jansen. “There’s going to be a lot of repetition in what you do. If you can inspire yourself and be really proud of one image out of every session, that’s a good day… it’s important for you to continue to impress yourself.” Prepare and educate your clients about timing, location, clothing, props, and posing1. Timing is important. Certainly try to plan around your client’s schedule when selecting the time frame for the photoshoot, but make sure to explain that morning light (before 11:00 am) and evening light (after 4:00 pm) are best for portraits. 2. Select the location carefully based on the style and age of the client and the lighting situation. For example: a newborn photoshoot should probably be conducted indoors in a controlled environment, but senior portraits of a senior who enjoys hiking should probably be conducted in a natural setting. 3. Help the client pick out their clothing according to their style and the environment you’ll be shooting in. For photographs of more than one client at a time, advise them to coordinate but not to match. Senior boys are particularly notorious for wearing simple t-shirts and pants, so encourage them to layer. 4. Ask the client to bring props that mean something to them. This makes the photos much more personal to the client and guarantees you more sales.
5. Use pre-positions when you pose your clients to generate unique shots. For example: have him stand behind the railing, then peek between the bars, and then lean against the railing. It’s also important to show the client what you want them to do rather than simply give vocal commands. Mirroring the pose for the client will help them to feel more comfortable.  Jansen carefully orchestrated this photograph so that all of the colors worked together. General Rules for Newborn PhotographyNewborn photographs are usually taken within the first two weeks of a baby’s life. This is because the babies are still weak and sleep most of the time at that age. After two weeks, the babies gain strength and begin to fight poses and fuss. 1. Prepare and educate the parents about what to expect. Let them know that newborn sessions usually last 2-3 hours, that they will need to be very attentive during the shoot as assistants, that the room will be very hot, and that the mother might need to nurse the baby several times to keep the baby asleep. 2. Have a space heater and a bean bag. 3. Ensure that the room temperature is 85 degrees, which is womb temperature. This will help to keep the baby asleep longer. 4. Schedule the shoot in the morning. Babies like to stay up at night, so they’re usually sleepy in the morning. 5. Ask the parents to try to keep baby awake at least an hour before the shoot. This will guarantee that the baby will sleep for most or all of the shoot. 6. Ask the mother to feed the baby right before the shoot. This will make the baby sleepy. 7. Choose the best location. If it’s warm enough, you can shoot outside, but most prefer to shoot indoors in controlled conditions. Jansen prefers to shoot in her client’s homes to give the images a personal touch. 8. Be patient and take your time. It can take a full hour to get that perfect shot. 9. Hire an assistant or ask the parents to help. Sometimes the smell of the mother can keep a baby awake, so Jansen usually asks mothers to bring a family member or friend to help. 10. Practice your posing an ideas with a baby doll first. Newborns are fragile! 11. Details are imperative. Pay attention to your composition and every little finger.
12. Offer a newborn package that includes birthing announcements. Families will want the announcements anyway, so this is convenient for them and ensures that you sell your work. 13. Use the four basic newborn poses. Jansen believes that there are four basic poses in newborn photography: chin up, lying on belly, on back, and fetal position.  Chin up 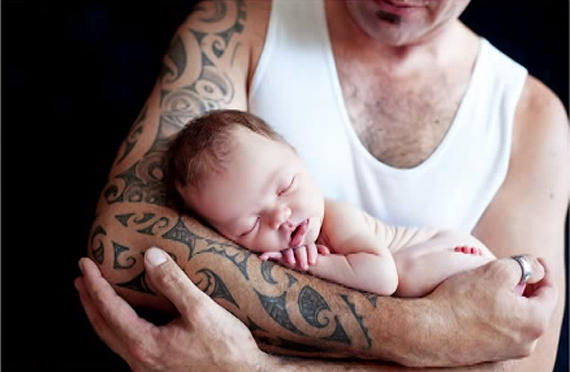 Lying on Belly  On Back 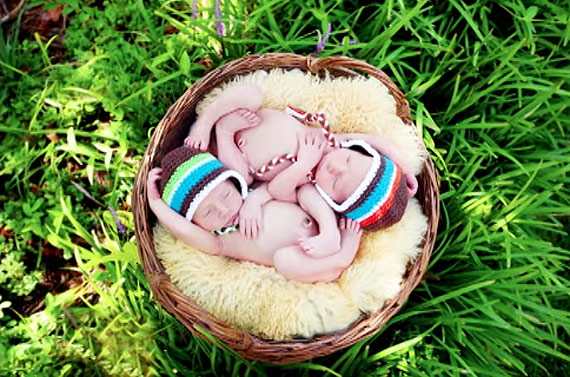 Fetal Position 14. Use the right equipment for your style. Jansen shoots with a Canon 5D Mark III and takes most of her newborn photos using a Canon 50mm f/1.4 lens with the aperture set at 1.8. She also sometimes uses a Canon 100mm f/2.8 macro for detail shots and a Canon 15mm f/2.8 fisheye for “fun” shots or for smaller spaces. 15. Capture three different types of images. Families want those classic soft images like closeups of their baby’s toes, but they also love fun whimsical images and photographs that depict the style of the family and the decor in their home. Jansen thinks of the third category as creating a new decoration for a family’s home. General Rules for Baby PhotographyThere are fewer rules for baby photography, because babies 6 months to 2 years old are not as fragile as newborns. 1. Shoot in the family’s home or in a rural location where the baby won’t get hurt. 2. Get to know the parents first. It is important to establish trust when working with someone’s child. 3. Plan for 45 minutes. Babies’ attention spans aren’t the best. 4. Plan around nap time. Or the baby will likely have a meltdown. If the baby has a meltdown anyway, put them in a bubble bath. They love the water and you’ll be guaranteed 20 more minutes of shooting time. 5. Ask the parents to bring snacks and toys. Anything to keep the baby happy and attentive.  Jansen’s colorful compositions are widely recognized. General Rules for Shooting Kids to SeniorsYou have a lot of freedom when shooting portraits of older kids and seniors. 1. You can shoot anywhere. Some options are homes, parks, urban areas, or rural areas. There are advantages and disadvantages to each type of location, so keep them in mind as you select your location. 2. Carefully consider the time of day. Avoid the 11:00 am to 4:00 pm window if possible, but be prepared to succeed if you do have to shoot during that time.
3. Find “wide open shade” in urban areas. Jansen calls this the best lighting in the whole world. Moving a client to the very edge of that wide open shade will cause some of the light to be reflected onto the client’s face and, most notably, into their eyes. 4. Look for light, texture, patterns, color, and leading lines.
5. For every pose and angle, take a closeup shot, a full body shot, and a “halfway” shot. Variety is security! 6. Help your client dress for the photo shoot. Most importantly, encourage senior boys to layer. 7. Use posing to your compositional advantage.
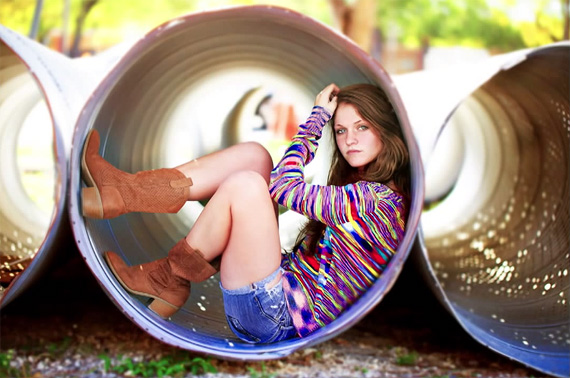 This photograph is an example of placing the client at the edge of “wide open shade.” Market Yourself as much as your PhotographyClients are not simply looking to hire a photographer. They’re hiring a person, someone they’re comfortable letting into their lives and someone they want to hang out with for a few hours. With that in mind, Jansen believes that marketing your yourself—”owning your style”—is just as important as marketing your work.
Go to full article: Newborns to Seniors: The Technical Aspects of Portrait Photography (Video) |
| Watch the Painstaking Process Behind a Product Photoshoot (Video) Posted: 12 Apr 2014 11:24 AM PDT Ever wonder what kind of work goes into creating those glossy commercial photos that are often found as advertisements in magazines? As you’d suspect, there’s more to it than just snapping a couple photos of a product and calling it a day. As Rob Grimm shows us in the video below, there is a lot of work to be done even before the photographer thinks about picking up a camera: For starters, Grimm has to prep the bottles which he’s photographing for this particular shoot. This entails giving the bottles a few coats of clear, waterproof polyurethane to protect the labels from splashing water, which will also be part of the shoot.  Grimm hand paints details onto the bottle to replicate ice chips and condensation. Once the bottle is perfectly decorated, Grimm photographs it, then goes to work on the drinking glass. It’s vital that the glass is spotless. Grimm uses a white cotton glove when handling the glass and wipes any and all spots off using a dust-free rag. The ice that goes into the glass is actually an acrylic glass that he methodically arranges in the cup.  Grimm uses acrylic ice cubes rather than actual ice cubes. He then moves the cup with ice to the shooting area, fills it with the amber liquid, and holds up a small gold reflector behind it, moving the reflector around until the light shoots through the drink just right.  The last part of the shoot required an assistant to drop the oranges into water as Grimm snapped the photos. To conclude the photographing part of the session, Grimm asks his assistant to drop several oranges into a tank of water. Like in the other photographs mentioned above, it’s was necessary to use strobe lighting to help freeze the motion of the water and properly illuminate the scene. Once all the images are finished, Grimm sends them off to post-production, where they are composited together to create the finished image. It’s a long, tedious process. Clearly, there’s more to this kind commercial product shoot than meets the eye. Go to full article: Watch the Painstaking Process Behind a Product Photoshoot (Video) |
| You are subscribed to email updates from PictureCorrect Photography Tips To stop receiving these emails, you may unsubscribe now. | Email delivery powered by Google |
| Google Inc., 20 West Kinzie, Chicago IL USA 60610 | |
No comments:
Post a Comment