Sunday 30 September 2012

The Elusive Perfect Shave - Men's Fitness


Diane Wood, master barber for King of Shaves, offers a five-point strategy for pleasing your face

1.) Grab a Sharp Razor
Disposable or multiblade, either works. Once you start to feel a slight drag, it's time for a replacement. A blunt blade causes redness and skin blotches.
2.) Use a Brush
Again, cream or gel is your call. Whatever you choose, always apply it with a shaving brush, not your hands. A brush produces a richer lather while lifting and softening your beard hairs so they're easier to trim away./p>
3.) Shave the Right Way
We've all heard it: Never shave against the grain; hair shaved too closely may get stuck in the follicle and grow inward. But instead of shaving with the grain, going across it (ear to nose), using light, downward strokes. You'll get the close shave you're looking for, without extra irritation.
4.) Rinse and Pat
Run cool water on your mug after shaving and always pat the skin dry instead of rubbing it, which can worsen inflammation.
5.) Soothe Your Skin
Finally, run on an aftershave lotion. It'll keep your skin from getting tight and dry. Wait at least 24 hours before shaving again so your skin has time to heal.
Bonus Tip: Always dry your razor when you finish shaving. Dullness is more the result of oxidation and rusting than frequent use. When water sits on the blades, it causes corrosion. And that leads to the pulling and tearing of hairs instead of cleanly slicing through them.
Read more:
The Elusive Perfect Shave - Men's Fitness

Mesmerizing Time-Lapse Shows What It’s Like to be an Airplane Pilot


You’ve probably seen time-lapse videos shot looking out the side of an airplane through a passenger window, but have you ever seen one from the pilot’s point of view? If not, check out the beautiful video above. It was created by pilot Jakub Vlk, who brought his Canon 600D to work and captured photographs across seven days. The video shows Vlk taxiing to the runway, taking off, floating up into the clouds, flying around, and landing.

The time-lapse plays back the images at 8x the speed of realtime. The nasty stuff you see on the windshield immediately after takeoff is the result of insect strikes, not unlike what you might experience while driving around on the freeway.
Much of the flight has “image stabilization” built right in thanks to the aircraft’s autopilot system that usually kicks in 20 seconds after takeoff.
The best part of the video, in our opinion, is rising up into the clouds and flying through them head-on. Even if you’re a diamond status frequent flier, seeing a straight-on view of the plane passing through clouds is completely different than what you see when staring out the small passenger windows. It feels much more like flying.
Read more:
Mesmerizing Time-Lapse Shows What It’s Like to be an Airplane Pilot

How to Take Pictures of a Sunrise – PictureCorrect


Waking up to photograph the sunrise isn’t the only hard thing about capturing the sun, there are plenty of technical details that a photographer must learn to make sure he isn’t crawling out of bed in the wee hours of the morning in vain. In the following video, Jim Zuckerman takes viewers along as he photographs sunrise at the picture perfect Portland Head Light and shares a few of his best techniques with us. Hopefully, you can use some of his tips on your next golden hour outing, take a look:

Let’s recap some of the key points from the video:

  • If you want to add more depth to your photograph and your scene allows for it, add some foreground detail into your frame.
  • Always make sure that the horizon line is perfectly parallel to the top and bottom edges of your frame–very important!
  • Remember, every second that the sun rises, you will lose some of the natural beauty of it’s light. Work fast, but don’t be afraid to work the scene and look at it from multiple angles.
  • Zuckerman prefers to shoot on daylight white balance, citing that auto white balance washes out too much of the golden light from the sun.
  • Follow the rule of thirds and put the horizon line in the upper third of your frame.
  • Finally, you may not be able to avoid lens flairs, but you can angle your camera so that the flair is in a location that will make it easier to clone out in Photoshop. For example, Zuckerman moved his camera slightly so that the flair was out of the detailed bushes and instead appeared on the relatively calm water surface.
photographing during golden hour
“What defines the success of a silhouette is the beauty of the shape of your subject.”
Read more:
How to Take Pictures of a Sunrise – PictureCorrect

Simple Fill Flash Tips


A Guest Post by Mia Johnstone.
Learning some very simple fill flash tips will help elevate the quality of your photographs. This tutorial will teach you to fill in shadows and help create more professional looking portraits. These tips can be applied to shooting indoors with window light and can also be great for shooting outdoors in open shade (no direct sunlight).
IMG_1965.jpgYou need:
  • A DSLR camera
  • Basic working knowledge of manual mode
  • An off camera flash with variable light output (you can get basic ones for $100)
  • An optional filter for your flash (softens light).
1. Have your model sit facing a window. Photographer should have the window to their back. See photo below. The whole point to fill flash is that it’s just ‘fill’. You will need a main light source. Natural light is free and readily available. See below how we set up the shot.
2. Depending on how strong the window lighting is, your ISO should be at around 100 or 200. I usually shoot at an aperture of 3 or 3.5. Then set your shutter speed appropriately, but not faster than 1/250. My settings=ISO 100, aperture 3.5, 1/125 speed.
3. Set your flash to manual mode and your variable light output to 1/34. If you are using a filter on your flash, your flash head should be at a 45 degree angle, if possible. Take a test shot. If I am only a few feet away from my subject, this is usually too bright. I love 1/64 or 1/128 light output from a flash. It gives that extra splash of light to help fill in the shadows.
Metered for natural light. Added fill flash at 1/64 power. A balanced image.
No flash. Dark shadows around nose and eye.
flash at 1/32 power. A little too bright
Flash at 1/32 power. A little too bright.
Taking a good portrait is very simple. The portrait above with no flash isn’t a bad image. But when you add some flash, it gives the model and photo a whole new dimension. You can use these simple tips when you take wedding photographs, at the beach on cloudy days, or when you just want to give your photos some extra life.

Read more:
Simple Fill Flash Tips: Disclaimer

More than a Vignette: The Simple Secrets of Dodging and Burning


A Guest Post by Alex Smith
On the wonderful journey through the world of photography many of us have points where we stop to smell the roses for a bit. Maybe we change from shooting landscapes to portraits or delve into the miraculous details of the macro world. Either way, after a shoot we are inevitably left with some post-processing finesse to add to our images.
If you are like me, you can never learn too many techniques to give your images some spark or flair hoping that the final result captures the viewer’s attention, making them stop for that split second to admire the magnificence of your capture. So lets add a gourmet recipe to your photography cookbook and give you a simple, elegant way to add that extra special spice to your photos.
As you peruse the photo collections of your peers you will find that many photographers use vignettes that darken the corners or edges of their images while leaving the central area of the photo lighter.
Why do they use this technique? It is likely that most of you already know that as you look at a photo, the eye is naturally drawn to lighter areas of the photo and away form darker areas. In the days of the darkroom, negatives were dodged (lightened) and burned (darkened) for this same purpose. Thus, the vignette is one of the simplest ways to guide the viewer’s eye toward your central subject.
Let’s delve into this idea with a little more depth. If we are using vignettes to focus the eye of our viewer and we can all agree that the viewer is the one responsible for deeming whether our artistic endeavor is view worthy, then this business of lightening and darkening in an image is pretty powerful stuff. So why not use this lightening and darkening in a pre-meditated way to take the eye on a narrated, guided tour of our image?
Think about that statement for a second. It’s like having parallel park assist on a new vehicle. We can control where we want the viewer’s eye to park.
dodging-burning-secrets-1.jpg
Let’s start with seeing the simple and subtle use of this technique in an image I took while on a trip with a good friend to Portland, Oregon. This is Punchbowl Falls, one of the many gorgeous waterfalls in the Portland area. When you look at this photo, the lightness of the water automatically draws you into the majestic waterfall roaring down into the creek where the rippling torrents slowly meander out towards the bottom of the frame.
As you look further, you see the lush, green vegetation surrounding the scene in an explosion of growth, however, then the eye goes right back to that waterfall. The only thing you don’t see is me, standing barefoot, and ankle deep in the middle of the creek, balancing on a few rocks praying that I can get the shot before the hypothermia sets in. Now, let me show you an overlay of how I used this lightening and darkening technique in a subtle yet calculated way to get you to drawn into the scene and experience the full gravity of it.
dodging-burning-secrets-2.jpg
Bingo! I have selectively lightened the areas outlined in red and darkened the areas outlined in blue and all of those leading lines guide your eye right back to the middle of the photo. The key is that it is not totally obvious that this is happening when you look at the original. It is a subtle yet wonderfully effective method to help further enhance the visual impact of your photo. Now let’s get to the meat and potatoes of how this is done.
There are several ways to lighten and darken areas of an image and really any technique you prefer can work, but I like to do this in Photoshop just cause that is where I am comfortable working. Once my image is open I hold down the Alt/Option key (PC/Mac) and click on the new layer icon to bring up a new layer dialogue box. In the Dial ogue box I change the blend mode to soft light and check the box to fill the layer with 50% Gray.
dodging-burning-secrets-3.jpg
What this does is give me a layer on which everything that I paint that is darker than 50% gray gets darker and anything I paint lighter than 50% gray gets lighter. I then get a soft edge brush set to an opacity of anywhere between 4-8%. I like to keep opacity low so I can just lightly layer in the effect with each brush stroke with a lot of control as to how much I am adding.
Next, I paint anywhere I want darker in black and anywhere I want lighter in white. Remember the key is to keep in mind how you want the image to be visualized by the viewer and plan your brush strokes accordingly. I do many separate brush strokes in each area until I start seeing the effect set-in.
Now, I know some die hard Photoshop enthusiasts are saying why not do separate layers for the dark and light areas so each is independent of the other? That certainly could be done, but I try to keep my number of layers to a minimum so I don’t bog down my system and I find that if I have gone too dark somewhere then I just paint over it again with white to lighten it and vice versa.
If you over do it a bit, you can always decrease the opacity of the layer itself. Now for that little extra something just to make it all transition smoothly. I like to go to Filter->Blur->Gaussian blur and add about anywhere from a 10-30 pixel radius of Gaussian blur to the effect to get a smoother and more subtle look.
dodging-burning-secrets-4.jpg
This is my secret sauce so to speak and I find it does wonders especially when applying this effect to portraits. Portraits? Did he just say portraits? You bet! I apply this same effect to highlight cheekbones, brow lines, accentuate hair highlights, etc…
Usually with portraits I find that my end step Gaussian blur pixel radius is a lot higher than for landscapes and often keep it set at 30. Here are a couple more images where I have successfully used this technique in different ways.
dodging-burning-secrets-5.jpg
dodging-burning-secrets-6.jpg
dodging-burning-secrets-7.jpg
So now you are equipped with yet another pearl in your post-processing repertoire. I just hope you remember that it is not just a technique, but it is a guided visual tour through your photo. Use it to enhance drama, create mood, or simply just to de-emphasize some of those more distracting elements in your photo. Now, get out there and give it a try. Your viewers have bought their tickets and are waiting for you to guide their way!
Alex Smith is a photographer and blogger out of Denver, Colorado. His blog Shutterhogs.com is dedicated towards making better photography easier for everyone. More of his work can be viewed at alexsmith88.500px.com.


Read more:
More than a Vignette: The Simple Secrets of Dodging and Burning

How to Photograph Fire


A Guest Post by Jon Beard
1/320 f/8 ISO1000 105mm
Fire is an interesting thing. Watch people around a campfire and it’s easy to see the spell it can cast on us. We have such a deep and instinctive relationship with it, there’s no wonder why including flame in a photo can have such an impact. In this write-up I hope to give you some examples, some understanding of how they’re done, and some direction toward creating your own fire shots.

Safety First

1/15 f/16 ISO200 105mm
In the wise words of Frankenstein’s monster, “Fire bad!” The heat and smoke can damage your equipment, the flame can quickly get out of control and burn things you don’t want burned, and most importantly, fire can flat out kill you. Plenty of great fire info can be found at http://www.ready.gov/home-fires but here are some basic safety tips you should already know (and follow!):
  • Think ahead and plan your shoot from beginning to end.
  • Have a plan for putting the fire out should it get loose.
  • Do not work near anything that you do not want on fire as well.
  • Work in a well-ventilated area.
  • Be sure you’re working somewhere that if the worst happens, the worst isn’t all that bad.
  • And if the grandmothers in the area where I grew up can be believed: Don’t play with matches or you’ll wet the bed.
Well, folks… Break out the bed liners and a grab a change of clothes because here we go!
You’ll find fire used in three main ways in a photo. It can be the primary subject, an accentuating element, or the primary light source. Typically, you’ll have a combination of the three, but understanding them individually is the best way to start.

Fire as the Subject

With these shots, the main draw and focus is on the flame (or effects of it) and the detail that can be shown within it.
In most cases you’ll want to use a fast enough shutter speed to freeze motion in order to see the detail in the flame. As always, “fast enough” is relative to what you’re shooting, but a good starting point is around 1/250 or faster. As your shutter speeds increase you’ll need to use wider apertures and higher ISOs.
1/2000 f/5.6 ISO2000 105mm
1/250 f/13 ISO400 105mm
Sometimes, the more interesting detail will be in what the fire emits – the path sparks take when leaving a jumping jack or a sparkler, for example. Slower shutter speeds are the key to capturing this kind of photo.
1.6” f/40 ISO100 105mm
38” f/36 ISO100 105mm

Read more:
How to Photograph Fire

Exclusive Interview: Photographer of World's Cutest Kitten - My Modern Metropolis


Remember Daisy? Silly question, right? How could you forget her! It was just yesterday that we introduced you to, who we named, the cutest little kitten in the world. If you were like us, you weren't satisfied with just those pictures, you were left wanting to learn more. Where was Daisy found and what's her personality really like? Also, what are some ways we can all take adorable pet photos like this? Lucky for us, we got a hold of owner Ben Torode to ask him these questions and more. Read that exclusive interview, below.

Where did you find Daisy?
We found Daisy at a pet store in Tokyo. We didn't know what kind of cat we wanted but when we first saw Daisy it was love at first sight. We actually just went in to the store "for a look" but came out with Daisy. We named her Daisy as it was my nickname for my wife when I first met her.
How old is she in these photos and how old is she now?
Most of the photos of her are from when she was between eight and sixteen weeks old. She's six months old now.

Can you tell us more about Daisy's personality?
Daisy doesn't like to be held or even petted that much, but she HATES to be alone. Her happiest time (apart from eating) is joining us on the bed. She just likes to be near us and that's when she'll purr like crazy. She also has a great hunter instinct. She'll stalk, hunt and pounce at her mortal enemy, the mysterious laser pointer, until she's tired.

What have you learned about shooting kittens in the process?
More than anything I have learned that it's nearly impossible to make a kitten do something and have it understand what it's doing in the process, so you cannot present human motivations and expect the cat to act accordingly. In other words, you need to play to the kitten's own instincts to provide the motivation for it to go somewhere or act in a certain way that feels natural to the cat. As soon as a cat decides it doesn't like something, you are going to lose the shot.
Read more:
Exclusive Interview: Photographer of World's Cutest Kitten - My Modern Metropolis

Exclusive Interview: Photographer of World's Cutest Kitten - My Modern Metropolis


Remember Daisy? Silly question, right? How could you forget her! It was just yesterday that we introduced you to, who we named, the cutest little kitten in the world. If you were like us, you weren't satisfied with just those pictures, you were left wanting to learn more. Where was Daisy found and what's her personality really like? Also, what are some ways we can all take adorable pet photos like this? Lucky for us, we got a hold of owner Ben Torode to ask him these questions and more. Read that exclusive interview, below.

Where did you find Daisy?
We found Daisy at a pet store in Tokyo. We didn't know what kind of cat we wanted but when we first saw Daisy it was love at first sight. We actually just went in to the store "for a look" but came out with Daisy. We named her Daisy as it was my nickname for my wife when I first met her.
How old is she in these photos and how old is she now?
Most of the photos of her are from when she was between eight and sixteen weeks old. She's six months old now.

Can you tell us more about Daisy's personality?
Daisy doesn't like to be held or even petted that much, but she HATES to be alone. Her happiest time (apart from eating) is joining us on the bed. She just likes to be near us and that's when she'll purr like crazy. She also has a great hunter instinct. She'll stalk, hunt and pounce at her mortal enemy, the mysterious laser pointer, until she's tired.

What have you learned about shooting kittens in the process?
More than anything I have learned that it's nearly impossible to make a kitten do something and have it understand what it's doing in the process, so you cannot present human motivations and expect the cat to act accordingly. In other words, you need to play to the kitten's own instincts to provide the motivation for it to go somewhere or act in a certain way that feels natural to the cat. As soon as a cat decides it doesn't like something, you are going to lose the shot.
Read more:
Exclusive Interview: Photographer of World's Cutest Kitten - My Modern Metropolis

Saturday 29 September 2012

Choosing & Using a DSLR Camera


If you’re in the market for a new DSLR you’re probably overwhelmed with the wide selection of options currently available on the market. Once you commit to a particular camera, the process of learning how to operate it can also be overwhelming. Luckily, David Brommer comes to the rescue with the following seminar on choosing and using a DSLR. At just over three hours long, the seminar is a bit lengthy, but Brommer does an excellent job of keeping his lesson interesting and informative. Grab a notepad, pull up a chair, and have a look:


He also goes into depth on various camera models from leading manufacuters such as Canon and Nikon. If you have uncertainty on any type of digital camera, Brommer will most likely address your concerns at some point in the seminar. Here is just a small sampling of what Brommer covers in the seminar:
dslr camerasdigital photography
It might be a long video, but is well worth watching from beginning to end despite your skill level.
Read more:
Choosing & Using a DSLR Camera – PictureCorrect

Sunday 16 September 2012

Master the Art of Photographic Composition


This entry is part 1 of 9 in the Composition Session - Show All
Next »
One of the first composition rules we learn in photography is the rule-of-thirds. But once you’ve understood this concept, what else can you do to improve the composition of your photos? It will get you started, but there’s more to composition than where you place your subject in the frame.
Today we’ll be exploring a few more aspects of photographic composition, to ensure you’re completely clued up on how to take brilliant shots!
[republish]February of 2010[/republish]
I’ve never liked the term ‘rule-of-thirds’. ‘Guideline-of-thirds’ is more accurate, but less catchy. Why guideline? Because sometimes the most effective composition places the subject in the centre of the frame. Or at the edge. The moment you start thinking of composition in terms of rules, you’re making photos according to a formula. You’re at risk of working with your head and not your heart (ideally, the two should work together).
photography composition tutorial
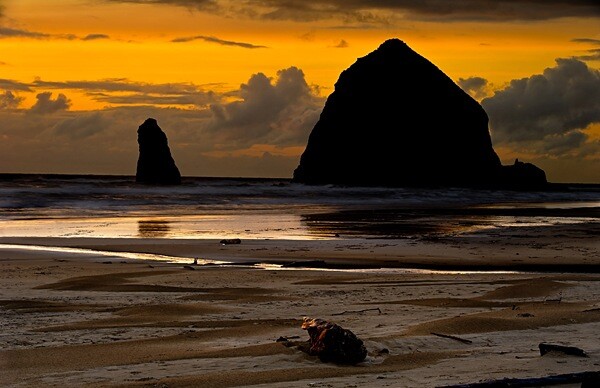
I placed main subject in this photo, the rock, at the edge of the frame, in the centre, because of its relationship to the reflection of the cloud. The composition is about the balance between the white clouds and the dark rock. This scene would have been nearly impossible to compose according to the rule-of-thirds, and the final image wouldn’t have been so effective.

1. Guidelines

In this spirit, here are seven guidelines for improving your composition. Think of them as signposts on the route to becoming an accomplished photographer. They’ll help you get there, but you have the freedom to wander off by yourself at any time.

2.Challenge Yourself

Here’s a challenge for you. For each point in this article, set yourself a goal of putting it into practice. Go out and take some photos. The information will become much more valuable, you’ll learn a lot about composition, and your photos will be better.

3. Lines

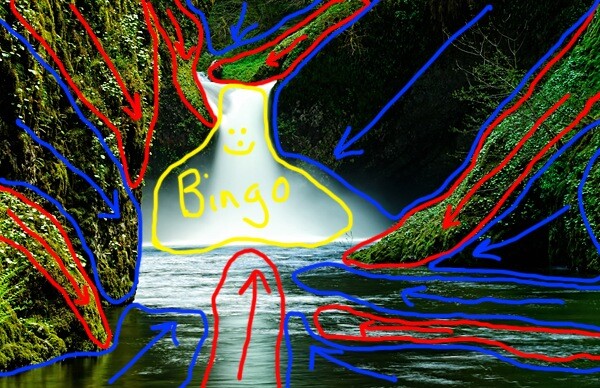
Lines guide the viewer’s eye from one point to another through the photo. Look for lines that lead towards your main subject. Avoid lines that lead the viewer’s eye out of the photo. Remember, lines can be curved as well as straight.
photography composition tutorial
The lines created by the boat ramp in this photo lead the eye from the edge of the frame to the centre. The eye follows the route a boat would take from the land to the sea.
photography composition tutorial
The converging lines in this photo are very powerful, leading the eye from the foreground to the horizon. It’s a very dynamic composition. Diagonal lines add a sense of movement to a photo, and help you create a photo with impact.

4. Foreground Interest

Don’t neglect the foreground in your photos. Make the foreground work for you. How do you do this? The best way is to make sure that there is something interesting to look at. The tricky part is finding something that’s interesting, but doesn’t compete with or distract attention from your main subject.
Your subject is the visual centre of your photo (it may not be positioned physically in the centre of the photo, but it’s the most important part of it). The elements around your subject, such as the foreground, should play a supporting role.
photography composition tutorial
This photo is a good example, I included the railway platform in the photo because I liked its texture and it helps set the scene for the train.
photography composition tutorial
What if you can’t find something interesting to put in the foreground? Then just leave it out. That’s what I did here. The interesting elements are the sky, the mountains and the church. The foreground was boring, so I left it out.
photography composition tutorial
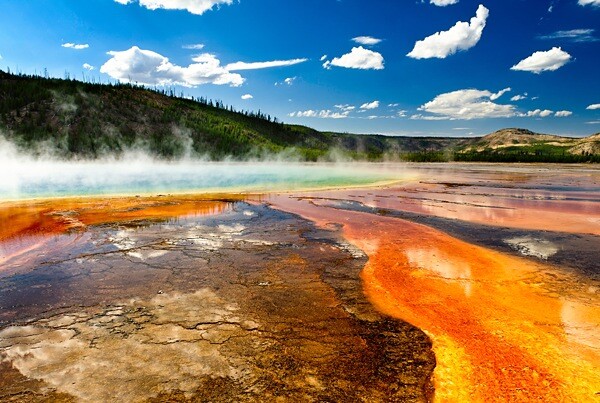
There’s another approach – put the main subject in the foreground. Here, the crater is the main subject. The steam, mountains and the sky are the supporting elements.

5. Lens Choice

What type of lens is best for the photo? There are three basic choices: wide angle, standard and telephoto. Each has its own unique characteristics.
photography composition tutorial
Wide angle lenses are a lot of fun. You can get in close to your subject and use a wide angle lens to include lots of background. Wide angle lenses are good for your photography because in order to take a good photo with one, you need to get close to your subject. That’s what I did with this photo of a Bolivian schoolboy. He was very close to the camera, and my wide angle lens let me include the children around him.
photography composition tutorial
Another approach is to use a telephoto lens to pick out the subject against the background. You can do this by using a wide aperture to create a photo with little depth of field. Or you can isolate your subject from its environment, as in this photo of two Bolivian girls. This photo is very different from the one above it, and the main reason is because it was taken with a telephoto lens, not a wide angle.
If you don’t own a wide angle or telephoto lens, you can still practise this by using the opposite ends of a zoom lens (for instance at 18mm and 55mm on an 18-55 mm zoom). These focal lengths are easily good enough to start off with.

6. Negative Space

Negative space is the area around your subject. If this area is empty, like in the photo of the shell below, it’s called negative space because there’s very little in it. Negative space gives the subject room to breathe. It can also convey a sense of the subject’s environment.
photography composition tutorial
Magnum photojournalist Robert Capa is commonly quoted as saying that if your photos aren’t good enough, then you’re not close enough. Lots of articles encourage you to get closer to your subject (and this is a good thing, as even accomplished photographers sometimes forget to get close enough). But sometimes you can make a beautiful photograph by drawing back and include some negative space around your subject.

7. Shapes and Patterns

Look for interesting shapes and patterns. They can be patterns in nature for example, or the shapes of buildings against a clear sky. Once you’ve found something interesting, get in close and concentrate on the shape or pattern that caught your eye.
photography composition tutorial
This photo of lily pads is composed of a series of circular shapes. I got in close and used a polarising filter to eliminate the reflections on the water. It looked good in colour, and great in black and white. The black and white version works for me because colour distracts attention from the pattern formed by the repetitive shapes of the lily pads.

8. Contrast

Contrast is an important compositional element. There are contrasts all around you. Once you become aware of how effective contrast is in your photos you can deliberately seek it out. Some types of contrast that work well in photos are the contrasts between old and new, light and dark, rough and smooth, solid and blurred or warm and cold.
photography composition tutorial
These flowers are a good example of colour contrast. The dark red flowers contrast against the green background. The colours are also complementary, which means they work well together. Some colours clash (for instance red and blue) which is another type of contrast you can also use to good effect.
photography composition tutorial
There is a contrast here between the old, run-down wooden shed and the beauty of its surroundings. The photo was taken in a remote part of southern Chile where the people live in houses made out of tin or wood (this may not even be a shed – I wouldn’t be surprised if someone was living there). They don’t have much money, but are surrounded by the harsh beauty of the Chilean Andes.
photography composition tutorial
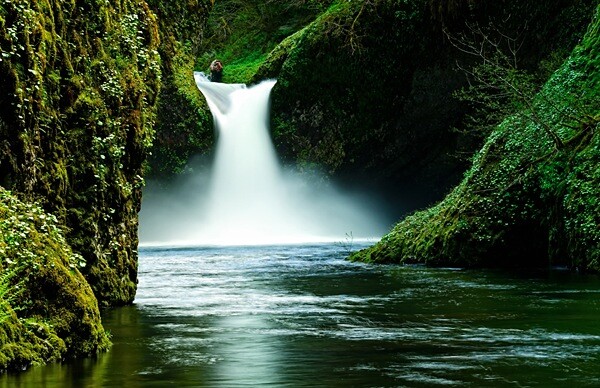
There are two types of contrast in this photo. The first is the contrast between the white water and the dark rocks. This is called tonal contrast. Tonal contrast is essential for black and white photos and is also very effective in colour. The second type of contrast is between the stones and the water. The water is soft and blurred, and the rocks are hard and sharp. I created this effect by placing the camera on a tripod and using a slow shutter speed to blur the motion of the water.

9. Keep it Simple

Now it’s time to put all these guidelines together. If there’s one overriding principle that will guide you well it’s this – keep it simple. Decide what the most important elements of the photo are, and eliminate anything that doesn’t contribute. Every part of your photo should be earning its keep. If it’s not needed, leave it out. Your compositions will become simpler, bolder and more effective. Your photos will have more impact and your message will be communicated to the viewer with clarity.
photography composition tutorial
I took this photo in Bolivia. We were in a remote village and the local people wear sandals made from tyre rubber. I wanted to make a photo of this and used a telephoto lens to close in on this man’s foot. The photo is about the foot and the man’s sandal – and nothing else.
photography composition tutorial
This photo of a standing stone is another good example of simplicity. I wanted to capture the stone’s unusual shape. The photo also has tonal contrast, between the light stone and dark background. There’s also a contrast between solidity of the stone, erected by man, and its natural surroundings.

10.Conclusion

If you take one thing away from this article, remember that composition means so much more than a basic “thirds” grid. Appreciating the theory of what makes a good image is incredibly important, and will serve you well in countless different situations.
If you have any of your own composition tips, I’d love to hear them in the comments!
Read more:
Master the Art of Photographic Composition

Photographic Equipment: The Reflector

 
Just one white reflector
When I’m teaching either with my online class with the PPSOP, or with my “Stretching Your Frame of Mind” workshops I conduct around the planet, students are always asking me the best way to use fill flash when shooting portraits outdoors. I have a simple and quick response to them.
I tell them that in my forty-two year career, I’ve never, and I mean not once used fill flash outdoors. I don’t even like to use it indoors. I can honestly say that I’ve never missed it because my portraits do just fine without it. So, you’re thinking, what do I do?
Here’s my set-up. How much simpler can you get?
I use a collapsible reflector with white on one side and silver on the other. 90% of the time I use the white side. I’ll occasionally use a larger piece of Foam-board when I have a larger area to cover, as in a full length shot. All I ever need is a stand that won’t fall over, an A-clamp, and a reflector. It’s a hell of a lot easier than figuring out ratios when I’m losing the light. Why complicate my life? There’s enough things I have no control over that does a good job messing with my head. Why cloud it up even more with something that I love and have control over.
It’s unbelievable how many times I see an outdoor portrait lit with a flash. It’s a look that’s been beaten to death, and usually the photographer doesn’t know what he or she is doing which makes it worse. I realize it’s a matter of personal preference, and for me I like a natural look. The kind of look that has never gone out of style and never will.
Take a look at some of my portraits lit with only a white reflector or a larger piece of foam-board:
holt
Read more:
Photographic Equipment: The Reflector

Waterfall Photography Tips | Everyday HDR


 I recently took a road trip out to Wichita Falls Texas for work.  I had been there before, before I was a photographer, and I hated it. Now going back 10 years later, I actually enjoyed myself a bit.  One thing I have realized is that photography makes any place better.  I believe you can always find something to shoot anywhere, after going back to Wichita Falls I am an even more firm believer!  It is not that Wichita Falls is a bad place, there is just not a whole lot to do unless you go looking for it with a camera.
I went to the Falls, what Wichita Falls was named after, and took a bunch of shots.  I teach Beginning Digital Photography at a local Adult Education Center and one of my most asked questions, “How do you make water slow down?”  I never really had a good example until now.  Wichita Falls has a rather large waterfall display that used to be a natural site, however a natural disaster wiped it out so they put in this incredible man made fall that was donated by Niagra Falls, New York, pretty cool huh?  See I told you, you can always find something cool about any town with your camera!
Probably the coolest water fountain I have ever seen. Look at that patina!

Waterfall Photography Tips:

Shooting waterfalls and moving water is much easier than you think.  It doesn’t take a Nikon D 46,000 or a Canon EOS 30 Mark Alpha Bravo to make a great waterfall picture.  It is all about the in camera settings, once you grasp the idea it is pretty easy.  The question raised is, “How do you slow water down” but in actuality the water is moving at the same speed, the effect comes from the speed at which you record the water.  Let’s go through the tips and then I’ll show you some examples.
There are several ways to set your camera up for waterfall or water stream photography, I like this setup:
  1. Put your camera on Aperture Priority mode.
  2. Place your camera on a tripod.
  3. If you have a shutter release, it might be a good idea to use it!
  4. I try to keep my ISO at 100 or the lowest possible to keep the recording speed as slow as possible.  This will also help to reduce the noise in the final image.
So how do you know what Aperture to use to to reduce the shutter speed?
  1. Apertures f/3.5 or lower will generally speaking, capture the waterfall as fast as possible.  These apertures will force the camera to use fast shutter speeds and will catch the waterfall action pretty quickly.  The water falling will appear as if it is caught in motion.  Keep in mind your depth of field will be very narrow at low apertures so you may see some bokeh in the lower apertures that will not exist in the higher ones.
  2. Apertures between f/5.0 and f/10.0 are generally mid range apertures.  They will capture the waterfall at a moderate speed.  These apertures will force the camera to capture the water a bit slower than f/3.5 or lower, therefore you will start to see some streaks in the water.
  3. Apertures between f/11 and higher are very small apertures.  They will force the camera to capture the image at much slower shutter speeds in order to get an accurately exposed picture.  Due to the slow shutter speeds, the water will appear like silky-misty streams.  Keep in mind your depth of field will be wide open at higher apertures, your chances of bokeh will be pretty slim, you may need to add that in post i it is an effect you desire.
  4. So what is actually happening here?  In aperture priority mode you are telling your camera how wide the opening of the lens should be to capture the image, the camera is then deciding the appropriate shutter speed to capture the image.  The wider the aperture (i.e f/2.8) the faster the image will be captured.  The smaller the aperture (i.e f/22) the slower the image will be captured.  The camera will need to let more light in the hole (aperture) of the lens to capture the image at the proper exposure.
  5. You can also shoot in Shutter Priority Mode as well.  You can tell the camera what shutter speed you want to use to capture the image and the camera will select the appropriate Aperture.  I feel I do not have as much control with Shutter Priority and therefore prefer Aperture Priority.  Your personal preference may differ.
  6. You can also add a Neutral Density Filter to your lens.  This acts like a pair of sunglasses on the front of your forcing the camera to record the image even slower making the water appear even more surreal.
Take a look at the examples below, look at the aperture used and the shutter speed at which the camera captured the image.

The shutter speed for the given aperture will be variable depending on the light in the environment.  I was shooting just before sunset in the shade, the shutter speeds for all of the above images would be considerably faster in the mid afternoon and much slower at night.
Read more:
Waterfall Photography Tips | Everyday HDR