Photographing 4th of July Fireworks |  |
- Photographing 4th of July Fireworks
- Photography Tips on Facebook: Reaches 40,000 Fans
- How to Shoot the “Holy Grail” of Timelapse Photography: Day-to-Night Sequences
- Interesting Photo of the Day: Epic Light Painting Self Portrait
- Eerie Portrait Photography: Environment Setup and Lighting
| Photographing 4th of July Fireworks Posted: 03 Jul 2013 04:34 PM PDT Once a year, Americans are allowed to celebrate a holiday in a manner befitting the importance of the day. Of course, I am referring to the 4th of July and celebrating with out-sized fireworks shows!  “Celebration of Light 2004″ captured by Ray Lee. (Click image to see more from Ray Lee.) To an enviable degree, today's point-and-shoot cameras, and even some cell phones, can capture the “bombs bursting in air.” However, the limitations of point-and-shoots and phones force the users to rely on a great deal of luck and may catch only a part of the shell's arc to eruption. If you are a serious 'tog and want to capture most–if not all–of the shell's trajectory, the crowning explosion, and the glowing detritus drifting to earth, you should use a digital single-lens reflex camera (DSLR). Even with a good DSLR, you need to get the settings correct to capture images that will make your friends say, “Oooooh! Ahhhh!” And, you need a little extra equipment. We'll discuss the equipment first and the settings later. EquipmentYou’ll need your camera, of course; and, don't forget to bring a spare battery. You'll need a remote release (or the camera’s self timer feature) and a tripod. Do yourself a favor and find some way to ensure your remote is not hanging directly from the connection pins; use gaffer's tape or wire or something to relieve the downward pressure. Also, put two to three winds of reflective tape around the legs of your tripod, this helps keep it from wandering off in the dark. Get a headlamp with a red light. If you can't find one, wrap red cellophane around a white light to help protect your night vision and to keep from pissing-off that big guy sitting in front of you! In a similar vein, if you insist on using your point-and-shoot or phone camera, be sure and disable the flash. Nothing is more annoying than some yo-yo's flash going-off in your eyes or, worse, right in your lens while the shutter is open! (Don't you just hate those people who try taking flash photos of the action down on the pitch while seated in the top deck of the stadium?) Your choice of lens may be a last minute decision; it depends entirely on how close you'll be to the fireworks. I always use a telephoto lens, because I sit on the other side of the bay from where the fireworks are launched and try to capture their reflections in the water. Of course if you pop for the orchestra seats and are so close the detritus actually drops on you, use a wide angle lens. I've seen images taken with a fisheye lens from right under the fireworks. I was not impressed, but who knows?  “Fireworks over Zürich” captured by Tambako the Jaguar on Flickr. CompositionWhile on the topic, let's discuss spiffing-up your fireworks images. If you're near water, try catching the actual explosions and the reflections in the calm water. It's always an eye pleaser to have buildings in the foreground or background to add depth and dimension to your shots. Another interesting touch is to have a few peoples' silhouettes in the foreground. Settings
If you're in the States, these suggestions will get you through the upcoming Independence Day. If you're in the UK, you'll be ready for the royal birth or HRH's next birthday bash! Go to full article: Photographing 4th of July Fireworks |
| Photography Tips on Facebook: Reaches 40,000 Fans Posted: 03 Jul 2013 03:32 PM PDT We love our Facebook followers, they are often the first to know if we have a new in-depth article posted and we value the comments, discussions and feedback we receive there. Today the number of photographers following us on Facebook surpassed 40,000! Thanks so much to all of you, we look forward to more exciting facebook activities! PictureCorrect Photography Tips on Facebook  Serving photography tips to over 40,000 photographers worldwide Go to full article: Photography Tips on Facebook: Reaches 40,000 Fans |
| How to Shoot the “Holy Grail” of Timelapse Photography: Day-to-Night Sequences Posted: 03 Jul 2013 02:31 PM PDT There may be a lot to consider in setting up a day-to-night or night-to-day time lapse, but photographer Preston Kanak assures us that they aren’t as difficult to achieve as it may seem. In the video below, Kanak tells us everything we could possibly want to know about three different methods of time-lapse, and how to work with the files in post (for those of you reading this by email, the video tutorial can be seen here): 1. Aperture Priority MethodThis one has the advantage of being the simplest method to take on. You turn the camera to Aperture Priority mode, set the aperture and ISO for proper exposure, set your interval between shots, and fire away.  The simplest method: Aperture Priority There are two big cons to this method, though. The first is that during the daylight portion of your time-lapse, you may end up with superfast shutter speeds (up to 1/8000), which can create a flicker effect on the final product. And then on the flip side, at night, your shutter speed may end up being longer than your interval. This results in less photos being taken during the night portion of the shoot, and you’ll end up with inconsistent smoothness of motion—the night scene will move more choppily than the day. This is why it’s important to consider your interval time carefully. Do you want consistent motion throughout? Then choose an interval time that will be longer than your longest exposure. Would you rather have a quicker interval so that at least the daylight section will feature silky smooth motion? Then set it for 5 or 10 seconds and hope for the best. Another factor in interval time is how much storage you have on the camera’s memory card. If you’re going to take a 5 hour shot, and your interval is set for 10 seconds, you’ll need enough space for 1,800 pictures. After you’ve decided on an interval, and set the exposure properly, there’s nothing left to do but wait. Kanak recommends checking the photos you’ve taken throughout the shoot to make sure exposure looks alright. If it doesn’t you can make adjustments midway through. When everything’s done, post process the images to correct for flicker or any other exposure issues. 2. Blend in Post modeThis is the more complicated option, but it’s the one Kanak recommends for getting a high quality time lapse. With this method, you actually take multiple time lapses—two is the minimum, but the more you take the better the final product. Kanak recommends at least one time lapse in full daylight, one during sunset, and one in the night. You put your camera in manual mode, and set your shutter, aperture, and ISO for proper exposure. The the interval is set—same considerations as above—and you shoot for a shorter period of time. You’ll need to babysit the camera, checking it periodically to see how the images are turning out, and adjusting any settings as necessary to maintain good exposure. When you’re all done, you should have 3 (or more) separate time lapses which you can blend together in post. 3. Bulb Ramping (aka Bramping)This is Kanak’s least favorite method, and he doesn’t devote much time to explaining it. It requires purchasing a Bulb Ramper, which is essentially an intervalometer that will also adjust shutter speed based on settings. Since you can open the shutter for as long as you like in bulb mode, the Bulb Ramper has the ability to set shutter speeds down to the millisecond. This gets you a crazy amount of precision in setting your exposure. How easy or difficult this method is really relies on the Bulb Ramper you’re working with. Some will automatically adjust settings throughout the shoot, and some require manual intervention each time the light shifts and exposure needs to be adjusted. It can also limit your range of exposure settings, which means you’re going to take a hit on the range of light you can capture. For Further Training on Time-lapse Photography:Check out this COMPLETE guide (146 pages) to shooting, processing and rendering time-lapses using a dslr camera. It can be found here: Time-lapse Photography Guide Go to full article: How to Shoot the “Holy Grail” of Timelapse Photography: Day-to-Night Sequences |
| Interesting Photo of the Day: Epic Light Painting Self Portrait Posted: 03 Jul 2013 12:31 PM PDT Today’s Interesting Photo of the Day is a self-portrait made by Ian Hobson, a UK photographer who specializes in painting with light. All of his effects are done in-camera, without any post-processing enhancement. He uses many types of torches in his work, but this one was done simply with a speedlight and a light stick. With the camera on a tripod and a very long exposure, he held the flash behind his back and set it off, then advanced towards the camera waving the light stick – a wand with 15 small bulbs- in a spiraling pattern. The evenness with which he did this certainly shows his years of experience: 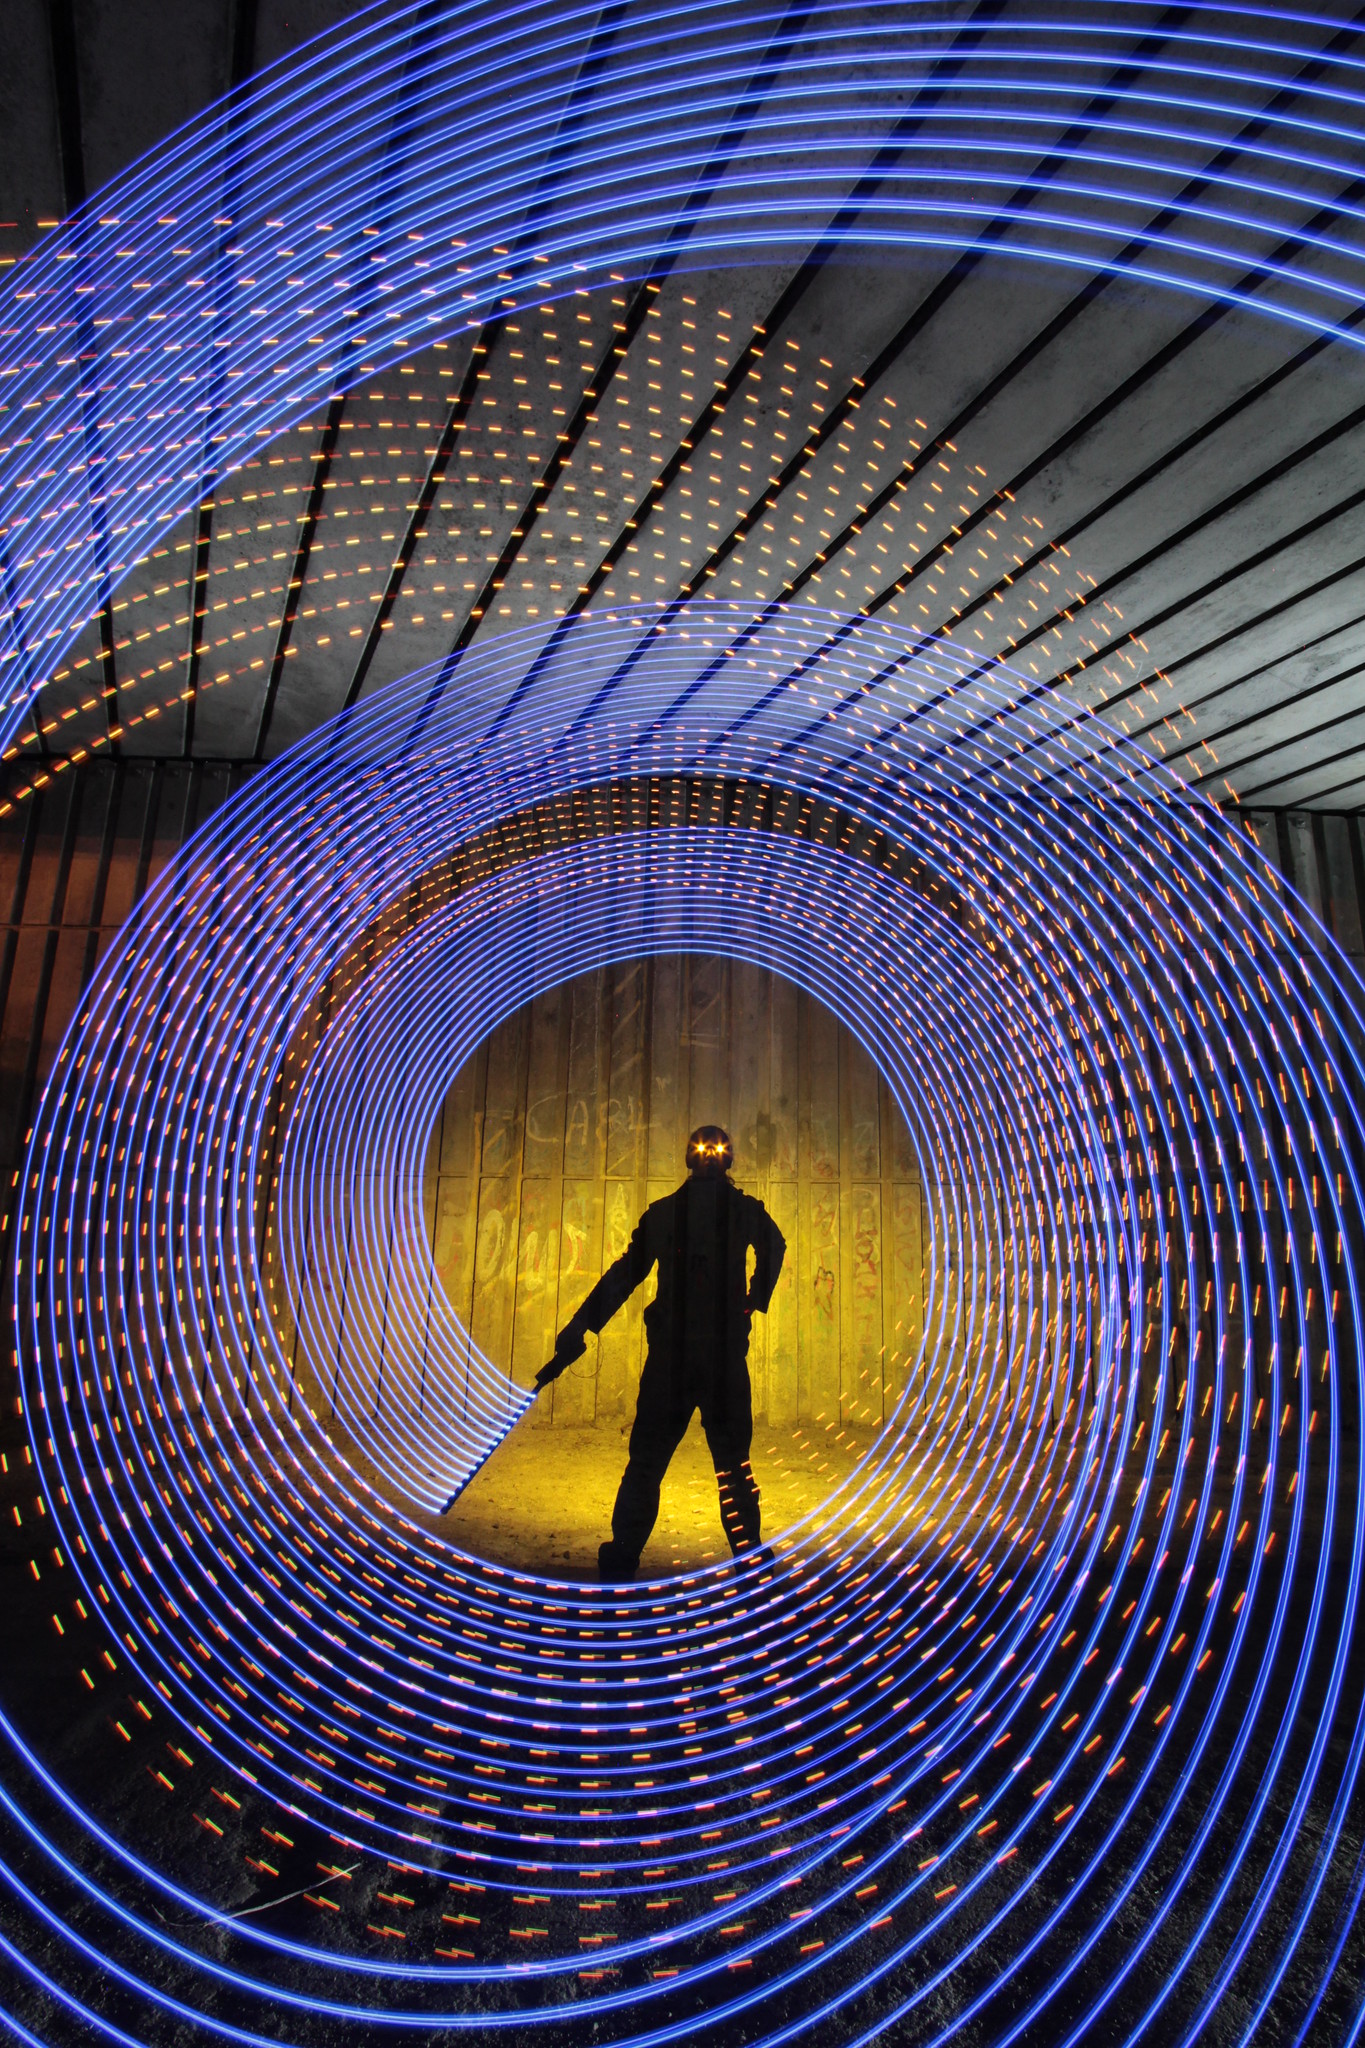 To create this self-portrait, the photographer fired a flash behind him and used a light stick to create the spiral (click to view full size, imgur) This is only a recent image in a long, long history of incredibly light paintings. You can view his entire Flickr for more examples, and read some of our past tutorials on the methods behind these electric photographs. For Further Training on Light Painting:Look into this best-selling eBook on how to do many photography techniques that produce unusual, eye-catching results (including extensive chapters on various light painting methods). The most recent version can be found here: Trick Photography and Special Effects Go to full article: Interesting Photo of the Day: Epic Light Painting Self Portrait |
| Eerie Portrait Photography: Environment Setup and Lighting Posted: 03 Jul 2013 10:55 AM PDT Skulls, flowers, elaborate makeup, tombstones, and candles. These are just a few of the things you will see in Jay P Morgan’s setup for his Day of the Dead shoot. With smoke machines and a beautifully decorated model, Morgan will show you how he created his Day of the Dead images by explaining his lighting setup, camera settings, and other details of the shoot (for those of you reading this by email, the video can be seen here): Though you can learn some important things from Morgan’s discussion of the technical details of the shoot, it’s also important to recognize the other things he talks about, such as his crew. There are four people in his crew other than himself and each one of them plays an important role.
There are many other crew members that you might want to add – gaffers, set designers, drivers, editors, caterers (very important) – but this all depends on the length and involvement of your shoot and, of course, your budget.  A slower exposure allows the candle’s flame to glow slightly Go to full article: Eerie Portrait Photography: Environment Setup and Lighting |
| You are subscribed to email updates from PictureCorrect Photography Tips To stop receiving these emails, you may unsubscribe now. | Email delivery powered by Google |
| Google Inc., 20 West Kinzie, Chicago IL USA 60610 | |
No comments:
Post a Comment