What is the Slowest Shutter Speed You Can Use for Handheld Photography? |  |
- What is the Slowest Shutter Speed You Can Use for Handheld Photography?
- How To Combine Daylight With LED Lights (Video)
- Interesting Photo of the Day: The Land of Whispering Wind
- Got Milk? Quirky Photos of Milk Being Thrown at People (Video)
- How to Add Texture to Images in Photoshop
| What is the Slowest Shutter Speed You Can Use for Handheld Photography? Posted: 04 Mar 2014 12:48 AM PST Once you start taking photos, many things become clear. The first is that light is vital to creating a nice photograph.  “Attendance,” handheld shot captured by Prabhakaran (Click image to see more from Prabhakaran.) The second thing is that digital photography has made things much quicker and simpler. Third, we understand that proper camera usage is crucial to getting good quality photographs. As soon as these three things meet, we can start to feel pleased with our images. Once we recognize that various subjects and distinctive scenes need different adjustments, we can then go ahead and take beautiful shots. Shutter speed and aperture (f-stop) are the two main things we must concern ourselves when aiming for sharp pictures. Shutter speed is responsible for the amount of time that the shutter is open. Aperture is responsible for depth of field and the amount of light coming into the sensor. Once you start exploring this closely you will realize that there’s more to the shutter than letting light in. What causes blurry images?If you are photographing at night, for instance, and you choose a shutter speed that is too quick, your images will be very underexposed. The shutter simply closes too fast to let any decent amount of light in. Alternatively, if you choose a speed that is too slow, you may run the run the risk of over exposing your scene. At times, when our shutter is too slow we can create blurry motion. Blurring the motion is good for intentional special effects, but it’s not good when you want tack sharp pictures.  “Twilight Dreams,” handheld shot captured by Gautham Narayan (Click image to see more from Narayan.) Shutter speed is one of the main factors for image clarity. An unintentional blurry photograph is often a result of hand holding the DSLR when the shutter is slow. It is really difficult to take a photo with a slow shutter speed and get absolute sharpness. You can have the best intentions in the world yet still manage to blur the shot just by standing there. How slow can you go?So what is the slowest shutter speed you can use when hand-holding the camera? In my professional experience, it lives anywhere between 1/80 and 1/ 50 of a second. I can quite confidently shoot at 1/80 of a second and see no blur. A number of people I know can shoot at 1/50 of a second and see no blur. Your neighbour or friend may be different from you and me. This won’t make it correct or wrong. It simply means there is a cutoff point that we can go past. A useful way to develop the sharpness in your images, without a tripod, is to position your shutter speed at the same number as your focal length. If you are working with a 50mm lens then try not to shoot slower than 1/ 50 of a second. If you are shooting with a 200mm lens then try not to shoot less than 1/200 of a second. The further away your subject is the longer the focal length you will need. Longer the focal lengths require a faster shutter speed. This is due to the fact that the more you zoom in, the more the image shakes and moves in the frame. You will have to balance this out by choosing a faster shutter speed.  “Lac Bourget,” handheld panorama captured by Shaun Plumb (Click image to see more from Plumb.) The smallest motion can totally distort your image. This comes about simply from breathing or just standing. If you are shooting with a DSLR, you’ll be able to see what focal length you have by looking down the barrel of your lens. Around your lens is a sequence of numbers. If you have a 24 to 105mm lens, you will see a succession of numbers ranging from 24 right through to 105. As you zoom closer into your scene you will see a little indicator next to the number. For example, if you see this small indicator pointing to the number 85 then you understand that you are working at 85mm. Matching the shutter speed and focal length numeric value is a good way to increase image clarity. However, there is a limit. You cannot use this rule for very slow shutter speeds unless you use a tripod. For example, if you are photographing a landscape scene at 20mm then I can promise that setting your shutter speed to 1/20 of a second will not advance your clarity. You need to be sensible about how slow you go with your shutter speed before you need the help of your tripod. Matching your shutter speed to your focal length to attain sharpness may not be observable right away. You will not be able to see a massive change for the better when you take a look at the shot on the LCD on the camera. Only when you get your photo into Photoshop or Lightroom will you observe the difference. Once you zoom into your photo you will see variation in sharpness. Once you know how to achieve sharpness, you will not need to over sharpen your images in post-production. About the Author: Go to full article: What is the Slowest Shutter Speed You Can Use for Handheld Photography? |
| How To Combine Daylight With LED Lights (Video) Posted: 03 Mar 2014 03:39 PM PST Combining different light sources can be tricky if you’re not already familiar with doing so. In addition to all the camera settings and posing the subject, getting the contrast, brightness, and color temperature correct can be a little overwhelming. In this brief tutorial, Jay P. Morgan shows us how he does it with outstanding results: When combining window light with any kind of studio light, you want to make sure that the studio light is daylight balanced so that it matches the outside light. Morgan uses the Photoflex NorthStar LED light coupled with a Photoflex LightDome to achieve this look. Add in a Canon 5D Mark III with a Tamron SP 70-200mm lens, along with some reflectors, and you will have yourself a setup similar to what Morgan uses in the photo below:  This is the setup Morgan used throughout the shoot. Now, let’s take a look at some before and after images. The first image you see was taken using only the ambient window light, whereas the second image shows the addition of the LED light.
The settings for both of these shots was 1/50 of a second shutter speed coupled with an aperture setting of f/3.5. The addition of the LED key light really made the subject pop from the image and offered more separation between him and the background. It all goes to show that diversifying your lighting setup can amp up your portraiture a few notches! Go to full article: How To Combine Daylight With LED Lights (Video) |
| Interesting Photo of the Day: The Land of Whispering Wind Posted: 03 Mar 2014 12:33 PM PST Flower-dotted meadows and cloud-topped mountains take center stage in today’s featured photo, which is set in Italy’s Sibillini National Park: 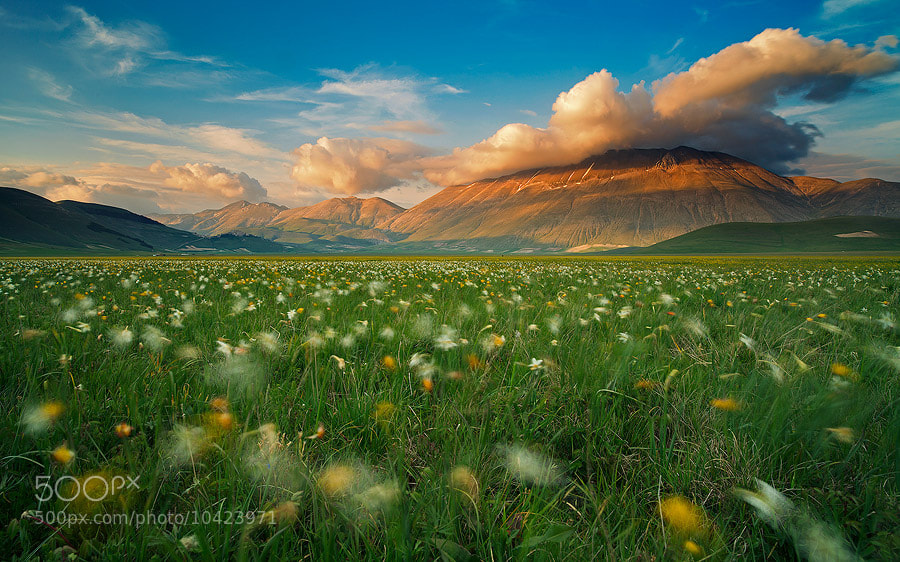 Italy’s Sibillini National Park, captured by Luca Giustozzi (Via 500px. Click for larger size.) Photographer Luca Giustozzi, who dubbed the shot “Land of Whispering Wind,” captured the picturesque landscape outside of the village of Castelluccio di Norcia, which borders Monti Sibillini National Park. The park was established as a protected area in 1993. Giustozzi used a Canon 5D Mark III camera and a Zeiss 21mm lens. Go to full article: Interesting Photo of the Day: The Land of Whispering Wind |
| Got Milk? Quirky Photos of Milk Being Thrown at People (Video) Posted: 03 Mar 2014 12:02 PM PST Did you ever realize milk had such a lovely heft to it? The shape it makes, when captured with the right shutter speed, can be beautifully wavy. If you want proof, check out this montage of random people being splashed with milk on the street: The man behind the series, called “Le Grand Spectacle du Lait” (“The Great Spectacle of the Milking”), is Alexander J.E. Bradley, an Australian-born photographer with a “wry sense of humor” based in Paris, France. The Grand Spectacle began when Bradley was visiting Australia in 2011. He was planning a friend’s party and, quite arbitrarily, decided he wanted an image of milk being thrown on someone. After being unable to find any such photo online, he decided to take one himself. Then another. Then another.
Bizarre concept photography is nothing new for Bradley, whose portfolios include eerie dreamscapes and domestically abusive naked clowns.
Bradley captures his milkings as precisely as he can, shooting in bursts to capture each stage of the splash–the pre-milk anticipation and terror, the initial shock, the laughter at the end.
 The photographer himself, defying his lactose intolerance. And yet, somehow, none of this is the weirdest part. That Bradley decided to create this series raises a much stranger question–one about the man’s physical health.
Go to full article: Got Milk? Quirky Photos of Milk Being Thrown at People (Video) |
| How to Add Texture to Images in Photoshop Posted: 03 Mar 2014 10:23 AM PST Looking for a way to add a little more interest to an existing picture? Overlaying a texture may be the fix you are looking for, and it is surprisingly easy to do. In this video, Ben Willmore shows us exactly how to do it using Adobe Photoshop: Willmore packs a ton of information into this six minute tutorial. While it covers much more detail, the basic steps for adding a texture to a photo are as follows:
After following the technique Willmore explains, you can see how the flat image of the letter “P” now has a little more drama and tends to draw the eye more than the original photo. Here is a side-by-side before and after of the two:  Left: Before Texture Was Applied Right: After Texture Was Applied This technique can be applied to many different types of photographs. We are only limited by our own imaginations and creativity, so once you have everything set up on Photoshop, play around with the different overlay modes and opacity slider until you have exactly what you are looking for. Go to full article: How to Add Texture to Images in Photoshop |


| You are subscribed to email updates from PictureCorrect Photography Tips To stop receiving these emails, you may unsubscribe now. | Email delivery powered by Google |
| Google Inc., 20 West Kinzie, Chicago IL USA 60610 | |
No comments:
Post a Comment