Action Photography: The Tips You Should Use |  |
- Action Photography: The Tips You Should Use
- Ticked Off Octopus Tries to Steal Photographer’s Camera (Video)
- 6 Expert Tips for Ski Photography
- Interesting Photo of the Day: Amsterdam in Indigo
- How to Set Up a Home Studio on a Budget (Video)
| Action Photography: The Tips You Should Use Posted: 10 Apr 2014 04:41 PM PDT Getting great photographs of the world in motion is a difficult task. More than any other kind of photography, action photography demands lightning-quick reflexes, a solid foundation in composition and other photo elements, and a little bit of luck. That being said, anyone can learn to take great action shots if they’re willing to commit a little time to understanding the methods to the madness. Here are some techniques to get you started taking action photos:  “Isle Of Wight Tom Penny” captured by Feride Seferaj (Click Image to See More From Feride Seferaj) Know Your Subject MatterDue to the short amount of time you have to shoot, it’s important that you understand the subject you’re photographing. For example, with basketball, if you’re not near the basket, you won’t get a good picture of the next dunk. Before you start shooting a particular subject in action, take time to understand your subject so you can anticipate the action before it happens. Get the Subject in ActionYou want to always try to get the subject at the time when the action is at its maximum impact. For example if you’re photographing snowboarders jumping off a ramp, know what type of shot you want. Do you want the launch, the landing, or the highest part in the jump? Action photography can be captivating if you compose the picture to include the most interesting part of the action. So, always be thinking of the best way to compose your picture. Focus in AdvanceMany professional photographers focus their cameras on an empty space where they expect something to happen. This is an easy thing to do if you know the activity you’re shooting, and it will save you valuable time when someone is flying through the air in your frame and you have milliseconds to react. Pan with the SubjectIt is important in action photography that you convey motion in the final print. While some subjects will have obvious motion, such as a basketball player frozen mid-dunk, others may require a bit of work on your part. Panning is when you move your camera to keep up with the subject as they pass in front of you. This will give you the end result of the subject being clearly in focus but the background being blurred by the motion of the camera.  “The Daily Show: Times Square Taxi” captured by Carol Stark (Click Image to See More From Carol Stark) Using the Right ISO and Using a FlashHigh ISO is usually best for action photography. The high light sensitivity will let you use faster shutter speeds in more varied light situations and help you to freeze actions perfectly. For ultra fast movements, a flash can also be helpful; however, most built-in camera flashes won’t work well beyond 10 feet. Frame the Image for ActionTry not to simply stop the action of a subject in your photograph. While freezing an action in progress is a good goal for an action shot, allow the viewer room to follow the action to a possible conclusion. For example if you have someone jumping down some stairs, position the subject near the top of the picture and have some stairs below so it’s easier to understand the outcome of the action. Digital Makes it EasierAction photography takes an enormous amount of patience and practice. Thanks to digital cameras and their near-endless supply of photographs, you can practice your action shots without taking a huge hit on your wallet. And even better, many DSLRs have continuous shooting modes that allow you to shoot 10-50 images in rapid succession, so you can have more opportunities for the perfect shot.  “Into the Station” captured by Mark Feliciano (Click Image to See More From Mark Feliciano) Anytime your shooting action photography, safety needs to come first so you can avoid injuring yourself or the subject in motion. Never position yourself where you run the risk of getting hit by vehicles or athletes, and make sure that the people you are shooting are aware of where you’ll be during the activity. Beyond that, the more you shoot, the better you’ll get! About the Author: Go to full article: Action Photography: The Tips You Should Use |
| Ticked Off Octopus Tries to Steal Photographer’s Camera (Video) Posted: 10 Apr 2014 03:24 PM PDT This isn’t the first time we’ve seen a wily octopus try to make off with a photographer’s camera, but that doesn’t mean it’s any less amusing to watch. Witness a Great Pacific Octopus get up close and personal with a photographer off the coast of California: Photographers David Malvestuto and Warren Murray captured the event on video as proof of their close encounter with wildlife. The photos below, taken with Murray’s camera, also serve as proof. Murray knew he would need this proof as soon as the octopus began entangling itself around the underwater camera rig, hence Murray’s reluctance to give up the camera—despite being ambushed by an eight-foot-long sea creature. 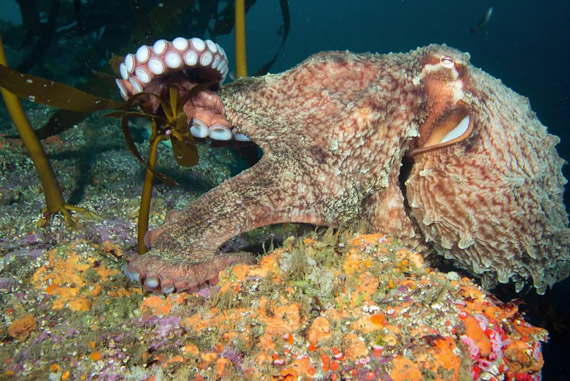 At first glimpse, the divers thought the camouflaged octopus was a rock until it moved, revealing that it was a living creature. 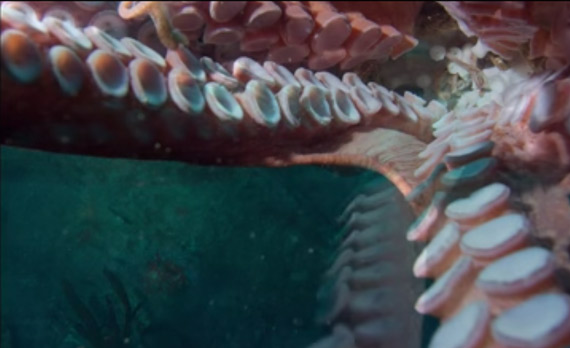 A look down the octopus’s tentacles as it wrapped around the camera.  Losing interest in the camera, the octopus retreats to deeper waters. This story, and all the other stories of animal photography gone wrong, should serve as a reminder that we, as humans and photographers, are just visitors when photographing in the wild. Respect the animals and do not encroach on their living quarters without expecting them to—in the best case scenario—get a little curious about what you are up to. Go to full article: Ticked Off Octopus Tries to Steal Photographer’s Camera (Video) |
| 6 Expert Tips for Ski Photography Posted: 10 Apr 2014 02:00 PM PDT Ski photography is a dangerous game—there’s snow flying everywhere and skiers shooting past you, and through the chaos you need to be ready to capture every moment while your subject is zooming down a mountain. You can’t ask them to turn back and try again, because that will take at least 10 minutes of waiting on a chairlift and getting back into the same position. In this video, veteran extreme sports photographer Corey Rich shows us six key tips for shooting downhill skiing: 1. Choose a good model.Don’t just choose someone who looks good or is a good skier, but someone who understands that this is a slow process, with a lot of stopping and waiting around for you, the photographer, to get ready. 2. Select the right clothing.Lay out the athlete’s clothing first thing in the morning and select an outfit that will work all day. Blue tends not to work against a bright blue sky, but contrasting bright colors (lime green, hot pink, tangerine) tend to work well. If there’s a bit of matching with the skis and boots, that also turns out nice.
3. Bring a backpack.Rich recommends the Lowepro Flipside 500 AW, but anything will work as long as it zips up tight. Even if you don’t have a lot of gear, having the space to store extra clothes is nice. 4. Have both wide and telephoto lenses.Rich carries a Nikon D4s (“the ultimate sports photographer’s camera,” he says, for its sharpness and terrific auto-focus) with a 14-24 f/2.8 for wide-angle shots and a 70-200 f/2.8 for close-ups.
5. Protect yourself against the sun.The sun can be a harsh mistress, and if you’re spending all day under the bright blue skies, strong sunblock and a baseball cap are good ideas. Re-apply the sunblock as often as your pale skin requires.
6. Have space on the chairlift.Before you sit down, ask the person beside you in line if you can have the space to yourself. This will allow you to use the space for your presumably large and heavy backpack. Place the backpack in your lap if there is no chair space. With enough room and agility, you can prepare lenses or even snap a few shots while you’re up there.
Go to full article: 6 Expert Tips for Ski Photography |
| Interesting Photo of the Day: Amsterdam in Indigo Posted: 10 Apr 2014 12:37 PM PDT Amsterdam is one of the world’s finest capitals, famous for clear canals reflecting the radiantly green trees lining streets of brick. It’s one of Europe’s most “European” cities, and in being a global capital, it’s rarely seen as a mystical dreamscape like it is here:  Blurred edges help detail the in-focus homes. (Via Imgur. Click for larger image.) Iván Maigua captured this beautiful sunset a few months ago on a trip to the Netherlands. He shoots with a Nikon D200, and here left open his Sigma 10-20mm for a 60-second shutter at f/18. Maigua is gaining some infamy online for his no-holds-barred HDR landscapes, and we can see why: his eye for color and composition is spectacular. Go to full article: Interesting Photo of the Day: Amsterdam in Indigo |
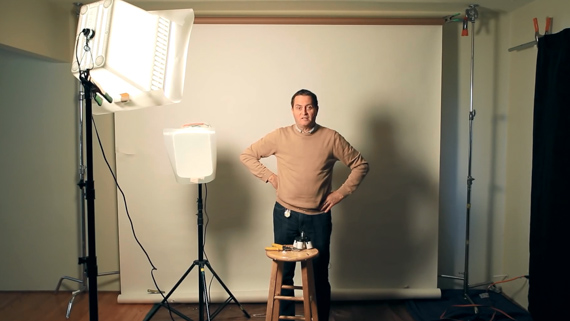
| How to Set Up a Home Studio on a Budget (Video) Posted: 10 Apr 2014 10:49 AM PDT Photography is an equipment-intensive hobby. Purchasing all the equipment you need to set up a professional studio setting is beyond the budget for many of amateur photographers. Luckily, Jay P. Morgan has put together a great video that shows us how we can build a few of the necessary items surprisingly easily and, most importantly, on a budget: What to Keep in Mind When Creating a DIY Home Studio:
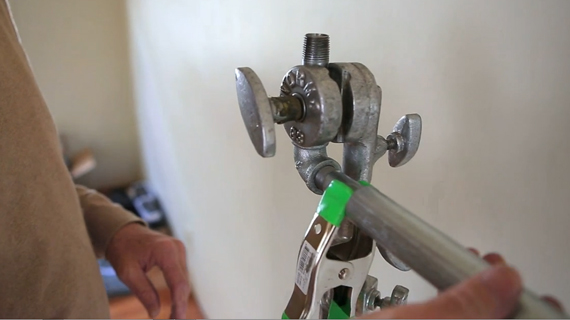 Backdrop holders are a quick and easy DIY project for photographers. Morgan starts by giving a detailed tutorial on how to make a simple backdrop holder using parts that can be sourced from any hardware store. He also gives useful advice on which backdrops to use–fabric as opposed to seamless–and how to properly control window light using Eclipse curtains, which can be found online for under $30. Next, he goes through the steps to build softboxes out of various household items, including a laundry detergent bucket, a styrofoam cooler, or a banker’s box.
Morgan does note that a studio fashioned out of the materials he uses in the video should only be temporary. As your skills progress, you will probably want to invest in proper equipment, especially if you plan on taking the equipment to an on-location shoot. That being said, the DIY method is a great start for practicing lighting or for occasional use in the home studio, but do keep safety in mind. Go to full article: How to Set Up a Home Studio on a Budget (Video) |


| You are subscribed to email updates from PictureCorrect Photography Tips To stop receiving these emails, you may unsubscribe now. | Email delivery powered by Google |
| Google Inc., 20 West Kinzie, Chicago IL USA 60610 | |
No comments:
Post a Comment