De-Mystifying Resolution in Photography |  |
- De-Mystifying Resolution in Photography
- How to Photograph Wildlife for Natural Geographic (Video)
- The Making of a Sports Illustrated Cover: Boston Strong Photo Shoot (Video)
| De-Mystifying Resolution in Photography Posted: 19 Apr 2014 07:02 PM PDT Quick Reminder: Only a little while left! in the deal on: Topaz Detail for Tack-Sharp Photos Low resolution photos may look great on your monitor at “screen resolution”(72 ppi or pixels per inch). The small file size downloads fast and is easy to share online. Plus, you can get a lot of these images on a memory card. But photos taken on a camera’s ‘basic’ or ‘low’ quality settings don’t cut it when you want professional quality images for print publication. With some exceptions, a resolution of 300 ppi is considered the minimum quality standard for printing photos. More on that in a moment. But first…  “Splash of NYC” captured by Mike Opinia (Click Image to Find Photographer) Some Definitionspixel: smallest unit of measurement in a digital image. Pixels are typically square and make up a grid the height and width of your image. Measured in microns (1/1000 of a millimeter or about 1/25,000 inch). Image sensors in most consumer cameras have pixels 4 to 5 microns square. ppi: pixels per inch. How resolution is measured for your “capture” or “input” devices (camera, scanner) and your computer monitor. dpi: dots per inch. How resolution is measured for your home/office printer which outputs your image in round dots, not square pixels. lpi: lines per inch. How resolution is measured for offset presses. Newspapers generally print at 100 lpi and require 200 ppi images for quality reproduction. Magazines use a 150 lpi linescreen (300 dpi images) and art books and exhibition prints are printed at 200 lpi (400 ppi images). The rule of thumb is to print images at a dpi that’s double the lpi. megapixel: one million pixels. How the resolution of digital cameras is measured. The larger the megapixel rating, the more information you can capture within an image and the larger you can print that image, maintaining high quality. resolution: level of detail attainable by a monitor or a printer, determined by the ppi, dpi or lpi. When capturing images for printing, the higher the resolution, the greater the detail (up to a point) and the larger the file size. Quality may also be affected by the lens capturing the image, the camera’s ability to process the image, and the grain and size of a scanned original. pixelization: the jagged stairstep effect you see on a low resolution image printed larger than optimal for its file size. file size: how many kilobytes (k) or megabytes (mb) of information in a file. Determined by the resolution and physical size of an image. Relevant for screen display and printing of images as well as storing and transferring of files. compression: how much of the potential information in an image file is discarded to keep file size down. Saving a photo in.jpg format allows you to choose a compression level, depending on whether better quality image or smaller file size is more important for your purposes. 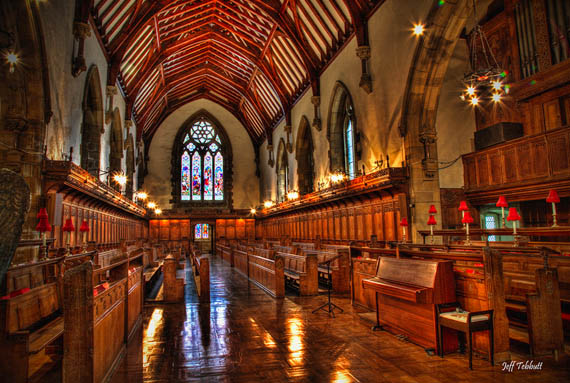 “church” captured by Jeff Tebbutt (Click Image to Find Photographer) Print Quality ResolutionIf you’re shooting for print output, capture your images at the highest quality setting your camera offers: High, Best, Fine, or whatever your system calls it. This captures the shot using the lowest compression ratio or no compression at all. You can always re-sample down (from more resolution to less) but if you interpolate up, you lose information and therefore image quality. Shooting at high resolution may also give you the option of cropping and enlarging a portion of your image later, retaining enough data for a quality print, even after tossing some pixels to the cutting room floor. You won’t get as many images on your camera’s memory card shooting at high-res but you can keep your creative options open by archiving your ‘keepers’ on CD or a back-up drive. Your future self will thank you. As mentioned, the industry standard resolution for quality photo output (offset press, digital, or inkjet) is 300 ppi. However, you may be able to get away with a ppi as low as 200 if the image is not too finely detailed, if it will be printed on low quality paper such as newsprint, or if it will be viewed from a distance. The following formula can help you calculate:
The Formula:Divide each dimension of your digital image (in pixels) by the print resolution desired (in pixels per inch). This will give you the largest print size (in inches) you can generate at that resolution. Example: (1500 pixels / 300 ppi) x (2100 pixels / 300 ppi) = 5″ x 7″. To capture an image of this physical size at this resolution, you would need a 3 megapixel (MP) camera: 1500 pixels x 2100 pixels = 3,150,000 pixels or approximately 3 megapixels A 1 megapixel camera will yield a 3 x 5″ print at 300 pixels per inch (ppi) (3″ x 300 pixels) x (5″ x 300 pixels) = 900 x 1500 pixels = 1,350,000 pixels or approximately 1 megapixels A 2 MP camera will give you a ‘print quality’ 4 x 6″, a 3 MP camera, a 5 x 7″… and it would take a 7 MP camera to shoot an 8 x 10″ print quality image.  “Louvre on a cloudy afternoon” captured by Anirban Karmakar (Click Image to Find Photographer) Photo File Types.bmp The bit-mapped (or raster) file format used by Microsoft Windows. The BMP format supports RGB, indexed-color, grayscale, and Bitmap color modes. .eps Encapsulated PostScript. File format capable of containing both high-quality vector and bitmap graphics, including flexible font capabilities. The EPS format is supported by most graphic, illustration, and page-layout programs. .jpg or jpeg. Joint Photographic Experts Group. JPEG is an image file format with multiple levels of compression. The more compression, the lower the image quality. The most commonly used forms of JPEG utilize ‘lossy’ compression algorithms, which discard a certain amount of information. JPG compression analyzes images in blocks of 8 x 8 pixels and selectively reduces the detail within each block. JPEG is the default format for most consumer digital cameras. While its small file size is great for storage purposes, its “lossy” compression makes it less than ideal for image editing. Every time you save the file, the picture quality degrades. Once the photo quality has been lost, the original quality cannot be restored. To avoid this degradation issue, save your JPEG photos to a CD or other storage system as TIFF files. You can do this with most photo software, or with Windows XP. (Open the image. From the File menu, choose Save As. In the Save as type box, select TIF. Compression option None is recommended.) .psd Adobe Photoshop file format (PSD) is the default file format in Photoshop, and the only format that supports all the program’s features. When saving a PSD file for use in previous versions of Photoshop or ImageReady, options for maximizing compatibility are available. .tif or tiff.Tagged Image File Format. File format commonly used for image files. 8-bit RGB TIFF and 16-bit RGB TIFF are two variations that most image editing software applications recognize. RGB TIFF is a common choice for saving photo images after they have been polished up in editing software such as Adobe Photoshop. Before going to press, always convert to CMYK color mode. About the Author: Related Deal Ending Soon:Topaz Detail is designed to create tack-sharp and highly detailed photos by enhancing natural sharpness and taking full control over image detail. Detail breaks down an image into three levels of internal detail separation and three levels of tone separation and allows you to selectively enhance or remove detail throughout your image without the side effects of halos or artifacts. They are offering it at 50% off until the end of the month, simply remember to use the voucher code APRDETAIL at checkout. Deal found here: Topaz Detail at 50% Off Go to full article: De-Mystifying Resolution in Photography |
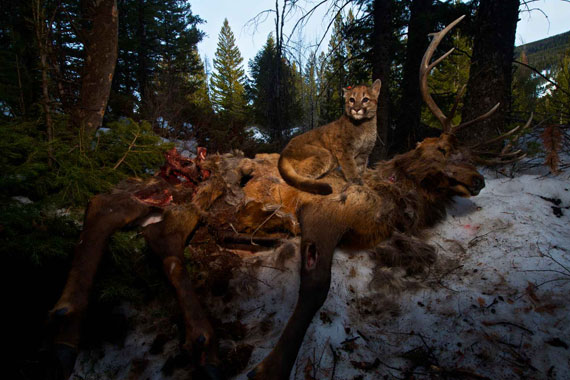
| How to Photograph Wildlife for Natural Geographic (Video) Posted: 19 Apr 2014 03:30 PM PDT Wildlife photographer Steve Winter has enjoyed one of the most storied careers in the history of National Geographic. A former photojournalist, he began working with NatGeo in 1991 and has since won dozens of accolades and awards, including first place in the 2014 World Press Photo Awards for nature photography. In this 95-minute video, he gives a lecture describing the conditions of each photo essay he’s shot, and a retrospective analysis of his mental state during each shoot: The video is a much-watch for anyone interested in wildlife photography, photojournalism, or environmental advocacy. The breadth and detail of Winter’s photos have illuminated some of the darkest corners of big cat culture—he’s spent months on single projects to successfully reveal the lives of snow leopards, cougars, and tigers, and the stories behind the images are worth hearing.
Go to full article: How to Photograph Wildlife for Natural Geographic (Video) |
| The Making of a Sports Illustrated Cover: Boston Strong Photo Shoot (Video) Posted: 19 Apr 2014 10:11 AM PDT Following the tragedy that occurred at the 2013 Boston Marathon, Sports Illustrated and the city of Boston wanted to pay homage to the victims and their families by dedicating the cover to the event in 2014. In the video clip below, you can have a behind the scenes look into the photo shoot, which involved thousands of people at the starting line of the marathon. Watch the emotionally charged footage here: Photographer, Gregory Heisler, is the man behind the camera responsible for capturing the huge crowd in the following photograph:  Boston Strong Sports Illustrated Cover (Via Sports Illustrated Facebook. Click image to see full size.) The mayor of Boston, along with some firefighters, policemen, and other first responders are all featured at the front of the photograph, surrounded by 3,000 cheering participants, all pumped to be part of the shoot. Go to full article: The Making of a Sports Illustrated Cover: Boston Strong Photo Shoot (Video) |
| You are subscribed to email updates from PictureCorrect Photography Tips To stop receiving these emails, you may unsubscribe now. | Email delivery powered by Google |
| Google Inc., 20 West Kinzie, Chicago IL USA 60610 | |
No comments:
Post a Comment