Stunning Imagery & Cameraflyer Talent at Burj Khalifa Base Jump (Video) |  |
- Stunning Imagery & Cameraflyer Talent at Burj Khalifa Base Jump (Video)
- The Shutter and Aperture: Let the Sun Shine In
- Interesting Photo of the Day: Volcanic Mt. Bromo at Early Dawn
- How to Use Flash to Capture Razor Sharp Water Splash Photos (Video)
| Stunning Imagery & Cameraflyer Talent at Burj Khalifa Base Jump (Video) Posted: 23 Apr 2014 04:33 PM PDT Imagine if you were hired to chase two world champion base jumpers off the tallest building in the world. And the plan involved first flying away from the skyscraper and then going into a head-down orientation which increases speed and difficulty dramatically – something that had never been done before. This is a reality for Noah Bahnson who has quickly become a leading aerial photographer on the edge of what is currently possible in human flight: (for those of you reading this by email, the video of the stunt can be seen here) In this latest project, professional French jumpers and Soul Flyer team members Fred Fugen and Vince Reffet broke world records by flying around the Burj Khalifa first in wingsuits and then in a separate jump performed freefly base (an activity they invented) carving head-down at staggering speeds with camera-flyer Noah Bahnson giving chase. The flight was commissioned by Skydive Dubai.  Via Facebook, Noah Bahnson, (Click to See Full Size) They are not the first to base jump from the tower, but they had a special platform built to add an extra 500 feet, enabling them to break the world record.  Via Facebook, Vince Reffet, (Click to See Full Size) The Burj has become a global landmark, towering above the rest of the world at 829.8 meters (2,722 feet). It took six years, from 2004 to 2010, but it now proudly stands as an incomparable piece of architecture. Literally nothing else even comes close.  Via Facebook, Skydive Dubai, (Click to See Full Size) The above video is also nicely in 4K quality, which is a new development in video capture and production. Bahnson doesn’t just use a GoPro camcorder strapped to his head (although Fugen and Reffet do); he also has a Canon DSLR on his helmet with an accessory where he can focus and activate the shutter with his teeth.  Via Facebook, Noah Bahnson, (Click to See Full Size)  Via Facebook, Noah Bahnson, (Click to See Full Size)
If you tuned in over the last few weeks, Noah Bahnson was also the photographer for the first ever & highly popular fashion shoot with a base jumper model which you can see here, you can also get a peek at his equipment setup at the end of the article. Go to full article: Stunning Imagery & Cameraflyer Talent at Burj Khalifa Base Jump (Video) |
| The Shutter and Aperture: Let the Sun Shine In Posted: 23 Apr 2014 03:33 PM PDT In order to get a picture that has the perfect brightness–not too light or too dark–the amount of light that gets into the camera has to be controlled. One thing that controls the light in the camera is the aperture. That’s what the light has to pass through before it reaches the sensor. The aperture opening settings are also called F-stops. The camera’s aperture settings actually operate on the same principal as the function of the pupil in the human eye. When you go the the eye doctor and have your eyes dilated, the pupils are enlarged, which allows a lot more light to enter the eye. To protect your retina, you need to wear sunglasses when you go out into the sun, until the pupils have a chance to go back to their normal size. Your pupils will enlarge automatically when you go into a dimly lit area to allow you to see better.  “Summer Palace Fishing Grounds” captured by Anna Perzel (Click Image to Find Photographer) The smaller the aperture becomes, the less light enters the camera; the larger the aperture gets, the more light enters the camera. F-stop settings can be a little confusing. The smaller the F-stop numbers, the larger the opening; the larger the opening, the more light. For example, more light would get through to the sensor on a setting of f/2.8 than a setting of f/5.6. Some people are good at memorizing this type of information. But, if you’re not one of them, consider keeping this kind of pertinent information tucked in your camera case for easy referral. The shutter, when open, allows light to enter the camera. This is determined by the shutter speed. Shutter speed, as with aperture, has a standard series of settings called stops. Shutter stops are measured in seconds or fractions of seconds, which determine how long the shutter is open. Shutter speed is relative to the length of time the shutter remains open after you press the button to take your picture.  “Endless” captured by Naga (Click Image to Find Photographer) Shutter speeds are measured in fractions of a second, such as 1/60, 1/125, 1/250, 1/500, and 1/1000. The longer the shutter speed, the more light; the shorter the shutter speed, the less light. An average shutter speed that would produce a good photograph taken in sunny conditions is 1/125 of a second. Shutter speed impacts how action photographs–such as an aerial performance of the popular Blue Angels–turn out. In this day and age, we’re more sophisticated and our equipment is definitely a lot smaller and more manageable. Cameras fit nicely in our camera bags along with our lenses, batteries, and accessories. But, the basic principles of aperture and shutter haven’t changed since the early days of photography. The waterhouse stop was invented by a photographer by the name of John Waterhouse in 1858. The size of the hole acted just as the apertures of today, and a lens cap was manually removed and then replaced for the exposure process, as our shutter does on today’s cameras. Photographic artistry often times can be attained by manually focusing, rather than relying on the automatic settings. It gives you complete control over aperture and shutter settings. With manual focus, you have the advantage of speed. You don’t have to wait for the automatic focus before taking your next shot. This can be an important reason to go with manual exposure, perhaps at a fast-paced sports event. So, remember before you head out to that all important game and you’re loading your camera bag with your camera and accessories to check the settings on the camera and make sure they’re set to manual. About the Author: Go to full article: The Shutter and Aperture: Let the Sun Shine In |
| Interesting Photo of the Day: Volcanic Mt. Bromo at Early Dawn Posted: 23 Apr 2014 01:23 PM PDT This is what they mean when they say “the crack of dawn”—when dawn’s early sunlight literally creates a crack in the sky, while the rest of the night sky is still pure darkness. This is the moment that Weerapong Chaipuck captured while waiting for the sunrise near Mt. Bromo, an active volcano in East Java, Indonesia: 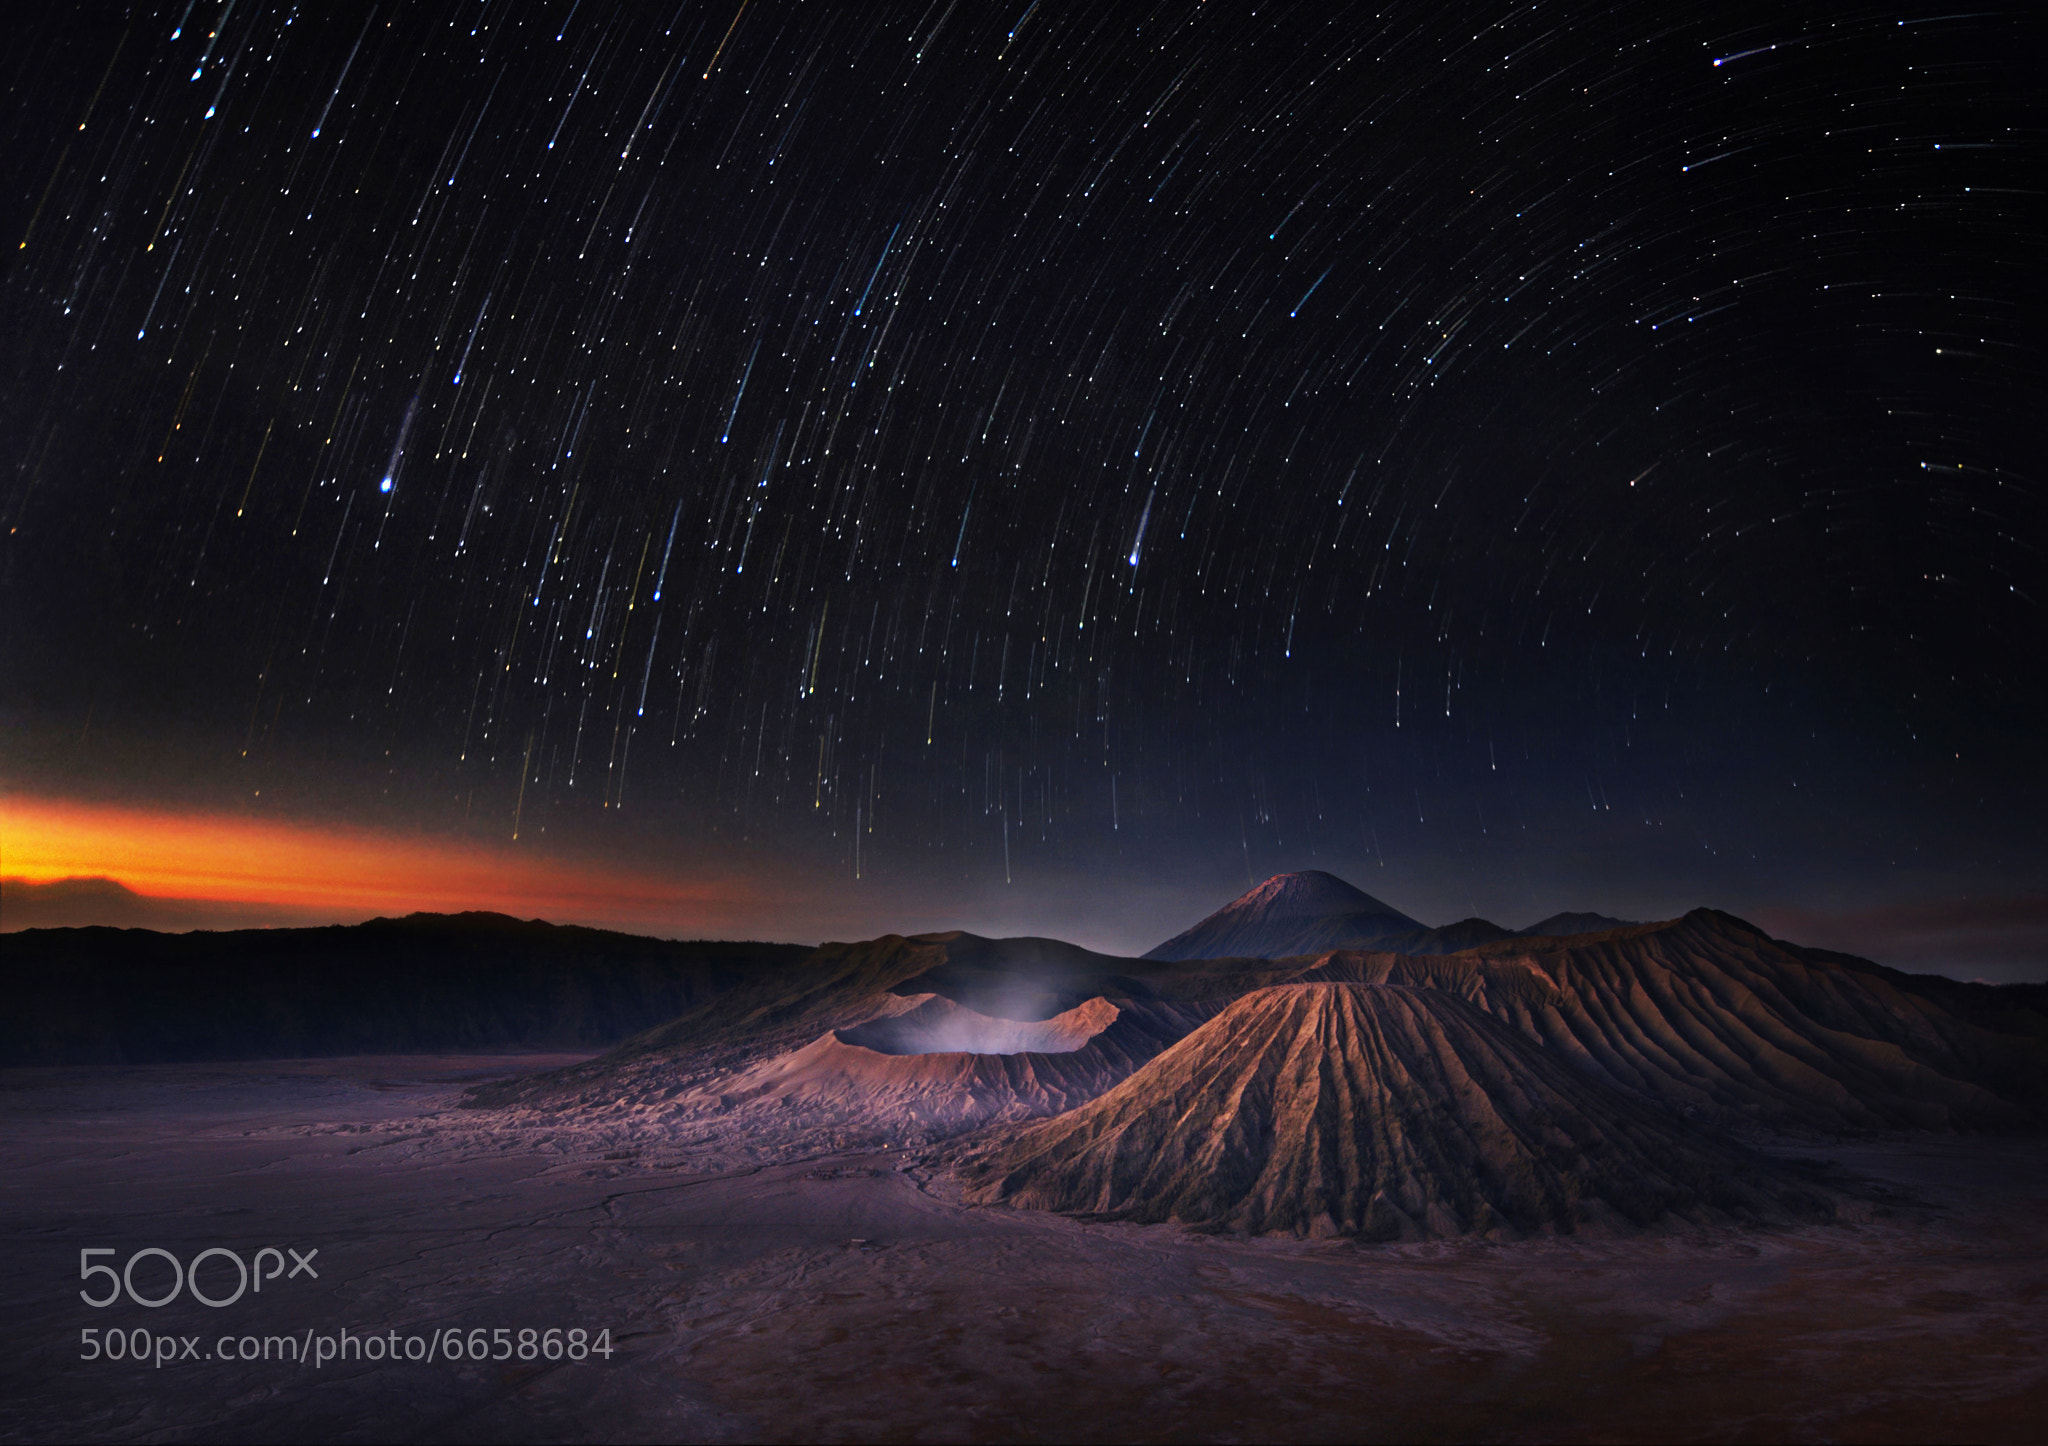 Mt. Bromo’s name comes from Brahma, the Hindu creator god. (Via 500px. Click for larger image.) Chaipuck is an incredibly open and friendly photographer and world traveler who specializes in Southeast Asian landscape shots, HDR, and long open exposures. He shoots with a Nikon D300, and his portfolio includes stunning shots of Vietnamese Hmong villages, Thai fishermen, Chinese rice paddies and ancient Indonesian temples. Some must-see shots for any wanderlusting travelers out there. Go to full article: Interesting Photo of the Day: Volcanic Mt. Bromo at Early Dawn |
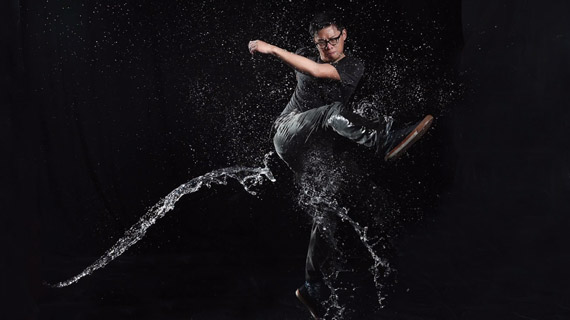
| How to Use Flash to Capture Razor Sharp Water Splash Photos (Video) Posted: 23 Apr 2014 10:55 AM PDT Splashing water moves fast. To capture sharp photographs of it, you’ll need to have good lighting with a quick refresh time. But, when picking out your light source, don’t overlook the importance of the power pack. You need one capable of refreshing your lights in very rapid succession. In the video below, Kai works out all the details and gets to play with a king of power packs, the Broncolor Scoro 3200 S: Breaking Down the Lighting System: Understanding T TimesBefore we get to the photo taking part, let’s geek out over the new Broncolor Scoro 3200 S which has already been dubbed “the unbeatable”—or as Kai likes to call it, a “Swiss Made Sexy Box.” With a flash duration span from 1/85 to 1/8000 sec. (T 0.1 or t.1) the 3200 S offers motion-stopping capability that exceeds any other strobe system currently available. Understanding T times can be a bit confusing, but in a nutshell, T 0.5 and T 0.1 are standard measurements used in flash technology and are an important part of understanding what a flash is capable of doing. Have a look at this chart to get a better understanding of flash duration:  The quick rise, peak, and fall of a flash firing. What the chart shows is a single flash fire. Note how the light intensity rises quickly to 100 percent, where it stays for only a short time before quickly dropping and then more slowly trailing off to lower intensities. A T 0.5 time indicates the duration of the flash at 50 percent or greater intensity, whereas a T 0.1 time indicates the duration at intensities above 10 percent. That noted, a T 0.1 time is closer to three times more than a T 0.5 time. Rapid and fast action shooters, like those of us trying to capture water splashes, will benefit more from T 0.1. If you are in the market for purchasing flashes and/or power packs, it would be wise to study T times more closely so you know exactly what the numbers mean. This would also be an appropriate time to mention the 3200 S is kind of expensive. Okay, really expensive. But, there are alternatives that don’t include all the bells and whistles as the 3200 (read: less expensive) that are suitable enough for what most photographers are trying to accomplish; just do your research. Enough tech speak… Freezing Motion With a FlashIf you’re going to be working with water—splashing water in particular—it’s a good idea to waterproof your workspace. This includes the floor, lights, powerpacks, basically anything you don’t want to get wet. Break out the plastic sheeting and start covering everything in range that you’re concerned about.
 Warning: Your subject will get wet. 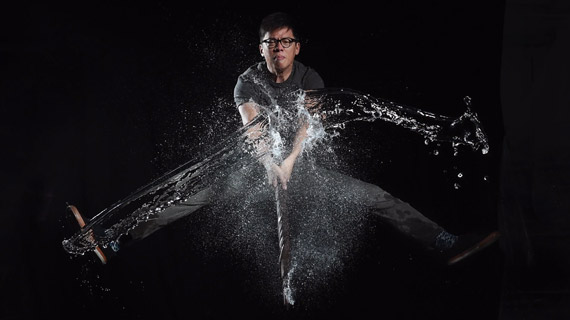 Add a jumping subject to your water splash photos for even more emphasis. 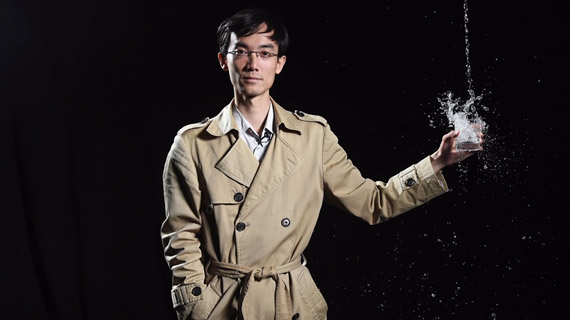 No matter what equipment you use, creativity is still the key to great photos. Since you have taken the time and gone through the trouble of setting everything up and waterproofing everything you own that’s important to you, you might as well try a wide range of shots. Go to full article: How to Use Flash to Capture Razor Sharp Water Splash Photos (Video) |
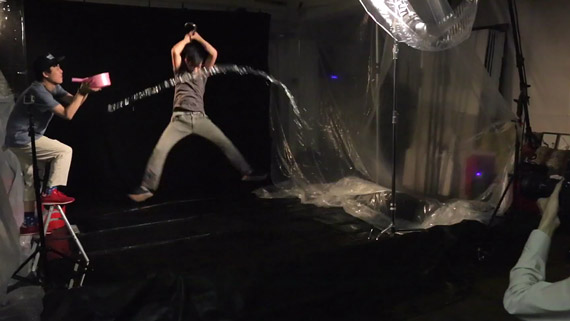 So long as you’re not the one having water thrown at you, this is where the fun starts. Have an assistant toss some water at your model while you instantaneously start firing away in continuous mode. The hardest part is being able to capture the action at the precise moment—the reason we are shooting in continuous mode.
| You are subscribed to email updates from PictureCorrect Photography Tips To stop receiving these emails, you may unsubscribe now. | Email delivery powered by Google |
| Google Inc., 20 West Kinzie, Chicago IL USA 60610 | |
No comments:
Post a Comment