Ways to Improve Your Wildlife Photography Composition |  |
- Ways to Improve Your Wildlife Photography Composition
- Short Film Highlights the Profound Dedication of Professional Photographers
- How to Build a DIY LED Lighting Setup for Photographing Still Life (Video)
- Interesting Photo of the Day: Shall We Dance (With a Bear)?
- A Smarter Way to High Pass Sharpen in Photoshop (Video)
| Ways to Improve Your Wildlife Photography Composition Posted: 11 Apr 2014 11:13 PM PDT Composition in nature photography comes easy to some, but many new photographers struggle to find their balance. This is especially true where wildlife is concerned. 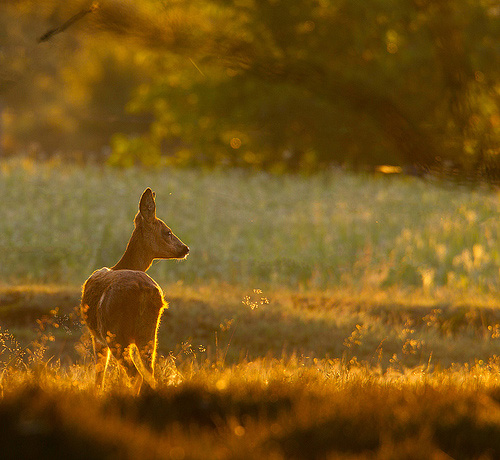 “Warming Up in the Warm Morning Sun” captured by Dennis Rademaker (Click image to see more from Rademaker.) There is a bit of false wisdom that says: “You should never put your animal right in the middle of the photo–only to the left or the right.” This is simply not true, but it is a notion that causes all sorts of anxiety for new photographers. 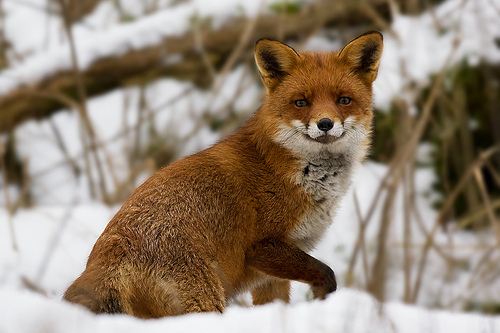 “Save Best Fox for Last…” captured by Dennis Rademaker (Click image to see more from Rademaker.) If you don’t put your animal in the middle of the photo, where do you put it? And what do you do with all that extra space? Well, it may (or may not) encourage you to know that there is not really any hard and fast rule to answer these questions. Like all things in composition, it really depends on your own sense of visual balance. Good composition requires you to have the confidence to trust your own judgment. That doesn’t mean you are on your own when it comes to learning composition. The answers to the following questions may help you if you are struggling to get started. Can I Position My Subject In The Middle?In certain situations, this can work just fine. If you are shooting a portrait-style photo where the animal subject fills up much of the frame, it can make sense to place it right in the centre. This approach can seem perfectly natural, especially when the subject is looking right at the camera. In this case, there is nothing to indicate a shift to one side or the other, and to do so may just create wasted space. 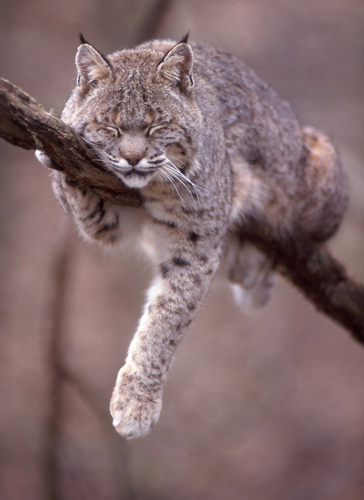 “Bobcat” captured by Ed Harp (Click image to see more from Harp.) For this type of photo, where the subject fills most of the picture, it is important to leave a bit of breathing room around the head of the subject. Your picture will look more balanced if there is a little space between the subject and the edge of the frame, rather than showing the subject cramped into the composition.  “Black and White” captured by David Hobcote (Click image to see more from Hobcote.) Should My Subject Go On The Left Or The Right?Your answer to this question should be guided by the physical positioning of the subject. As a general rule, it is preferable to have your subject looking toward the middle of the picture, rather than toward the edge of the frame. So if your subject is facing to the left, shift its position a little to the right, and vice-versa. 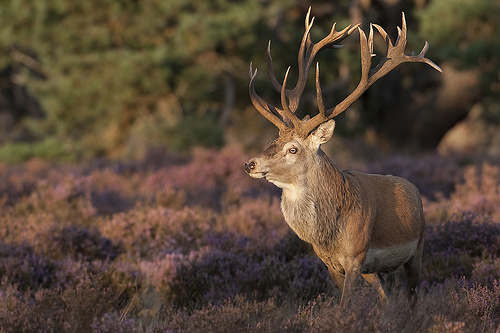 “In the Spotlight” captured by Dennis Rademaker (Click image to see more from Rademaker.) It is not necessary to move the subject all the way over to one side. In fact many of my wildlife photos show the head of the animal right in the centre of the picture, with the body leading in from one side or the other. So the position of the subject is only slightly to the left or right. The important thing is that there is more space in front of the subject than behind it. What Do I Do With All That Extra Space?If you get the balance right in a portrait-style photo, the extra space will not appear too empty. In fact, it looks quite natural to have a little empty area for your subject to look into. Problems can arise when you take your photo from further away, with a lot more space around the subject. This is when you really have to do some creative thinking about how to put that extra space to work in your composition. The more space that appears around the subject, the more information you reveal about the environment it was photographed in. As an artist, it is up to you to make that work for you. I always believe in the following principle: “Anything that does not make my photo better makes it worse.” You need to ask yourself if showing more of the surroundings actually adds to the impact of the photo. If not, it may be better to zoom in and eliminate the extra space. However, the surroundings can add interest and impact to a picture if you know how to use them well.  “Icelandic Horses” captured by Joop Versteegh (Click image to see more from Versteegh.) You already know that if your subject is facing to the right, you should position it to the left so that it looks into the picture. In that case, if you have another object that adds interest, you should try to position it to the right, so the animal is facing toward it. The idea is to try to establish a relationship between the animal and the surroundings. If you do this well, all the elements of the composition work together, adding to the impact of the entire picture. For example, imagine a bird on a branch alongside some flowers. If the bird is facing away from the flowers, they are just two random objects in the same photo. But if the bird is facing toward the flowers, your photo tells a completely different story. 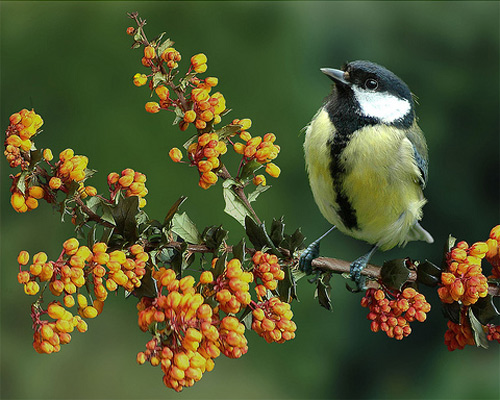 “Great Tit on Pyracantha” captured by John Booth (Click image to see more from Booth.) This may sound simple, but good wildlife photos are the result of patience, perseverance, and lots of wasted exposures before you get that perfect shot. However, don’t think of them as wasted exposures. Every time you press the shutter you add to your experience, and it is with experience that you will begin to trust your instincts and settle on a style of composition that expresses your love of the subject. About the Author: Go to full article: Ways to Improve Your Wildlife Photography Composition |
| Short Film Highlights the Profound Dedication of Professional Photographers Posted: 11 Apr 2014 03:29 PM PDT Robert Beck, Sports Illustrated staffer, caught the photo bug in his twenties. George Karbus, premier outdoor photographer, dolphin whisperer. Dave Black, Nikon Ambassador, lightpainting master. What do these three professional photographers have in common? They are each deeply and profoundly passionate about photography, even moved to tears by the power of a great picture. In this short film, Beck, Black, and Karbus discuss their shared passion for making amazing images and the relentless hard work and dedication that has ultimately brought them success: Beck, Black, and Karbus might bring three totally different life experiences to their art, but they have all figured out how to maintain their passion for photography even after making photos became “a job.” Karbus and Beck speak to that issue in DEDICATED, agreeing that once a photographer begins shooting to make others happy rather than for himself or herself, burnout is not far away.
 According to Beck, a good picture tells a story, is technically sound, and is unique. Building on that, Black believes that maintaining real passion for photography requires that willingness to sacrifice other lesser things—such as extra spending money and free time—in pursuit of mastery. In that way, a photographer is not unlike an athlete.
For Beck and Karbus, this means thinking of every photoshoot like a championship competition that must be won through rigorous effort and careful study of the subject.
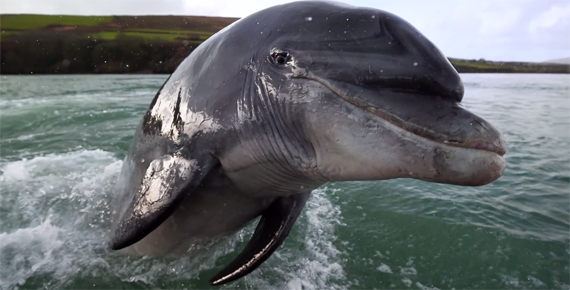 Karbus’ 9-year friendship with this dolphin allowed him to photograph it with mastery. But as for what real passion for photography actually looks like, perhaps Black says it best:
You can watch behind the scenes footage of the making of DEDICATED here: DEDICATED was shot exclusively with the Nikon D4S by Nikon Ambassador Corey Rich as part of a 21-day assignment from Nikon. Rich filmed in seven different locations, including California, Utah, Florida, and Ireland using “small footprint production” techniques and gear that allowed him maximum efficiency without sacrificing quality. Go to full article: Short Film Highlights the Profound Dedication of Professional Photographers |
| How to Build a DIY LED Lighting Setup for Photographing Still Life (Video) Posted: 11 Apr 2014 01:44 PM PDT Professional commercial photographer Alex Koloskov has made an insightful video outlining some of the advantages of a DIY light setup. He demonstrates how you can build your own setup using LED light bulbs that are readily available in many stores for a fraction of the price of dedicated photography lights. He even gives an in-depth look at how to use the LED setup to create beautifully lit images: Koloskov proves that using a daylight balanced LED light, like the Feit Dimmable LED or the Utilitech 90-Watt bulb, and a DIY diffuser and reflector, it’s possible to get acceptable images to use in your portfolio. 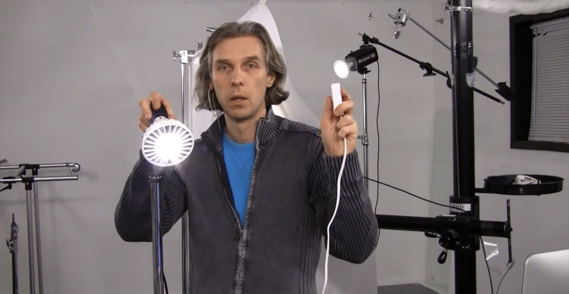 Koloskov used two of these outdoor decorative LED bulbs for this shoot. 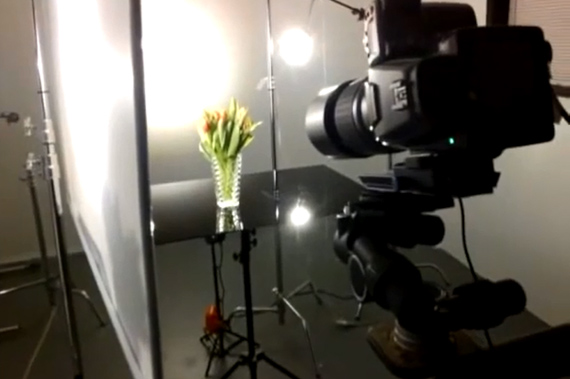 The setup.  Final image. Kolosklov made the image above using just two of the Utilitech bulbs. One was set up on the side of the vase through a DIY diffuser. The second bulb was reflected at full strength onto the wall behind the vase. The setup is an easy and affordable alternative to dedicated photo lights. Go to full article: How to Build a DIY LED Lighting Setup for Photographing Still Life (Video) |
| Interesting Photo of the Day: Shall We Dance (With a Bear)? Posted: 11 Apr 2014 12:24 PM PDT The following image is —incredibly—not computerized in any way. That is to say, the bear, at least, is as real as the girl. The whole thing is a remarkably deft photo shoot showing the delicate and beautiful potential harmony between humanity and nature:  The bear was placated by intermittent feeding on-set. (Via Imgur. Click for larger image.) This fairytale image is one of a whole portfolio created by Russian photographer Katerina Plotnikova, who shoots with a Canon 5D Mark II. On her site, you can find many more soft-focus portraits of redheads hugging animals of all kinds: deer, chipmunks, owls, moose, raccoons and even, somehow, an elephant. Between shots, the bear’s trainer fed the bear to make sure it, you know, didn’t maul and devour everyone onset. Go to full article: Interesting Photo of the Day: Shall We Dance (With a Bear)? |
| A Smarter Way to High Pass Sharpen in Photoshop (Video) Posted: 11 Apr 2014 10:43 AM PDT High pass sharpening has been one of Photoshop’s most commonly used filters by professional photographers. But Michael Woloszynowicz noticed some problems with the traditional method—namely, an unnatural white outline and awkward lighting around the eyes, where colors contrast. Here’s his solution: Woloszynowicz’s video is very technical and may be confusing for some, but professionals and semi-professionals will recognize it as the kind of tip that distinguishes them from amateur digital editors. The kind of haloing created by Photoshop‘s high pass filter creates an unnatural look around the eyes and around the shoulders of a subject, looking like a subtler version of this application:
While the manual process is a little complicated, involving multiple layers and jiggling around the opacity, Woloszynowicz’s method becomes easier with practice or a Photoshop action. Go to full article: A Smarter Way to High Pass Sharpen in Photoshop (Video) |

| You are subscribed to email updates from PictureCorrect Photography Tips To stop receiving these emails, you may unsubscribe now. | Email delivery powered by Google |
| Google Inc., 20 West Kinzie, Chicago IL USA 60610 | |
No comments:
Post a Comment