Depth of Field and F-stops |  |
- Depth of Field and F-stops
- 7 Simple Camera Hacks in 3 Minutes (Video)
- 13 Amazing Nature Panorama Photos
- How to Make Your Photography an Art Form (Video)
- Incredible New Zealand Timelapse: Awakening (Video)
| Posted: 12 May 2014 05:48 PM PDT Depth of field (DOF for short) is usually associated with the aperture, which is often used interchangeably with the word f-stop. The aperture controls the amount of light that passes through the lens and onto the film–or in the digital world, onto the sensor inside the camera. This amount of light is determined by the size of the lens opening (the aperture) inside the lens. On the older, traditional 35mm cameras, the settings on the outside of the lens that controlled this function were called f-stops. That’s why even though, technically, they are two different things, many writers use the words aperture and f-stop as if they were one and the same. It’s like calling the door knob a door. You do use one thing to affect the other, but they are NOT one and the same.  “Droplets” captured by Johnson Zhang (Click Image to Find Photographer) The greater amount of light the aperture allows in, the narrower the depth of field is, and visa versa. The less amount of light the aperture allows inside, the wider the depth of field. Many beginning students get confused by this. Since the f-stop is what controls this light, the easiest way to remember it is: Small number = small f-stop (f/1.8) = small amount of picture in focus Large number = large f-stop (f/32) = large amount of picture in focus Shutter SpeedThe shutter also affects this same light. Whereas the aperture controls how much, the shutter controls how long. If the shot is exposed for too long, the photograph appears washed out. If the shot is exposed for too short a time, the photograph appears too dark. This is commonly referred to as over exposure and under exposure. The shutter speed (how long things are exposed) can be used to freeze things in midair (with a fast speed), or it can be used to intentionally blur something like water (with a slow speed). As a general rule, if you want to freeze something, you want a shutter speed of 1/500 of a second or faster. If you want to blur something (on purpose), you would use a slow shutter speed like 1/30 of a second or longer. Just remember that, generally, you only want part of the picture as a blur, so when you do use slower speeds, also use a tripod.  “Twig Droplets” captured by Johnson Zhang (Click Image to Find Photographer) Focal PlaneWherever you focus your lens within a given image, there will be an area that is in focus and other areas that are out of focus. The area that is in focus is referred to as the focal plane. The important thing to remember is that 1/3 of this focal plane is in front of whatever you focused on, and 2/3 of the focal plane is behind whatever you focused on. By deliberately focusing 1/3 of the way into your landscape shot and using a high number f-stop (like f/16 or f/22) you capture the greatest amount of the photograph in sharp focus. Hyperfocal DistanceSome people have the mistaken idea that if you just set your focus to infinity that it would do the same thing. The infinity setting that looks like an 8 turned on its side will give you an indication that says anything from ten feet back will be in focus. So what happens if you want to include something that is less than 10 feet away? That’s where the hyperfocal distance comes into play. When you use the hyperfocal distance, you focus on something that is half of what the front infinity setting indicates. In this case, that would be five feet. Since we know that 1/3 of the area in front of your picture will be in focus, it gives the illusion that every part of your picture is in equal focus. Whether you use the 1/3 in rule or set the hyperfocal distance, they both give you a greater sense of a large depth of field, which is good for both landscapes and scenic shots. Exposure ValueIf you always trust your camera meter and use what it tells you, you are using what we refer to as a standard exposure value. Exposure values are those numbers that refer to the combinations of f-stops and shutter speeds that can give you an accurate exposure under a given light situation. Keep in mind that meters do not see in color. In order to make up for this the meter will average your scene and give you a reading for 18% grey. All meters do this; it’s not their fault. That’s how they were designed. But what happens if you actually want a white wedding dress to look white? Or what happens if you want that great black stallion to actually look black?  “Those memories we have forgotten” captured by Johnson Zhang (Click Image to Find Photographer) BracketingJust as many pictures look better after you take them into Photoshop and increase or decrease the brightness or contrast settings, many images actually look much better if they are exposed slightly more or less than what the meter suggests. This process of shooting above, directly at, and below what the meter indicates is referred to as bracketing. If you are in an especially difficult lighting situation or a location that is in and of itself very hard to get to . . . use bracketing. If your camera batteries are getting low, use bracketing. In short, if you have any doubts in your mind at all, use bracketing. Most photo books strongly cover the subjects of f-stops and shutter speed. These are important, but there are other subjects, that many of them just skim over. Understanding the focal plane, hyperfocal distance, exposure values, and bracketing will all greatly increase the tools you can use to make a better image. About the Author: Go to full article: Depth of Field and F-stops |
| 7 Simple Camera Hacks in 3 Minutes (Video) Posted: 12 May 2014 04:50 PM PDT Need a little inspiration in the creative photography department? Want to add a little oomph to your images but can’t really afford to buy fancy equipment? The Cooperative of Photography photographer Leo Rosas has seven great ways to get creative with your camera that are easy, inexpensive, and totally effective: The Hacks1. Timelapse Rig Hack Create a moving timelapse with an egg timer. You can easily mount a GoPro camera to a flat egg timer to get a steady, moving sequence of pictures. 2. Arty Filter Hack Add some color to an otherwise dull image with a clear plastic bag and some colored markers. Just color the plastic, tear a hole in it, and fasten it over your camera lens to get an arty effect.  The colored filter hack. 3. The Vaseline Hack Add some artistic blur to the photo with a Vaseline vignette on a lens filter. Smear the Vaseline over the filter, but keep a clear spot to focus your subject in; the rest of the image will have smooth, blurred edges. 4. Flash Diffuser Hack You can cut a flash-sized hole in and layer a regular Tupperware container with some transparent paper and tinfoil to create a perfectly good flash diffuser.  The flash diffuser hack. 5. ND Filter Hack Mount welding glass over your lens by fastening it to the lens hood with elastic bands. This will block the light, forcing the shutter to stay open longer, which creates blur on moving objects like water. The more light blocked, the longer your shutter will stay open. 6. String Tripod Hack Try tying a long string to a tripod mount in order to create a “triangle” tripod that you can stand on to steady the camera to ensure sharper images. 7. Bokeh Hack Cut out a shape (any shape) in a round piece of cardboard paper and tape it over your lens. This will make the lights in the background blur into the cardboard shape.  The shaped bokeh hack. Creating new looks doesn’t have to mean a shopping spree at the nearest photography store. Choose one of these easy hacks and see where it takes your photos. Have you tried any of these techniques? Share your experiences and ideas for simple camera hacks in the comments below. Go to full article: 7 Simple Camera Hacks in 3 Minutes (Video) |
| 13 Amazing Nature Panorama Photos Posted: 12 May 2014 02:58 PM PDT A panorama is a wide-angle view or representation of a physical space, whether in painting, drawing, photography, film, seismic images or a three-dimensional model. The word was originally coined in the 18th century by the Irish painter Robert Barker to describe his panoramic paintings of Edinburgh and London. For this list, we’ve chosen some amazing nature panorama shots, but soon we’ll treat you to some urban samples! Enjoy the view:  photo by Sierra Pictures  photo by Kadir Murat Tosun  photo by mio  photo by John Fowler  photo by Johnny Barrington 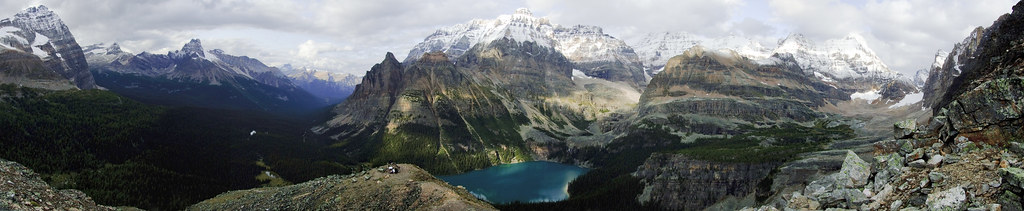 photo by Steffen Sauder  photo by Jim Cooper 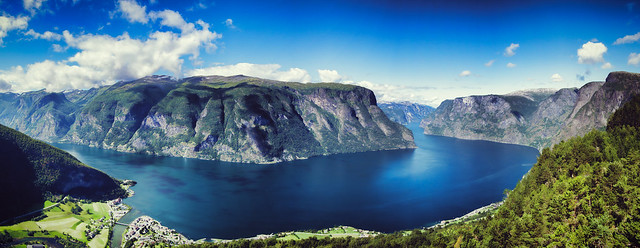 photo by Sören Schaper  photo by Donald Blackmore  photo by Stephen Coiner  photo by Reckoner  photo by Peter Liu  photo by Zach Dischner I hope you enjoyed these amazing nature shots! Feel free to share your panorama samples in the comments section below. Take advantage of those sunny days; pack up your gear and go out shooting. Go to full article: 13 Amazing Nature Panorama Photos |
| How to Make Your Photography an Art Form (Video) Posted: 12 May 2014 01:59 PM PDT Commercial advertising photographer Joel Grimes is an artist. Viewing himself as an artist rather than a photographer has given him the freedom to experiment, push boundaries, and lead. He is determined to make a statement with each photograph to provoke some kind of emotion, and to do so he pushes the limits of reality and fantasy:
As an artist, Grimes has the ability to choose what he wants to render. For each concept, he reaches deep down into his imagination to blend the every day life with illusion in order to make his subjects appear larger than life. His goal is to make them look like superheroes.
Grimes believes it’s the creative process that really makes a photograph pop. To him, lighting is paramount. Lighting is all about trial and error. With more practice and experience, you can learn to follow your intuition and start building a look that fits your vision as an artist. While people have differing opinions on the subject, Grimes believes that photo manipulation is part of the process of producing a great final image. In an article by SmugMug, Grimes says:
Grimes says the hardest thing is that people don’t know how to stand out. We tend to follow rather than lead. If you follow, you blend in with the masses, but if you lead, create something that nobody else has done, and aren’t afraid to experiment or be criticized, you will stand out. His best advice:
Go to full article: How to Make Your Photography an Art Form (Video) |
| Incredible New Zealand Timelapse: Awakening (Video) Posted: 12 May 2014 01:02 PM PDT Martin Heck of Timestorm Films spent four months roaming around the backwoods of New Zealand. He didn’t just set out to explore and privately enjoy the amazing scenery of the expansive mountains and deep fjords, although that was an added bonus. His goal was to share the island’s natural beauty through photography. What he came up with was an incredible timelapse series: In Part I of IV of his New Zealand series, Heck really submerges the viewer into the ever-changing landscapes. We get a real sense of what it was like to hike through the mountains, travel the island’s remote areas, see the stars in a truly natural setting without light pollution, and just be at peace.
To get the footage, Heck used different variations of the following photography equipment:
He then processed and edited his images in Lightroom 5, LRTimelapse, After Effects, and Premiere Pro CS6 to enhance them and bring them together in the final video. Go to full article: Incredible New Zealand Timelapse: Awakening (Video) |


| You are subscribed to email updates from PictureCorrect Photography Tips To stop receiving these emails, you may unsubscribe now. | Email delivery powered by Google |
| Google Inc., 20 West Kinzie, Chicago IL USA 60610 | |
No comments:
Post a Comment