Photo Tips For Documenting Life’s Events |  |
- Photo Tips For Documenting Life’s Events
- How to Keep Your Subject in Focus When Shooting Long Exposure Photography (Video)
- Interesting Photo of the Day: All the World’s Ablaze in this Canadian Mountain Valley
- Resurrecting Pan Am For a Period-Piece Photo Shoot (Video)
- Behind the Scenes: Creative Light Painting With a Drone (Video)
| Photo Tips For Documenting Life’s Events Posted: 07 May 2014 06:19 PM PDT Final Reminder: Only a little while left in the launch sale: Secrets of Successful Event Photography There are really only 2 kinds of events: milestones and recurring annual events. MilestonesSorry for stating the obvious here, but these are the so-called once-in-a-lifetime biggies. Ones so important that you sometimes associate with a song or piece of music.  “Easter Sunday, 1978, The Vatican, 200,000 People” captured by Joel Gillespie (Click Image to Find Photographer) A partial list of milestones may be the following:
Recurring EventsThe list below is fairly obvious. Your subjects may not change over the years, but that doesn’t mean your photography can’t improve if you do a lot of these.  “cny reunion dinner” captured by James Chew (Click Image to Find Photographer) The key is to come up with a different way of looking at the same subject. No, don’t stop taking the same pictures you took the year before; be bold and experiment.
Better Milestone PicturesBased on subject and setting of each event, your approaches will vary. The first group of events, which I call Milestones, are very important–just ask my wife. Don’t blow it…there’s no pressure. When I worked at the paper and was very new, this sort of anxiety was normal. But a technique I learned in flying school, called “bunk flying”, helps. It’s nothing more than pre-visualizing everything you think you’ll encounter in your head at the event.  “Olivia & Erik Wedding” captured by Don Campbell (Click Image to Find Photographer) Everything right down to the equipment you’ll bring and where you’ll pose your subjects. It of course helps if you’ve been to the venue, preferably at the designated time of day. You want to get an idea of not only what the place looks like but also the lighting, hence the “time” element. Mind you, when I worked for the newspaper, there are few instances when I asked for something to be repeated, or as they say in golf, asked for a “mulligan” or a “do-over.” Imagine asking for a repeat of the action when a baseball play occured at home plate and you weren’t paying attention. So what’s your best chance of capturing those once-in-a-lifetime moments? Scout the location beforehandFigure out where the light is for a particular venue or scene. In a church, where there are stained glass windows and big doors, there will be spots where it is brighter than others. Be ready to shoot your subject at those spots. Be preparedHave all your gear in one bag. Keep your camera, flash, lenses, and other accessories, like extra memory cards, in one bag. That way all you need to do is to grab it and you’re ready. Remember, digital cameras without charged batteries are paperweights. A camera with a full memory card is also a paperweight–both are good only for war stories.  “Cradle the Future” captured by jmurphpix (Click Image to Find Photographer) Set Realistic GoalsIf all you have is a short telephoto lens, realize you’re limited by your equipment. Either wait till your subject is closer or try to get closer. If you’re shooting with a digital camera that has RAW capability, you could try taking your pictures in that mode. Shooting in RAW is like using a telephoto lens, because you are capturing at the highest resolution your camera is capable of. It allows you to crop in, make your tiny subject bigger, and just maybe allows you to get a decent image. Because you don’t have access to be front-and-center at most events, be realistic as to the kinds of pictures you can get. If all you have is a short telephoto, don’t expect to get tight closeup shots. Instead, wait for pictures with wide angles or pictures that you can take after an event is winding down. As an example, graduations are great happy events to photograph, but you will be most hampered by lack of equipment and limited access. Better Recurring/Annual PicturesJust because you’ve shot some of these annual events over and over doesn’t mean they need to be boring. Sure, shoot the same picture you did last year, but push yourself to come up with something different, too.  Photo captured by David Stephen Kalonick (Click Image to Find Photographer) Assess the lightingHave you stopped to think how those birthday cake scenes look with the room lights turned off? Well, it actually looks very warm, inviting and nostalgic. So next time you’re ready to shoot this scene and it’s indoors, turn off the lights. If you have time, consider also changing the White Balance. Don’t forget there is no hurry. You can tell them to re-light the candles or wait while you check your camera’s LCD as you make some tests. Try a different viewpointIf you’ve shot the quintessential blowing out the candles every year, try shooting from a different position or using a different lens. A wide angle from close up from right up next to the cake by the candles can be a different view. This has the added benefit of allowing you to brace your camera in a low light situation.  Photo captured by Robert Nemeti (Click Image to Find Photographer) Let the kids take their own picturesSet up a makeshift photo studio. All you need is backdrop and a camera on a tripod. Most cameras have a self-timer. You can try that or you can let them trip the shutter themselves if you can spare one camera on a tripod. Do at least one group shot at the same locationA group shot at the same location will show how everyone has changed year after year. If the same guests attend, this can be a great record to show how children have grown or changed. These need not be prize-winning pictures. They are mainly for the record type pictures. Look for details and closeupsAn adult’s hand holding a newborn’s always makes for a nice, intimate detail shot. Finally, while these are all events in your life, don’t forget to gather important details like brochures of the places you’ve camped. Years later, that information will add more meaning to your memories. About the Author: For Further Training, Deal Ending Soon:This new course is designed to teach photographers the techniques used by professionals to get great photos – every time – even in the most difficult conditions at parties, weddings, concerts, corporate functions, nightclubs, fashion shows, fast-moving sports games, festivals, and more. To have the equipment and knowledge ready so you'll never again feel nervous or out of your league when photographing an event again. It is currently 33% off for the launch sale which ends soon. Launch sale found here: Secrets of Successful Event Photography Go to full article: Photo Tips For Documenting Life’s Events |
| How to Keep Your Subject in Focus When Shooting Long Exposure Photography (Video) Posted: 07 May 2014 04:25 PM PDT Have you ever taken a long exposure at dusk only to find you snapped a shot filled with amazing light trails and a blurry subject? Most photographers agree this can be a tricky scene to shoot, especially if you’re trying to keep a main subject in focus and shoot without a tripod. Photographer Joe McNally ran into this type of lighting situation when he visited the central business district of Beijing to capture graphic pictures of the new skyscrapers being built. After hanging off the ledge of a building 65 stories in the air, clipping a flash to a steel beam, and creating a makeshift light blocker, he created this tutorial to teach you how to get that perfect shot: McNally explains the driver in this situation is the ambient light level resulting from the darkening city. The lower light level will naturally result in a longer shutter speed, which will ultimately risk his subject (the welder) being out of focus in the photo. Ideally, McNally says he wants to showcase the tracer lines created by the showering sparks and moving traffic, but he also wants the focus of the photo to be the welder.
To remedy the situation, McNally mounted a Nikon SB-910 TTL AF Shoe Mount Speedlight Flash on a Manfrotto 175F1 Spring Grip Justin Clamp, attached it to a nearby beam, and focused the light directly on the right side of the welder.  The final photograph combining the light trails of the traffic and sparks with the welder in focus. (Focal length: 12mm, ISO: 100, Aperture: f/6.3, Shutter: 2 seconds)
McNally said the only other issue he encountered was the bright light resulting from the actual welding itself. He moved a piece of steel over to cover the welding site and even out the exposure.
Go to full article: How to Keep Your Subject in Focus When Shooting Long Exposure Photography (Video) |
| Interesting Photo of the Day: All the World’s Ablaze in this Canadian Mountain Valley Posted: 07 May 2014 02:21 PM PDT DIRE WARNING: Look away right now unless you wish to be gripped by an irresistible urge to move to Canada immediately. If you choose to continue forward, please also remember that it is impossible to climb through your screen and pitch a tent inside landscape photographer Marc Adamus‘ gorgeous image of this river valley in Yukon’s Ogilvie Mountains at sunset: 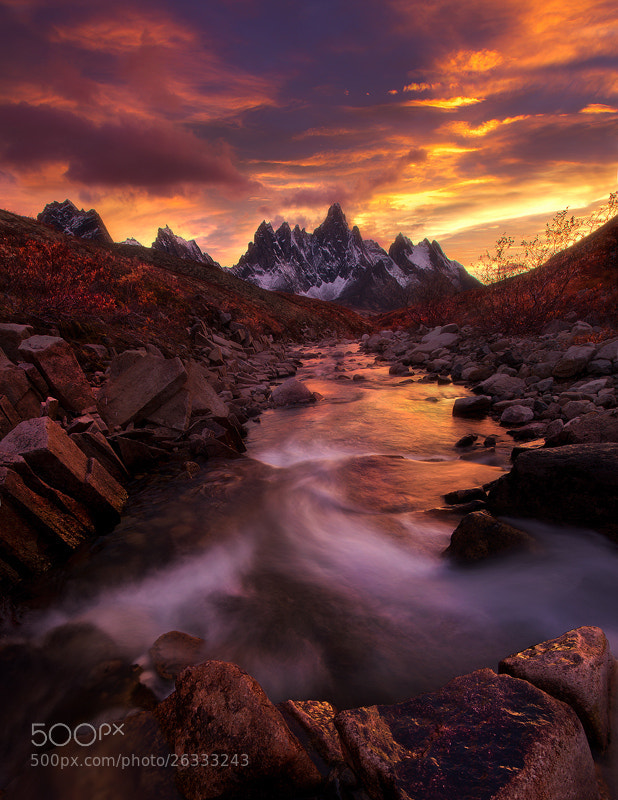 “Into the Flames” by Marc Adamus (Via Imgur. Click to see larger size.) The Ogilvie Mountains lie in the northernmost region of Canada’s Yukon territory. Some of the most popular views of the range’s picturesque peaks can be had from Tombstone Territorial Park, an 850 square mile tundra blanketed with black granite, roving caribou, beautiful alpine foliage, and more.
Adamus, who is based in Corvallis, Oregon, discovered this river valley while backpacking through the area one autumn. He captured three different exposures and blended them together to create the image. Go to full article: Interesting Photo of the Day: All the World’s Ablaze in this Canadian Mountain Valley |
| Resurrecting Pan Am For a Period-Piece Photo Shoot (Video) Posted: 07 May 2014 01:21 PM PDT Pan American World Airways may have declared bankruptcy in 1991, but that didn’t stop photographer Michael Kelley and aviation prop fanatic Anthony Toth from taking flight on an authentically decorated Boeing 747-200 in 2014. Together, they assembled all the bits and pieces of Pan Am memorabilia they could find, hired over a dozen models and eight camera assistants, and tackled an incredibly ambitious period-piece photo shoot inside the mock-plane: What sold the shoot as a good idea before it even began was undoubtedly the source material. Pan Am had a terrific panache for design and style, blending curvy minimalism of the ’60s and ’70s with bright solid colors and trendy designs.
The biggest problem, Kelley stresses, was lighting. Because the set was so small and boarded up, without enough electrical wiring inside, the only way to light the thing decently was to blast in 1,000-watt un-diffused Profoto beams from the outside. The goal wasn’t just light, but that flat, broad, obviously artificial light that illuminated magazine pages decades ago. You can see the difference here. In the before, he wasn’t using the Profotos through the window, and in the after shot, he was:
In total, Kelley was using eight lights, including Profotos, speedlights, and Einsteins—all while shooting at ISO 400, 1/10 exposure, and an f/8 aperture. And sometimes even that wasn’t enough. Cramped space meant they had to remove rows of seats just to make room for the tripod to try and get a wide shot and allow in as much light as possible.
The upper luxury lounge was even harder to light, because the windows were so low that shooting light in just fell across the floor. Running out of scrim, Kelley lined the windows with paper towels and aimed each light straight at a highlight–a face or object on set, which you can see here:
To their credit, the level of detail, from clothes to hair to the little Pan Am logos on the napkins and silverware, are all impressively authentic.
Go to full article: Resurrecting Pan Am For a Period-Piece Photo Shoot (Video) |
| Behind the Scenes: Creative Light Painting With a Drone (Video) Posted: 07 May 2014 11:46 AM PDT Drones are making their mark in the world of photography as creatives come up with new ways to utilize them on a daily basis. Not too long ago we saw a fun Superman clip that was created using a drone and now, as you can see below, a pair of photographers are using a drone to have a little light painting fun. Take a look at the behind the scenes footage: With a little ingenuity and creativity, the photographers came up with the idea to attach a speedlight onto the drone. They had to find an ultra lightweight flash and the Nikon SB-300 seemed to fit their needs. The SB-300 was controlled from the ground using a Phottix Odin Wireless Flash Trigger and Receiver. They then flew the drone, a DJI Phantom 2, around the lighthouse to take multiple images of it, lighting one section at a time.  The drone can be seen hovering above the ground with green and red lights to identify its location. Once all the photos were taken, the images were then opened into Photoshop where they were meticulously hand blended together, taking only the sections of each photograph that were lit from the drone flash. The lengthy composite process enabled them to create this stunning image.  The Final Image To make sure the image was the best it could be, Hall went to the location a couple times to try to capture a more interesting sky. He also used Photoshop to add some of the haze you see around the light beams emitting from the tower. Being able to fine tune every aspect of your image is the beauty of composite photography. Go to full article: Behind the Scenes: Creative Light Painting With a Drone (Video) |


| You are subscribed to email updates from PictureCorrect Photography Tips To stop receiving these emails, you may unsubscribe now. | Email delivery powered by Google |
| Google Inc., 20 West Kinzie, Chicago IL USA 60610 | |
No comments:
Post a Comment