5 Tips to Immediately Improve Your Retouching |  |
- 5 Tips to Immediately Improve Your Retouching
- How to Remove Objects From an Image With Photoshop (Video)
- 13 Panoramic Photos of Cities Around the World
- Waiting for the Shot: Can a Photographer Learn to Be Lucky? (Video)
- Interesting Photo of the Day: A Kangaroo Takes a Winery Tour
| 5 Tips to Immediately Improve Your Retouching Posted: 25 Jun 2014 11:37 PM PDT Retouching is a labor of love. It takes time, focus, and the right mindset to turn good images into great ones. All of that time in front of the computer can drive anyone crazy, so we asked world-renowned retoucher Pratik Naik for his tips for staying loose and producing consistently beautiful final images. (To hear more tips from Pratik, tune into his course, The Art & Business of High-End Retouching, today through Saturday on CreativeLive).  Photo captured by Joey L and retouched by Pratik Naik 1. Take BreaksFor every hour that you work, take a five minute break. Use this time to get a glass of water, stare into the distance, or simply get some rest. It will recalibrate your system. Ultimately, you will be able to see anything you’ve been doing wrong without going too far. How many times do you come back to an image the next day only to dislike it? This will help prevent that from happening. It’s amazing how your eyes tend to get accustomed to what you’re looking at, no matter how bad it starts looking. 2. Make a Game PlanBefore diving right in at 100 percent, make a game plan of what you want to retouch. Stick to those boundaries and it will stop you from getting side tracked when you retouch endlessly for hours on end. You’ll be able to focus on the most important areas without overdoing the image. It will allow you to set a good workflow for what you want to truly accomplish. Getting sidetracked is an expensive habit that will charge you in time.  Photo captured by Joey L and retouched by Pratik Naik 3. Keep Zooming Back OutContinuing on the same thought, be sure to keep zooming back out. How many times have you worked on an area, only to realize you didn’t make that big of a difference when you see the before and after while zoomed out? Keep zooming out to get a sense of perspective. You’ll prevent yourself from spending unnecessary time going through the image. This will allow you to see what areas still need work without spending time on areas that don’t really matter. It will stop you from overdoing particular areas.  Photo captured by Lara Jade and retouched by Pratik Naik 4. Use a Graphic TabletIf you’re still using a mouse to retouch, I would highly recommend giving a Wacom tablet a try. It may be hard at first, but you will never go back once you get used to it. Your lines will be smoother and more accurate. Your results will show for it and you’ll spend less time! Think of it like learning how to ride a bike, except for your fingers.  Photo captured by Lara Jade and retouched by Pratik Naik 5. Watch Your PostureThis is a point that may not seem important, but it is one that may be the most important. I’ve visited many studios and places where photographers work. The chairs they use are setting themselves up for some serious issues. Get a good chair, and set your tablet and keyboard in places that promote good posture. Retouching comfortably will allow you to retouch longer without making it feel like a chore. Have a chair with good back support and you’ll look forward to retouching no matter how long your next session is! (To hear more tips from Pratik, tune into his course, The Art & Business of High-End Retouching, today through Saturday on CreativeLive). Go to full article: 5 Tips to Immediately Improve Your Retouching |
| How to Remove Objects From an Image With Photoshop (Video) Posted: 25 Jun 2014 06:30 PM PDT Photoshop has such a diverse range of tools and image editing capabilities that it’s hard for one person to learn how they all work. It’s easy to stick to what you know and need, but there are advantages of learning about some of Photoshop’s finer hidden gems. Listen to Hughes as he introduces us to Vanishing Point and the Path Tool, two lesser known options to use when removing objects from images: Vanishing PointIn his sample photo, Hughes wants to remove a horse head and replace it by cloning it with a section of road that runs through the photograph. The problem is that the clone stamp will not clone in the correct scale. For this we’ll need to use the Vanishing Point feature.  The Vanishing Point Tool quickly and accurately replaced the dirt road. Once you have made an accurate selection of the object to be removed, delete using the Content Aware Fill option. Photoshop will do its best to fill in the area where the object was using the content of the surrounding areas. In this case, it replaced the horse head with grass, which was close but not quite ideal. To resolve this, Hughes goes to Filter > Vanishing Point. This opens a new window that offers options such as its own version of the Clone Tool, a perfect choice for cloning in the dirt road while maintaining its perspective–something the regular Clone Tool would not be able to do. Path ToolBryan O’Neil Hughes then introduces us to The Path Tool which is a great option to use when you are trying to clone out curved lines or objects, such as the telephone wire in the Before image below. Since you can’t Shift + Click a bent line, the Path Tool allows you to define the exact path of the object you are trying to remove.  A Before & After Look At A Wire Running Through A Photograph.
 Stroke Path With Brush makes for a quick, accurate clone. That’s all there is to it! You now have two more fast and simple ways to remove objects from your images in Photoshop. Go to full article: How to Remove Objects From an Image With Photoshop (Video) |
| 13 Panoramic Photos of Cities Around the World Posted: 25 Jun 2014 05:46 PM PDT Back in the days of film cameras, creating a panoramic photograph meant either buying a particular, expensive camera or hours in the darkroom stitching images together by overlapping exposures onto the finished photo paper. Today, making a panoramic photo is a simple and easy process. Creating a panorama is very useful if you don’t own super wide lenses, as you can often achieve a similar effect. Here are some remarkable examples:  photo by Jonny Walker  photo by mariusz kluzniak  photo by Vlad Popa  photo by Jeff S. PhotoArt photo by Navid Qureshi  photo by Rina Kupfer 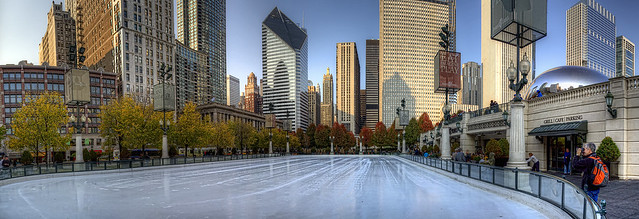 photo by Jonathan  photo by Jaideep Singh Rai  photo by Wizam  photo by David Yu  photo by Arthur Taylor  photo by Kadir Murat Tosun  photo by Pedro Szekely What about your own city? Check out our panorama photography tips and start making your own masterpieces! Go to full article: 13 Panoramic Photos of Cities Around the World |
| Waiting for the Shot: Can a Photographer Learn to Be Lucky? (Video) Posted: 25 Jun 2014 03:25 PM PDT Jordan Matter, photographer and author of Dancers Among Us and Athletes Among Us has a real passion for life and for his work. And he believes that other people’s passions and emotions—the magic of life—can be captured through artistic imagery… if he just waits for the right moments to present themselves. Listen to Jordan’s story about how he serendipitously captured the perfect shot of a dancer on a Florida beach during what should have been a beautiful sunset, but turned into a dark and dreary downpour: Can you train yourself to find serendipity in any moment? Matter believes the perfect opportunity will reveal itself if you just wait and stay open to the possibilities.  Matter, at first, thought this was the perfect shot.  A lifeguard dropped his rescue board in the frame, and Matter had his lucky shot.
Go to full article: Waiting for the Shot: Can a Photographer Learn to Be Lucky? (Video) |
| Interesting Photo of the Day: A Kangaroo Takes a Winery Tour Posted: 25 Jun 2014 12:11 PM PDT Traveling can be a great time to take photos, and photographer Greg Snell nailed it when he captured this western grey kangaroo lounging in the vineyards of the Adelaide Hills in South Australia:  “Are you here for the winery tour?” (Via Imgur. Click to see full size.)
Snell’s photo is just one of hundreds of amazing photos entered into this year’s National Geographic Traveler Photo Contest. What interesting critters have you photographed while traveling? Can you top this one? Go to full article: Interesting Photo of the Day: A Kangaroo Takes a Winery Tour |
| You are subscribed to email updates from PictureCorrect Photography Tips To stop receiving these emails, you may unsubscribe now. | Email delivery powered by Google |
| Google Inc., 20 West Kinzie, Chicago IL USA 60610 | |
Really enjoyed reading these photography tips — especially the reminder that composition and lighting matter more than expensive gear. Small adjustments can make a huge difference in the final image.
ReplyDeleteFor anyone who also wants professional retouching and real estate photo enhancement, I highly recommend checking out Phephotos
. Their editing team does an amazing job with HDR blending, virtual staging, and day-to-dusk edits for real estate photography.