How to Get Superb Color in Your Photography |  |
- How to Get Superb Color in Your Photography
- Interesting Photo of the Day: This Remote Island is Named After James Bond Himself
- Photographers Describe Their Perfect Day (Video)
- A Rough Guide to Timelapse Photography
| How to Get Superb Color in Your Photography Posted: 15 Jun 2014 09:24 PM PDT Color accuracy is one of the most important aspects of photography. A big part of this is getting accurate white balance. White balance relates to the overall color hue in your images. Even a minor modification of color tone can mean a huge impact on all your photos. White balance is important in portraiture, because it means accurate skin tones. If it is not set to an accurate setting then skin tones may seem slightly blue, greenish, or pink. It does not matter whether or not skin tone is light or dark. If your white balance is inappropriate for your shoot, you will find dissatisfying results.  “Untitled” captured by Paweł Kostka (Click image to see more from Kostka.) White Balance PresetsThere are different white balance settings on your digital camera. These are called presets. Presets are designed to adjust your photos to a certain hue. For example, there is a preset called daylight. Daylight is designed to reproduce the color temperature at noon. The light at midday looks very different from the light in the late hours of daylight. If you would like a color temperature consistent with daylight hue then simply change the white balance preset to the daylight setting. If you like your images to look warm then you may select cloudy or shade in your white balance presets. Color TemperatureBefore I go on any further let me delve a little deeper. White balance is connected with color temperature. Color temperature is related to the certain type of hue in your photos. The light at various times of day will give you different hues. Some of these hues are appropriate for particular subjects and not others. That’s why, when you select differences in your white balance presets, your whole photograph looks distinctive to the one before.  “St. Michaels Mount, Cornwall” captured by Leo Pera (Click image to see more from Pera.) Color temperature does not mean Celsius or Fahrenheit. color temperature relates to the color of light. When the light seems to be fairly white you can say it is reminiscent of daylight color temperature. Camera manufacturers created a white balance preset to mimic this daylight temperature. Color temperature simply relates to the color of the light you are shooting in. To simplify this, let’s just say you are photographing a scene at 2:30 in the afternoon. There is a strong breeze that’s pushing the clouds across the sky quite rapidly. As a result, the light changes every few minutes. One minute you are photographing in full sunlight. The next minute you are working in overcast light. The color temperature of these two lighting conditions is very different. So how can you get precise color in different light? The answer is to do a custom white balance. Custom White BalanceCustom white balance is designed for the unique light you are photographing in. This means that even if you have varying light, you can still have very accurate color. Creating custom white balance is done using a color checker reference tool, such as a gray card. A gray card is simply a small card that communicates to the camera where middle gray is. Once the camera knows where middle gray is, it understands where all the other colors are. By photographing in this way, you are telling it to locate all the other colors around this spot. The way to set white balance is to shoot your gray card.  “White Balance” captured by Joe D. Photography Once you photograph the gray card you can then adjust your white balance setting to custom. The camera will then ask you if you want to use that image as a color reference for all the photos from now on. Once you select yes, the magic begins. You will see authentic color in all your photos. Changing your white balance may differ from camera to camera. It’s crucial to check your camera instruction manual to see how to do this. I know where the controls are on the Canon 5D but I am unfamiliar with where they are on a Nikon. I trust that the process is quite alike from manufacturer to manufacturer. Shooting with a gray card is an essential part of your color management workflow. Color management is one of the unsung heroes of photography. It is vital with all the photographing that you do. You will be able to get correct color in your brighter areas, midtones, and shadows. No longer will your whites look off-white or your deep blacks look dark gray. If you set white balance to suit the available light, you will find that white actually appears like a sharp and crisp white. Once you find that your color management has been done properly, achieving accurate, clear, and beautiful color will become as simple as pressing the shutter button. About the Author: Go to full article: How to Get Superb Color in Your Photography |
| Interesting Photo of the Day: This Remote Island is Named After James Bond Himself Posted: 15 Jun 2014 05:21 PM PDT “James Bond Island” isn’t just a figure of speech. There really is an island in Thailand that has been named after 007 himself. Situated in Phang Nga bay and generally overrun with tourists, we have landscape photographer Sebleu to thank for this picturesque view of the top-heavy isle: 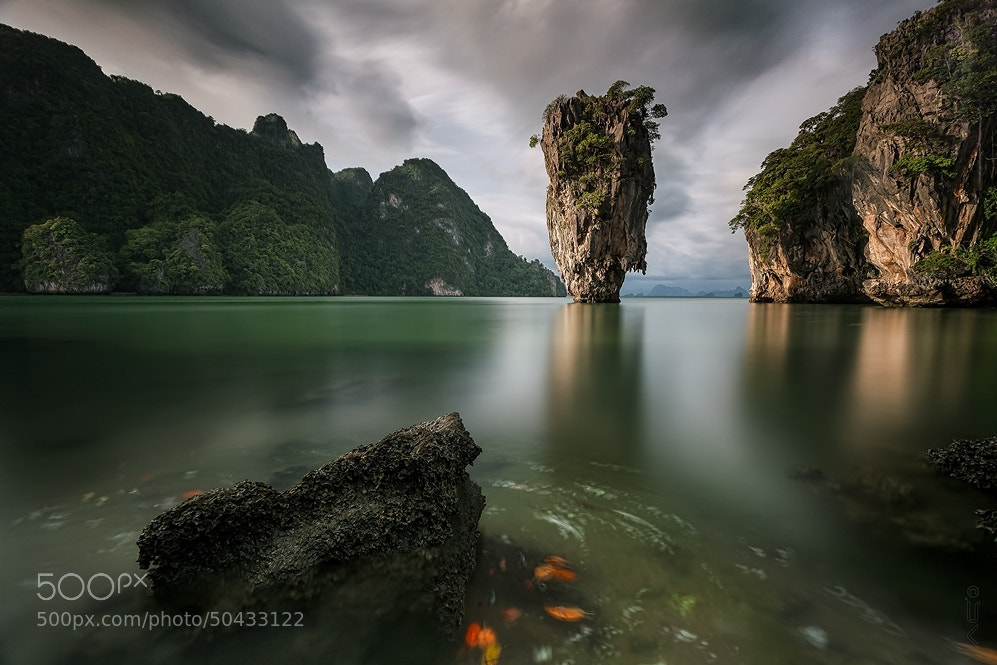 James Bond Island, Thailand as captured by Sebleu (Via 500px. Click to see full size.) More popularly called James Bond Island, Ko Khao Phing Kan, was featured in the 1974 Bond movie called “The Man With the Golden Gun,” which was directed by Guy Hamilton. In the film, the island serves as the remote base for villain Francisco Scaramanga, an infamous assassin played by Christopher Lee who seeks to eliminate Bond. Sebleu created the image at dusk using a Canon EOS 5D Mark II after the usual hoards of tourists and vendors had vacated the beach. The photograph, which Sebleu calls “X Light,” is a 131-second long exposure and was recorded at 17mm and f/10. Go to full article: Interesting Photo of the Day: This Remote Island is Named After James Bond Himself |
| Photographers Describe Their Perfect Day (Video) Posted: 15 Jun 2014 12:28 PM PDT Portrait and wedding photographer Jerry Ghionis once asked a photographer to describe her perfect day. What would it be like? Would she still wake up at 6 in the morning? What would she do? When was the last time she actually experienced her perfect day? You can listen to her answer in this short film: Buried within the somewhat overly sentimental and broad ruminations on love and happiness sits an interesting story about an up-and-coming photographer’s rise to fame. He would wake up at 3 in the morning as a teenager and just wander the streets, looking for things to shoot. Eventually he offered to apprentice for free at a major studio, and after two years they began trusting him with solo wedding shoots, which led to more independent bookings and 7-day work weeks.
At the four-minute mark, Ghionis reveals the real golden nugget of information—a fascinating paradox that every professional photographer struggles with:
Go to full article: Photographers Describe Their Perfect Day (Video) |
| A Rough Guide to Timelapse Photography Posted: 15 Jun 2014 09:55 AM PDT What is Timlapse Photography?Timelapse refers to capturing a series of images at a predetermined frame rate. It’s most commonly used to show scenes that evolve slowly. For example, this method could be used to show the movement of clouds or sunsets at a faster rate than would ever be seen in a natural setting. Sequences are becoming increasingly common in television programs such as news, nature programs, and title sequences.  “Milky Way over Mt Kobau” captured by Preserved Light Photography / Caillum Smith Timelapse allows subtle processes–which are usually impossible for the human eye to notice–to be shown at significantly increased speeds, allowing the viewer to see an event that could potentially take place over days, weeks, months or even years, in a matter of seconds or minutes. For instance, one of the most common uses of timelapse is in nature programs, where flowers are seen opening and plants are shown emerging from the ground at an incredibly fast rate. Even the yearly changing of the seasons can be documented and reproduced in a matter of seconds. How to Create Timelapse FootageThe process of recording footage is simple in theory. Essentially, you find a place to shoot your desired scene, set a recording rate for the camera (i.e. a frame per second/minute/hour), and let the camera run for as long as needed. Getting the technique right can be hard, but as with anything, practice makes perfect. Aside from a camera, there are some other important tools required for time-lapse:
 “Hanoi Hoan Kiem Timelapse” captured by Duong Nguyen In addition to the tools listed above, here are some key considerations:
Which Camera Should I Use?Many types of camera are suitable for time-lapse photography, but modern digital cameras are superb for the job. The ideal camera will be small, robust, and will preferably have the ability to shoot in HD. Action sports cameras, such as the Drift HD and GoPro, are perfect for the task. Designed for shooting in an action packed environment, these cameras are sturdy enough for almost any time-lapse project. Timelapse can be a very long, drawn out process, and often a day’s work will produce only a few seconds of footage. But when this technique is used to full effect, the results can be remarkable. It’s well worth the initial hard work during trial and error phase. As difficult as it is to get right, this style of photography can be an incredibly rewarding art form. About the Author: Go to full article: A Rough Guide to Timelapse Photography |

| You are subscribed to email updates from PictureCorrect Photography Tips To stop receiving these emails, you may unsubscribe now. | Email delivery powered by Google |
| Google Inc., 20 West Kinzie, Chicago IL USA 60610 | |
No comments:
Post a Comment