How to Photograph Fireworks eBook |  |
- How to Photograph Fireworks eBook
- How to Shoot Hand-Held Photos at Low Shutter Speeds (Video)
- 9 Beautiful Photos of the Most Dazzling Eyes
- Daring Photographer Shares How He Captures the Right Moments (Video)
- How to Use a Softbox and Photoshop for Retro-Style Portraits (Video)
| How to Photograph Fireworks eBook Posted: 30 Jun 2014 06:21 PM PDT With 4th of July Independence Day celebrations quickly approaching, we have been receiving requests for more training on how to photograph fireworks. Fireworks photography is indeed one of the most daunting types of photography. This eBook explains the process from start to finish, everything from gear and camera settings to composition and post-processing to achieve great results. The publisher has kindly agreed to give PictureCorrect readers 33% off until the 4th of July ($10 marked down from $15). Deal found here: How to Photograph Fireworks eBook  How to Photograph Fireworks eBook A common result of photographers new to fireworks photography is capturing nothing but bright white spots instead of colorful bursts. But with the guidance of this eBook in hand, you should be fully prepared to photograph brilliant fireworks displays. While the exposure fundamentals of aperture, shutter speed, and ISO are essential to great fireworks, it's important to make sure you have the right accessories and set up for your shots correctly. Some of the Many Topics Covered (50 Pages):
 Pages from How to Photograph Fireworks (Click to See More) Like post processing in general, there are a myriad of ways to approach the post processing of fireworks shots. To start, they describe general tips and explain how they are universally applicable, and then they apply the techniques to example photos, explaining how they change the overall result. How to Get a Discounted Copy This Week:We were able to arrange a 33% discount for our readers until Friday, July 4. It aso carries a guarantee, if you do not find the book useful just let us know to receive a full refund. So there is nothing to lose in trying it. Offer found here: How to Photograph Fireworks eBook Go to full article: How to Photograph Fireworks eBook |
| How to Shoot Hand-Held Photos at Low Shutter Speeds (Video) Posted: 30 Jun 2014 05:18 PM PDT Holding a camera seems like a no-brainer, right? If you’re just grabbing the grip and snapping shots on your DSLR, you might not be getting the best possible shots–especially in low-light conditions. In this back-to-basics video, photographer Karl Taylor explains the correct way to hold your camera in order to take the best photos when using a slow shutter: Tips For Shooting Hand-Held Photos in Low-Light ConditionsAccording to Taylor, you need to support your camera and lens in order to take a steady shot. Ultimately, you need to create a tripod with your body. To do this, Taylor says you need to do the following:
Taylor goes on to demonstrate a few variable positions that still use this basic “tripod” form. If you want to shoot from a seated position, sit cross-legged and place your elbows on your knees with the eyepiece locked against your eyebrow for stability.  Sit cross-legged with your elbows on your knees for seated shooting. Looking for a low-angle shot? Lie on your belly and support your camera with your elbows on the ground.  Rest your elbows on the ground for low-angle shots. If you’re working in very low-light conditions and plan to shoot from a standing position, find an object to help support you and eliminate vibration. Here, Taylor presses his body weight against a tree for support while still maintaining the “tripod” stance.  Lean up against a tree, wall, or pole for extra stability. If you find your images are still a bit blurry and you are unable to increase the shutter speed, find an inanimate object you can use to support your camera. Ideally, you want a flat, immobile surface, but Taylor says you can always soften the surface by placing your hand or fist between your camera and the surface as he shows here with a park bench.  Use your hand or fist to soften the surface of a stable object. How Low Can You Go?One question many people often ask Taylor is “how low can you actually go with your shutter speeds?” He says there is a nice rule of thumb that can be applied to most cameras and lenses.
Taylor says he often uses a wide angle lens to get his shutter down to 1/15 of a second (if not all the way down to 1/8 or 1/4) for street photography. This allows for a little bit of motion blur of people walking or vehicles driving by.  Slower shutter speeds allow for blurred motion in street photography. Another tip Taylor shares sounds like something you would hear in yoga class:
By breathing correctly and utilizing Taylor’s suggested brace positions, you will be able to snap wonderful low-light, hand-held photos. Go to full article: How to Shoot Hand-Held Photos at Low Shutter Speeds (Video) |
| 9 Beautiful Photos of the Most Dazzling Eyes Posted: 30 Jun 2014 04:49 PM PDT The eyes have long been considered the windows to the soul. Photographers often try to focus on a subject’s eyes as a way to add depth and emotion to a photo. So, we decided to look a little closer. Check out those eyes:  photo by JAY SADLER  photo by Gary Vernon  photo by sangeeth sivan 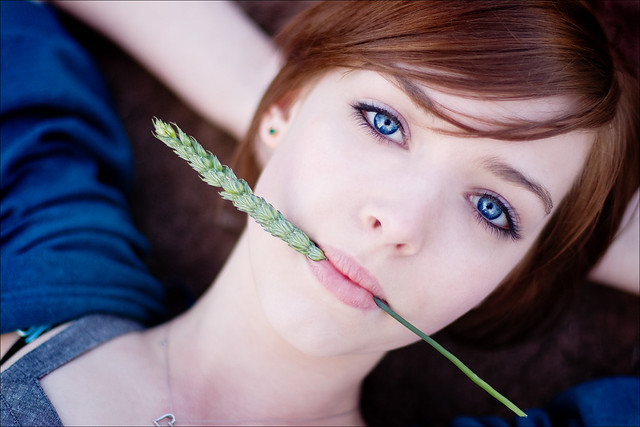 photo by Dan Foy 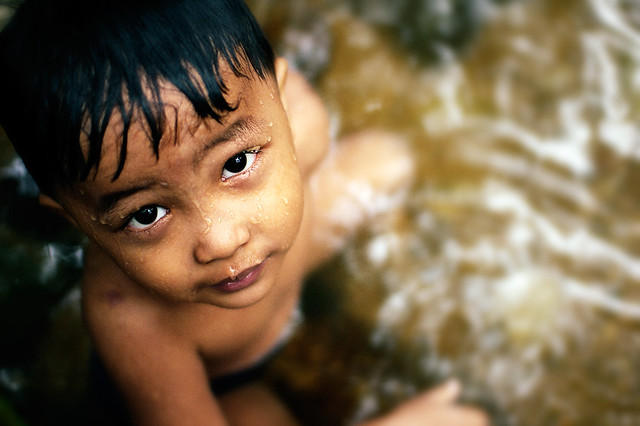 photo by Fadzly Mubin  photo by rudy reid 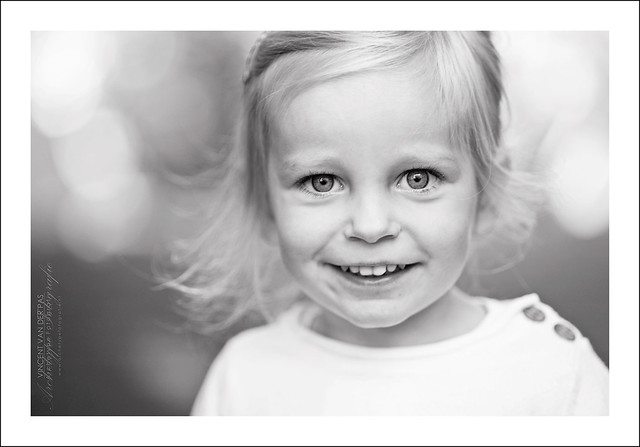 photo by Vincent van der Pas  photo by JAY SADLER 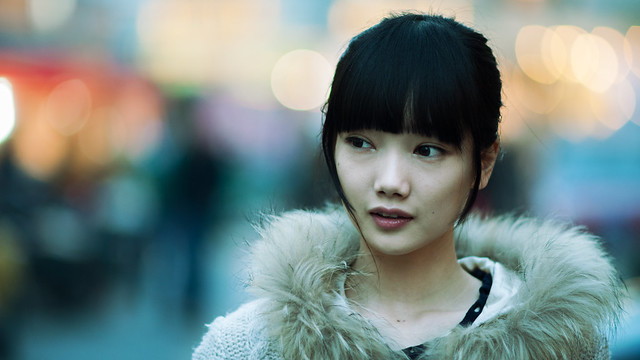 photo by Jonathan Kos-Read Show us some of your interesting portraits in the comments section below, and feel free to read more about out how to enhance eyes in Photoshop.
Go to full article: 9 Beautiful Photos of the Most Dazzling Eyes |
| Daring Photographer Shares How He Captures the Right Moments (Video) Posted: 30 Jun 2014 01:25 PM PDT A photographer can easily set up and compose a picture before it is even shot; however, it is a different talent to capture a photograph in a split second, with no planning beforehand. Carsten Peter, a regular photographer for National Geographic and a World Press Photo Award winner, speaks of his experiences in capturing the right moment in extreme situations: Peter is known for exploring extreme situations such as active volcanoes, lava lakes, acid waterfalls, and deep ice shafts. He braves some of the world's most dangerous natural climates in order to capture never seen before images.
When asked about how he captures the perfect moment, he talks about how sometimes the people around him scream that it is time to move. However, he is stuck in place because there is a certain appreciation for the world we live in that comes from being in its most thrilling corners.
There are certain risks that come with the job. Peter has learned to accept the injuries which can vary from broken bones to diseases. He also has accepted that the traveling portion of his job means missing important people and events in his life.
Go to full article: Daring Photographer Shares How He Captures the Right Moments (Video) |
| How to Use a Softbox and Photoshop for Retro-Style Portraits (Video) Posted: 30 Jun 2014 11:32 AM PDT One of the questions that is most commonly asked when shooting in a small home studio is, “Should I use a softbox or an umbrella?” In this video, photographer Gavin Hoey explains the effects of both and delves deeper into how to use a softbox. He then shows us how to take softbox-lit photos and turn them into stunning retro-style images in Photoshop: Umbrellas vs. SoftboxesSoftboxes and umbrellas both have their uses, it just depends on what kind of lighting you’re going for. With a shoot-through umbrella, you get beautiful soft lighting. A reflective umbrella gives you much more control over the lighting and gives it more direction. A softbox gives you both, if you use it correctly. Hoey shows us how to control light and shadows that come with shooting in a small home studio. First, he sets up the shoot with one softbox, which will give the light direction while still providing a soft glow. He uses the Westcott Apollo Orb Softbox with a Flashpoint Streaklight 360 inside. The bare bulb light provides soft but dramatic lighting. Lighting with One Softbox
 Move the softbox around to see how the angle affects the lighting. For Hoey’s photoshoot, he has a final image in mind of a vintage portrait. The nearly straight angle of the lighting creates kind of a flat image, lacking the drama that a sharp angle provides. He wants something in between so he moves the softbox somewhere in the middle, which gives a nice amount of contrast and a little bit of shadow behind his model. Post-Processing for a Retro LookTaking his RAW file into Photoshop CC, Hoey makes a few small adjustments to give the photo a feeling of age and create a cool vintage style portrait. The photo already has a nice, warm background color, and the model has a retro style, so the post-processing will just add to that feeling.
Because he only used a single, smaller softbox, Hoey also needs to fix the uneven lighting that left the model’s legs darker than her face. To do this, he zooms in on the legs and makes a few adjustments:
 Before/After And there you have it, a beautiful final image with a retro feel. Go to full article: How to Use a Softbox and Photoshop for Retro-Style Portraits (Video) |


| You are subscribed to email updates from PictureCorrect Photography Tips To stop receiving these emails, you may unsubscribe now. | Email delivery powered by Google |
| Google Inc., 20 West Kinzie, Chicago IL USA 60610 | |
Really helpful tips on photographing fireworks, especially the part about camera settings and long exposure.
ReplyDeleteI’ve noticed that even with good shots, post-processing plays a huge role in getting the final result right, especially lighting and color balance.
I’ve been exploring some real estate photo editing techniques here as well: Phephotos
Thanks for sharing this!