Capturing Landscape Photos with Character |  |
- Capturing Landscape Photos with Character
- Action Sequence Photograph for the Golf Digest Cover: Behind the Scenes (Video)
- Interesting Photo of the Day: Incredible Microscopic Image of a Moth’s Wing
- Not All Wear Capes: Stylized Portrait Series Celebrates the Heroism of First Responders (Video)
- 3 Quick Ways to Rate And Cull Images in Adobe Lightroom (Video)
| Capturing Landscape Photos with Character Posted: 26 Apr 2014 08:25 PM PDT Related reminder: Launch sale ending soon on the new Landscape Post-Processing eBook Landscape photography is a most rewarding pastime, but it can be far more challenging than some people imagine. It sounds so easy; visit a beautiful location, shoot a few snapshots, and come home with a work of art in your camera. After dealing with the public for over 20 years, I swear most people think it really is that simple. 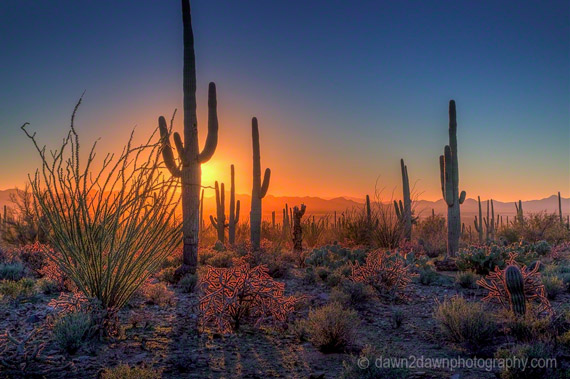 “Saguaro_1679″ captured by Michael Just (Click Image to See More From Michael Just) 4 Tips for Capturing the Character of a LandscapeBut really good landscape photography is much more challenging. Anyone can recognize the potential of a good subject, but turning that potential into a memorable image is another story. The task is even greater if it is a popular location. When you photograph a place that is photographed a thousand times a day, you have to find a way to create something different from the everyday snapshot. 1. You Don’t Have to Fit Everything In Some panoramic views are so huge that the only way to fit everything into your photo is to use a very wide-angle lens. The trouble is, this reduces everything in size, so that the grandeur of your subject is diminished. It can be more effective to concentrate your composition around one feature of the landscape; a feature other people will recognize. With this approach, you can use a larger lens to add size and prominence to the the subject. You may also capture details that could be lost with a wide-angle lens. 2. Look For a New Angle Why is it that so many photos of the great landmarks look the same? Simply because everybody photographs them from the same lookouts. It is easy to get a good shot from a major lookout; in fact, that is probably why the lookout was built in the first place. The trouble is, it is almost impossible to get a unique shot if your photo is taken from the same angle as all the others. If possible, search beyond the established lookouts to see if there is a more interesting angle to take your photo. This may take a little more effort, and you may have to do some bushwalking to find the best spot. I don’t suggest risking your neck or trespassing, but in most cases there are alternatives to the established lookouts. 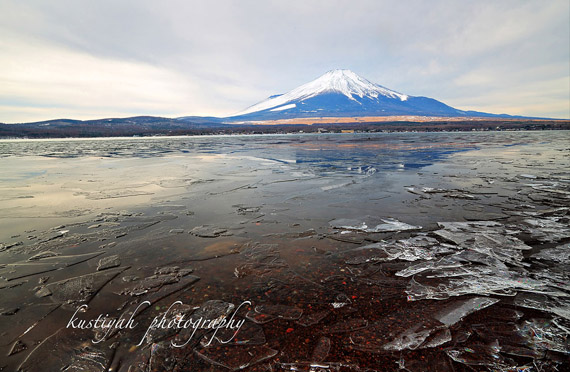 “Ice-over-Yamanaka-Lake” captured by Kustiyah (Click Image to See More From Kustiyah) 3. Use The Surroundings to Your Advantage Anyone can take a snaphsot of a mountain range. But what about a mountain range framed through the branches of a tree in the foreground or with a river winding away into the distance, drawing with it the eye of the viewer? Every landscape can be photographed from a number of angles; the most obvious one is not always the best. By scouting around and looking for interesting foregrounds, you can add real character to your image and create something truly unique. Always try to remember that you are not the first person to photograph this subject. To produce a memorable photo, you need to put in some effort to create something a little different. 4. Consider the Conditions Capturing your subject in the best light can be a real balancing act. First you need to consider the time of day. Usually the ideal light is early in the morning and late in the afternoon, when the light is softer and more colourful. The trouble is, any photographer with experience already knows that. So how do you take your photo to the next level? 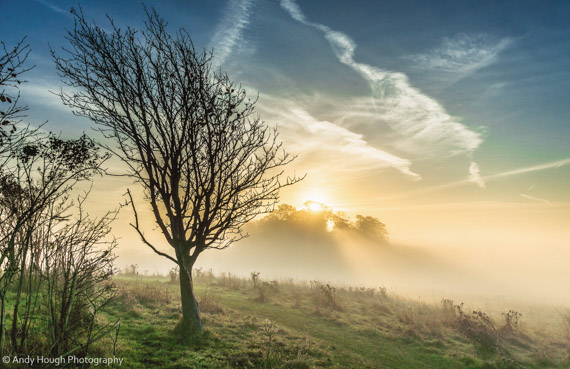 “Wonderland” captured by Andy Hough (Click Image to See More From Andy Hough) Keep a constant eye on the weather. You may be able to see something special, like a storm front, a good cloud formation, or even a good chance of a rainbow starting to develop. If you choose your moment just right, you can be on location in time for something really special. This is a measure of the commitment of a landscape photographer. The more effort you put in, the greater the rewards. You will spend a lot of time waiting for the right moment, but once you get that perfect image, you will see it was not time wasted. You will know you have done a good job when people start to say, “I have been there, but my photos are nowhere near as good as yours!” About the Author: Related Deal Ending Soon:Digital image capture and post-processing has totally transformed the art of landscape photography. The days of being restricted to the results made in-camera are long gone – we are now presented with a seemingly boundless array of processing options. The goal of this in-depth new eBook is to demystify the digital landscape photography workflow. It is currently 33% off for the launch sale which ends soon. Deal found here: Landscape Photography Post-Processing eBook Go to full article: Capturing Landscape Photos with Character |
| Action Sequence Photograph for the Golf Digest Cover: Behind the Scenes (Video) Posted: 26 Apr 2014 05:23 PM PDT Multiple exposures are a great way to capture motion and action, and few know this better than sports and commercial photographer Dylan Coulter. With his trademark multiple exposure technique, he has captured star athletes from every sport—most recently for the Sochi Winter Olympics, and the cover of the January issue of Golf Digest magazine. Shooting Hunter Mahan, Coulter uses multiple exposures to capture the golfer’s championship-winning swing: Having begun his career as an art director, Coulter decided to make the transition to photography while working for Adidas. “I started to formulate opinions on how sports could be photographed differently. . . Beautiful lighting, minimal sets, shorter lens,” he said in a 2010 interview.  Hunter Mahan takes a swing during the shoot. The setup for the cover shoot is simple, but precise. Using only a white backdrop, but meticulously perfect lighting, Coulter shows how he has put his vision for sports photography to work. 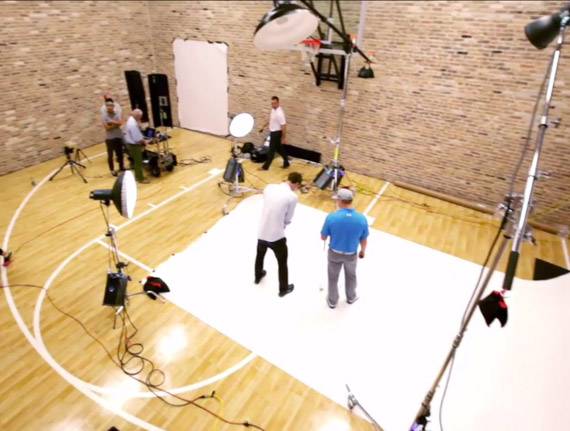 A view of the set.  Golf Digest cover photo featuring multiple exposures. The resulting image is visually arresting and filled with movement. Go to full article: Action Sequence Photograph for the Golf Digest Cover: Behind the Scenes (Video) |
| Interesting Photo of the Day: Incredible Microscopic Image of a Moth’s Wing Posted: 26 Apr 2014 03:06 PM PDT As a biochemist by trade, Linden Gledhill has learned to appreciate the beauty of even the smallest of things. So when he isn’t developing biopharmaceuticals to treat diseases like cancer and diabetes, Gledhill combines his skills with a microscope and his love for photography to create incredible macro images that showcase nature’s intricate beauty. In a recent study of the wing structure and colorful adornment of butterflies and moths, Gledhill created a stunning series of images that includes this photograph of a sunset moth’s wing:  Gledhill’s macro image of a sunset moth’s wing. (Via Imgur. Click to see larger size.) The sunset moth, technically known as Urania ripheus, is a day flying moth native to Madagascar. Its wings are iridescent, which means that their colors change to the eye depending on the direction of light. Like butterfly wings, moth wings are made up of microscopic scales that, when disturbed, flake off of the wing like “pixie dust.” Gledhill photographs the wings with an Automated Gigapixel Olympus BHM meteorology microscope and a NeoSPlan tube lens within a BH2-UMA vertical illuminator. To boost the vibrancy and iridescence of the scales, he also utilizes the microscope’s epi lighting and several LED lamps, in addition to an NFK 2.5x eye piece (see the setup here).
Go to full article: Interesting Photo of the Day: Incredible Microscopic Image of a Moth’s Wing |
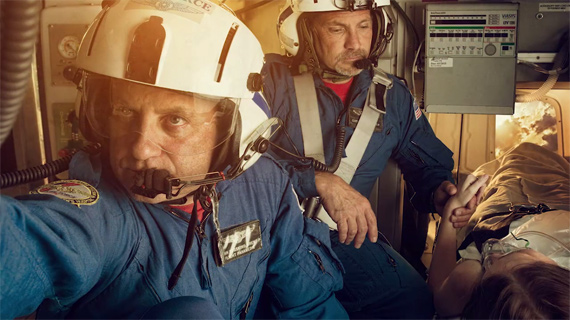
| Not All Wear Capes: Stylized Portrait Series Celebrates the Heroism of First Responders (Video) Posted: 26 Apr 2014 01:09 PM PDT Begin a personal photography project, they said. It’ll be rewarding, they said. Well, for Brandon Cawood, the photographer behind the “Not All Wear Capes” series, a collection of stylized composite portraits of first responders in Dalton, Georgia, it actually was. In the following video, Cawood explains his inspiration, concept, and goals for the “Not All Wear Capes” project and discusses several of the struggles he had to overcome throughout the six months he spent shooting, in addition to showcasing his stunning series of photographs: Cawood is a relative newcomer to the craft, having only started shooting professionally three years ago under the name of Flashlight Productions, but the quality of his technique looks more like a seasoned veteran than a newb. “Not All Wear Capes” was an idea wrought from a photography workshop course that Cawood attended; the instructor suggested that everyone commit to a personal project on a topic of their choice. Cawood ended up deciding to undertake a project on first responders: fire fighters, police officers, EMTs, and the like.
Despite the initial “bumpiness” at the beginning of the project when Cawood lacked images to entice local departments to participate, he was eventually able to create this image of the firefighter, after which Dalton’s firefighters and police officers, Cattanooga’s SWAT team, and Georgia state troopers all began contacting him and asking to be involved:  After making this image, it was not difficult for Cawood to find participants for his project. To create that stylized look, Cawood created the images as composites, which means that he combined multiple separately-captured images together into just one—like the firefighter photo, which was created with just under 40 different photos. Cawood hasn’t gone into detail about his specific workflow, but he does include a timelapse sequence in his video from 1:00 to 1:10 depicting those 40 different images coming together, probably in the order that they were captured, to create the final striking composite.
 Cawood often had to shoot while first responders were on duty. 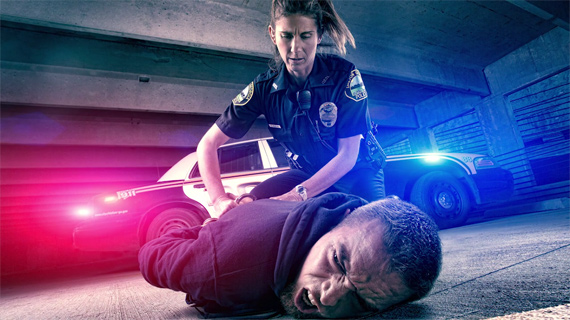 Cawood created several photographs of police officers in his 12-image series.  Many of Cawood’s portraits have a “video game” or “movie poster” feel. As if the cause of dignifying unsung daily heroes wasn’t noble enough, Cawood decided to contribute the $6,000 proceeds from his gallery exhibition to the Creative Arts Guild in Dalton, Georgia as scholarship money for children who aren’t able to afford art classes.
And so, it seems that Cawood is something of an unsung hero himself. Go to full article: Not All Wear Capes: Stylized Portrait Series Celebrates the Heroism of First Responders (Video) |
| 3 Quick Ways to Rate And Cull Images in Adobe Lightroom (Video) Posted: 26 Apr 2014 12:40 PM PDT One of the benefits of using digital cameras is the convenience of being able to take a lot photos at the fraction of the cost of film. The downside of that comes when you upload all the images to your computer and have to sort through them. The task can be overwhelming when you are faced with choosing and sorting hundreds—perhaps even thousands—of images. However, Lightroom users can rejoice; the following video clip from the SLR Lounge course details a few different ways to help you quickly sort and organize your images: Three Methods for Rating Images in LightroomRegardless of your skill level, all of your photos won’t be keepers. Some will inevitably need to be culled, while others will earn high marks. Having a solid workflow in Lightroom will ease the pain. Following one of the processes listed below will help ease the pain and un-complicate the process:
 There are multiple ways to cull images in Lightroom. Which Rating System Is Best?Long answer short: the best one way to rate and cull your images is the one you find most relevant to your needs. Logically thinking, the quickest way to sort photos is most likely just scrolling through them quickly and either picking them or rejecting them. That being said, there are benefits to star ratings. One being that it is more hierarchical which makes it easy to pick the best images right off the bat. As far as color flagging goes, it is useful in situations where there are many photos, some which are good to go and some which need some kind of editing. As explained in the video, colors are a good way to mark photos when multiple people will be working with them. In the narrator’s studio, marking a photo with red means it needs to be revised. So when the photographer has finished sorting and labeling, his images are sent on to the editing team who can quickly go through and see which photos need to be revised. To that end, evaluate your needs and chose a workflow that works best for you. Most casual shooters will find the “pick or reject” method the easiest and most suitable, but each photographer’s needs will vary. Go to full article: 3 Quick Ways to Rate And Cull Images in Adobe Lightroom (Video) |
| You are subscribed to email updates from PictureCorrect Photography Tips To stop receiving these emails, you may unsubscribe now. | Email delivery powered by Google |
| Google Inc., 20 West Kinzie, Chicago IL USA 60610 | |
No comments:
Post a Comment