5 Strategies for Shooting Your Best In-Studio Portraits Yet |  |
- 5 Strategies for Shooting Your Best In-Studio Portraits Yet
- How to Edit Photos on the Go With Adobe Lightroom Mobile (Video)
- Interesting Photo of the Day: Mysterious Hallway of Poplar Trees
- Light Painting Meets Digital Art in Beautiful Collaboration (Video)
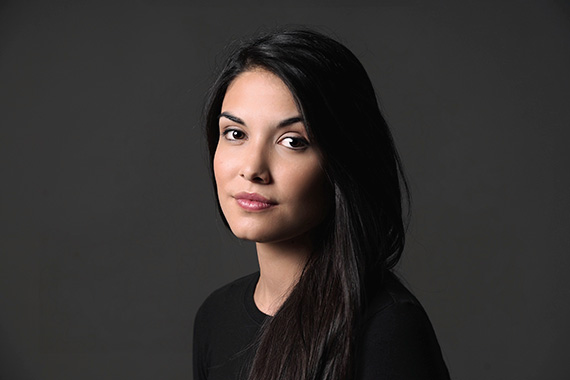
| 5 Strategies for Shooting Your Best In-Studio Portraits Yet Posted: 25 Apr 2014 06:26 PM PDT Are your studio portraits not turning out the way you’d like? Learn how to capture the superior shots that will set your work apart with expert advice from pro Kirk Tuck, who has photographed President Bill Clinton and Academy Award winner Renée Zellweger. Plus, access even more essential techniques when you enroll in his online Craftsy class Studio Portrait Lighting for 50% off — a deal we setup for PictureCorrect readers!
1. Set the right shutter speed for your camera.If you’re going to be hand holding a camera, make sure to select a shutter speed that won’t introduce any camera shake. When in doubt, use the old rule of thumb: never use a shutter speed that is slower than the focal length of your lens. For example, if you are using a 50mm lens, don’t go lower than 1/60. When using flash you can decide whether or not you want the ambient light to have a strong effect. If you want your finished image to contain both flash and ambient light, set your shutter speed slower than the synchronization speed (generally 1/250), and “drag” the shutter. The slower shutter speed allows the flash and ambient lighting to mix. If you only want the flash to show, aim for a shutter speed closer to the synchronization speed of your flash.
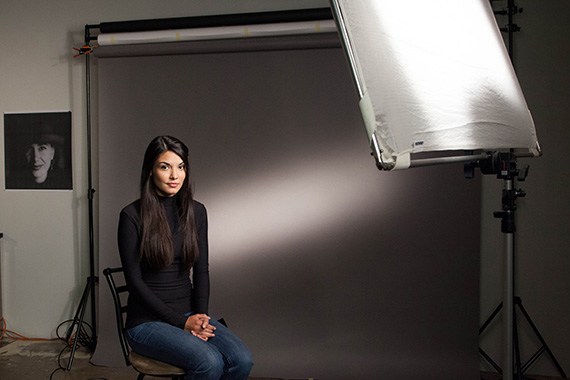
2. Select the best aperture and ISO for portraits.To begin, “zero out” your camera and set all the controls from scratch. If you’re shooting anything longer than 85mm and you’re not trying for the slimmest depth of field, try f/5.6. Lenses are sharpest there (or at f/8), and you should be able to get sharp focus from the subject’s nose back to their ears. When shooting commercial portraits, it's best to use strobe lighting so that you can use your full film speed range (ISO). Set your ISO as low as you can to maximize your image quality and reduce noise. 3. Use this go-to lighting setup for full-length portraits.Use large light modifiers or softboxes set back from your subject for good, even lighting coverage. Try a 4×6 foot softbox for an even distribution in the front with a secondary light source behind your subject to define edges and give a few highlights.
4. Get the most out of umbrellas.Umbrellas that have silver linings tend to reflect a more heavily contrasting light than white umbrellas. The advantage of silver umbrellas is that they are more efficient, so you get more light out of them at the same power setting. Nowadays we don’t worry much about a lack of power, and you should think about keeping your light source soft and flattering. If you can only buy one version, go with the white. Need more contrast? Move the umbrella further away from your subject. 5. Practice with these clever ideas—because practice makes perfect.There are a few ways you can easily get in some practice! Most cameras have a self-timer mode that you can use to act as your own model so that you can shoot and experiment to your heart’s desire. The benefit is that you are available all the time, and you probably take direction from yourself pretty well. Stick a light stand in the shot where you intend to stand, put your camera on manual focus to lock in focus on the light stand and then trigger the self-timer and walk over to where the light stand is. Then, move the light stand and get a nice test shot. Once you have the focus determined, you can put a spot on the floor and get repeatable focus.
Another cheap and easy idea is to get a used mannequin as a model; you can dress it up any way you want. 6. BONUS! Overcome clothing conflicts.When a client is wearing clothing that conflicts with the background and she doesn’t have a change of clothes, one solution is to switch to a different color or style of background.  Background color change to complement the model’s clothing Ultimately, it’s important to consult with clients prior to their appointments and really discuss what to wear and why. If you let them know which colors are slimming and flattering and which aren’t, you can help prevent a less than happy session. Ask clients to wear subdued, solid colors: for example, a long-sleeved, gray knit shirt with a crew neck or a collar. This will allow the viewer to focus on their face (the important part!) instead of their clothing and will also help to keep portraits from becoming dated quickly. Now that you have a few tricks under your belt, take the next step toward portrait success. Sign up for Kirk Tuck’s online Craftsy class Studio Portrait Lighting for half off today and save $30. Watch your class anytime, anywhere, forever as Kirk reveals how to master equipment, setup, and lighting methods that will help you get the perfect shot—from fun senior photos to professional business profiles—every time. Kirk will even critique your photos and answer any questions you have as you go. What are some of your favorite tricks for shooting incredible in-studio portraits? This has been a sponsored post kindly brought to us by Craftsy. Go to full article: 5 Strategies for Shooting Your Best In-Studio Portraits Yet |
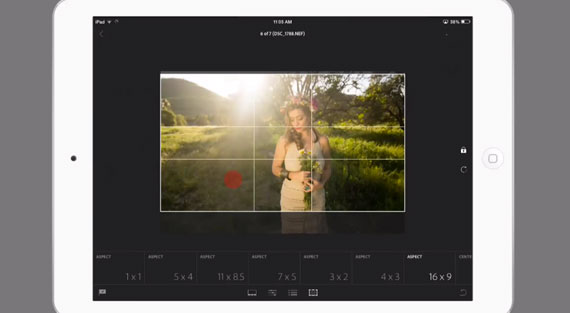
| How to Edit Photos on the Go With Adobe Lightroom Mobile (Video) Posted: 25 Apr 2014 04:03 PM PDT Adobe has had some trouble breaching the mobile market. With apps like Snapseed and Pixlr dominating the marketplace for free, the complexity of Photoshop hasn’t quite transitioned naturally. They’re hoping to change that with their mobile version of Lightroom, called Lightroom Mobile, available only on iPads (for now): Key Takeaways for the Lightroom AppControls seem pretty natural—swipe down to get rid of a photo, swipe up to keep it; left and right scroll through the selections. To glance at a reverted image after making some edits, press three fingers down. The auto-tone is more sophisticated than most. Some shots may look a little overexposed, but you can see the contrast, brightness and temperature adjustments it makes automatically, and adjust it further. Fiddling with the white balance seems to help. The array of Instagram-esque filters, like faux-cross-processing, black-and-white and the ever-vague “vintage”, are not bad if you adjust your temperature and brightness beforehand.
Overall, the amount of editing seems limited, but Lightroom was always meant to be a pared-down version of Photoshop for batch-editing photos quickly. All things considered, it’s a solid contender for any photographers using their iPads for editing on the go. Go to full article: How to Edit Photos on the Go With Adobe Lightroom Mobile (Video) |
| Interesting Photo of the Day: Mysterious Hallway of Poplar Trees Posted: 25 Apr 2014 02:17 PM PDT It’s rare to see the forest through the trees; it’s rarer still to see the end of said forest something like a mile away. But that’s what Las Vegas-based photographer David Thompson saw a few weeks ago near Boardman, Oregon, when he snapped this gorgeously colored shot of a thick grove of poplar trees:  The light at the end of the tunnel adds great perspective to the shot. (Via 500px. Click for larger image.) Thompson was shooting with a Nikon D800E, which adds great detail and really helps to bring out the colors—though a bit of Photoshop likely helped, too. This is a great example of texture, color, and perspective all coming together to create a richly beautiful shot with an infinite number of stories behind it. Go to full article: Interesting Photo of the Day: Mysterious Hallway of Poplar Trees |
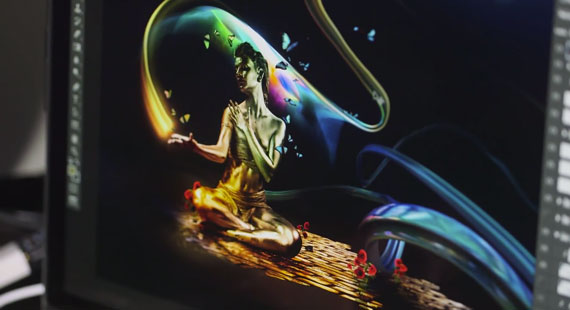
| Light Painting Meets Digital Art in Beautiful Collaboration (Video) Posted: 25 Apr 2014 10:35 AM PDT In a marriage that seemed destined to happen, stock photo suppliers Fotolia brought together light painter Eric Paré and CGI artist Mike Campau, each renowned for intensely hyper-colorized dreamscapes, to create a single shining digital image from their minds. And though the final product is a kaleidoscopic achievement, the process is seriously technical. A must watch for anyone interested in a real behind-the-scenes glance at modern creativity: Step One: Light PaintingParé is a French-Canadian light painter whose work we’ve loved in the past, and whose name has become synonymous with the craft today. He explains his studio in great detail: three cameras—all manually focused, set to f/9 and an ISO of 800—are triggered by remotes to capture what he can’t see while he moves around in the dark. He uses a powerful flashlight of 300 lumens, funnelled by metallic paper. It’s all about experimentation. Sometimes the light strobes, other times it’s continuous. The idea is to achieve a striking image in-action, and to use as little post-production as possible.
Step Two: Shooting the BackgroundThe duo next trek up Montreal’s Mount Royal (at night, in unfortunately -17 Celsius / 1 Fahrenheit weather) to shoot the background image.
Their idea still isn’t solidified, so they need a good variety of options. Paré shoots wide-angle backgrounds of trees, while Campau takes pictures with monstrous megapixel counts to crop out interesting details. Step 3 – Digital ImagingLastly, it’s Campau’s turn. He opens the initial image in Photoshop and uses the path tool to generally outline the model, then use channels to isolate hairs and create a perfect mask.
His big tip for keeping shadows realistic: use Photoshop’s eyedropper tool to capture the color of a light, then gently brush the color onto your image as if that light were radiating onto it. To create the 3D object, Campau uses Luxology Modo to create a mimicked version of Paré’s light image.
The final result is a strikingly original piece of artwork. To see it without knowing its story, you might shrug and say it looks cool. But after knowing how much effort goes into perfecting those details, it makes the final product all the more impressive.  An unfinished version of the photo, combining the original light-painted image with a floor and background of Montreal.  Close to the final product, after Mike Campau added his digital artwork.
Go to full article: Light Painting Meets Digital Art in Beautiful Collaboration (Video) |


| You are subscribed to email updates from PictureCorrect Photography Tips To stop receiving these emails, you may unsubscribe now. | Email delivery powered by Google |
| Google Inc., 20 West Kinzie, Chicago IL USA 60610 | |
No comments:
Post a Comment