Tack-Sharp Photos by Enhancing True Image Detail: Topaz Detail at 50% Off |  |
- Tack-Sharp Photos by Enhancing True Image Detail: Topaz Detail at 50% Off
- Essential Gear for Wedding Photography (Video)
- Interesting Photo of the Day: Mysterious Bright Light Photographed on Mars
- Panning Photography: How to Blur the Background without Blurring the Subject (Video)
- A Simple Way to Improve Architectural Photography (Video)
| Tack-Sharp Photos by Enhancing True Image Detail: Topaz Detail at 50% Off Posted: 14 Apr 2014 05:19 PM PDT Topaz Detail is designed to create tack-sharp and highly detailed photos by enhancing natural sharpness and taking full control over image detail. Detail breaks down an image into three levels of internal detail separation and three levels of tone separation and allows you to selectively enhance or remove detail throughout your image without the side effects of halos or artifacts. They are offering it at half off until the end of the month, simply remember to use the voucher code APRDETAIL at checkout. Deal found here: Topaz Detail at 50% Off  Topaz Detail for Tack Sharp Photos (Click to See How it Works) Apply crisp and clean image sharpening without fear of “oversharpening”. A major issue with all other sharpening techniques is that they create sharpening artifacts known as “overshooting” or “halos”. Topaz Detail uses the most recent advances in micro-contrast imaging technology to almost eliminate these sharpening artifacts, allowing for highly effective and natural sharpening. Key Features of Topaz Detail 3:
It allows you to find the right balance of detail in your images by giving you a unique command over small, medium, and large image details in 3 separate tonal regions: Overall, Shadow and Highlight. Adding even more control over image detail are the multiple tools that allow for selective addition or removal of detail exactly where it’s needed. With the edge-aware masking brush, transparency options and the ability to stack effects using the Apply button, adding precise and intricate detail is easier than ever. 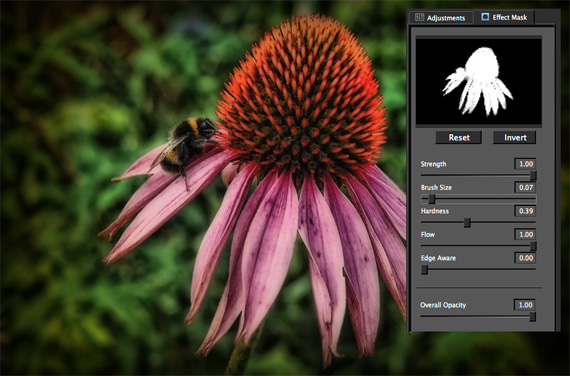 Edge-aware masking for precise selections (Click to Learn More) With efficient, powerful, and intuitive adjustments, Topaz Detail is ideal for photographers looking for ultimate control over image detail and the most advanced and comprehensive sharpening technology on the market. How to Get a Discounted Copy:The tool is very easy to install and then appears under your filters menu in Photoshop or other programs. Currently 50% off until the end of the month, simply remember to use the voucher code APRDETAIL at checkout. Deal found here: Topaz Detail at 50% Off Go to full article: Tack-Sharp Photos by Enhancing True Image Detail: Topaz Detail at 50% Off |
| Essential Gear for Wedding Photography (Video) Posted: 14 Apr 2014 02:18 PM PDT Photographing weddings can be a huge task. You need to capture all the special moments between the bride and groom, and their friends and families–and you only have one chance to get it right. To lessen your stress level, professional wedding photographer Moshe Zusman provides a rundown of the necessary equipment you should have in your camera bag so you can capture the best shots on the big day: Moshe Zusman’s Wedding Gear Bag Essentials
Recommended Lenses for Wedding PhotographyTo ensure he has the proper equipment for any situation, Zusman carries five different lenses to shoot weddings. Canon EF 24-70mm f/2.8L II This versatile lens captures everything from wide shots to close-up portraits, making it a good choice to keep on the camera when photographing the couple and the bridal party.
Canon EF 70-200mm f/2.8L IS II This longer lens is the one to choose when you need to capture the couple’s special moments at the alter, but need to stay at the back of the venue. The extensive zoom allows you to capture great portraits from a distance, so you don’t have to worry about invading the couple’s privacy when you snap a shot of them kissing.
Canon EF 14mm f/2.8L II This super wide-angle lens is an excellent choice for photographing crowds, and Zusman suggests using it during the reception. A wide-angle lens is great for capturing the entire set up of the reception room, even if you’re in close quarters.
Canon EF 50mm f/1.2L You knew the ol’ “nifty 50″ would make an appearance in this list, right? Perfect for capturing portraits, this lens allows you to shoot with a shallow depth of field to create an image that really focuses on the subject.
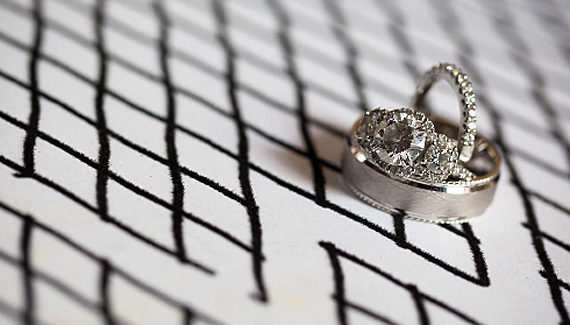
Canon EF 100mm f/2.8L This macro lens is exactly what you need to capture all the little things that make each wedding unique. From the topper on the cake to the sparkle of the wedding ring, the 100mm allows you to take crystal-clear photos of the smallest details.
Zusman’s Tips for a Successful Wedding Photo SessionUsing the right lens for the situation is half the battle, but there’s more to creating the ideal image than simply snapping the picture. Zusman shared a few tips to help you capture the memories the couple will want to remember forever.
The wedding day can be a lot of fun, but it can also be stressful for the bride and groom. As a photographer, you have the ability to help them relax, have fun, and capture those happy moments. Go to full article: Essential Gear for Wedding Photography (Video) |
| Interesting Photo of the Day: Mysterious Bright Light Photographed on Mars Posted: 14 Apr 2014 12:52 PM PDT Long have we speculated about life on other planets, and on Mars in particular. Could there really be other intelligent beings somewhere out there amongst the stars? We might never know for certain, but images like this photo captured by NASA’s Curiosity Rover—as it explored the Red Planet on April 3—will likely forever keep us wondering: 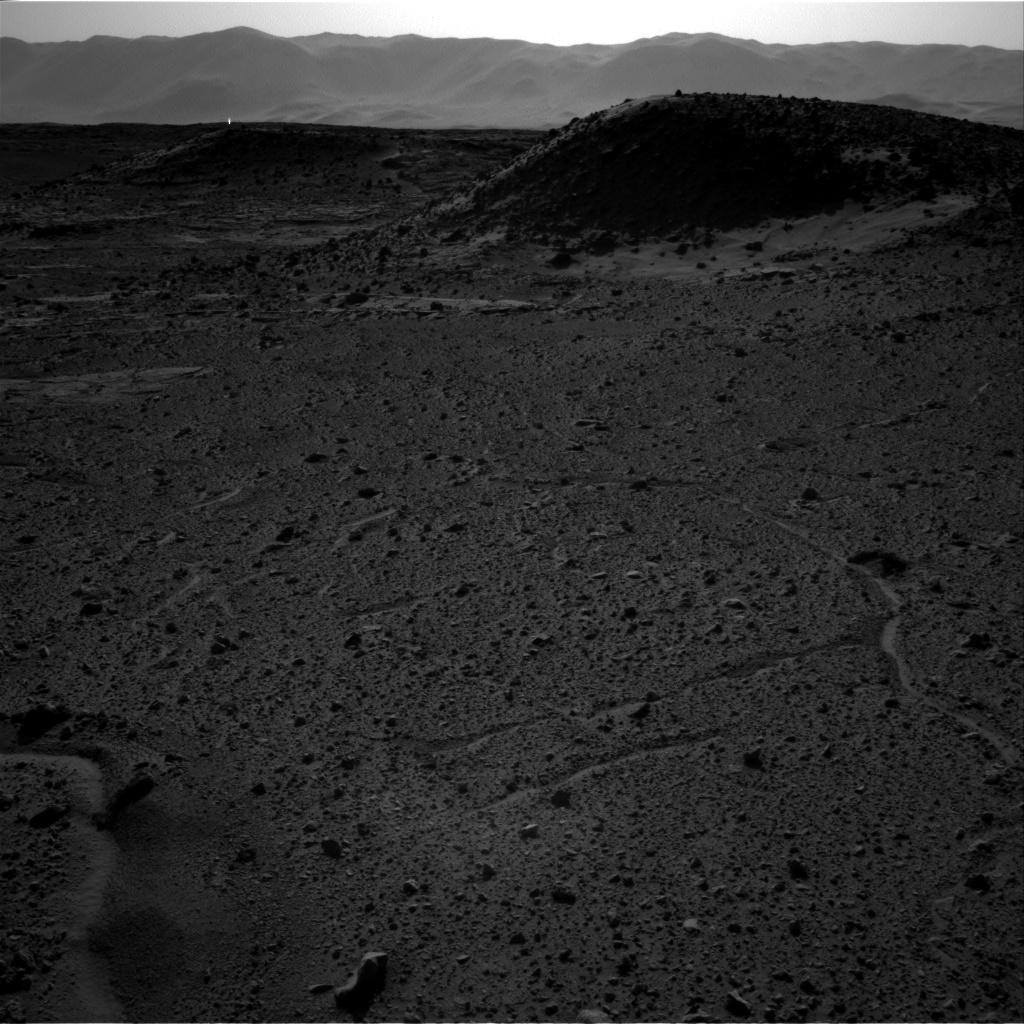 Strange bright light captured by Mars Curiosity rover’s right-eye camera. (Via NASA. Click for larger image.) NASA is actually very accustomed to seeing “bright spots”—like the one in the upper left of the photo—in Curiosity's images and reports seeing them nearly every week. Unfortunately, (or fortunately, since it means no Independence Day or War of the Worlds) the real explanation for the bright spot has nothing to do with aliens. Scientists attribute them to sunlight reflecting on distant rocks or cosmic rays hitting Curiosity’s CCD light detector. (Via PetaPixel) Justin Maki, a team leader and camera operator at NASA’s Jet Propulsion Laboratory in California does admit, however, that the bright spot in the above photograph presents a unique situation. The Curiosity rover, which has been tasked with exploring Mars and aiding scientists in a study about habitable past conditions and environmental changes at various waypoints, is equipped with two navigation cameras (NavCams), the “right-eye” and the “left-eye.” These two cameras work together to capture images of the same subject or setting roughly one second apart, but from two slightly different perspectives.
Here is the photograph from the left-eye camera, where the bright spot is notably missing: 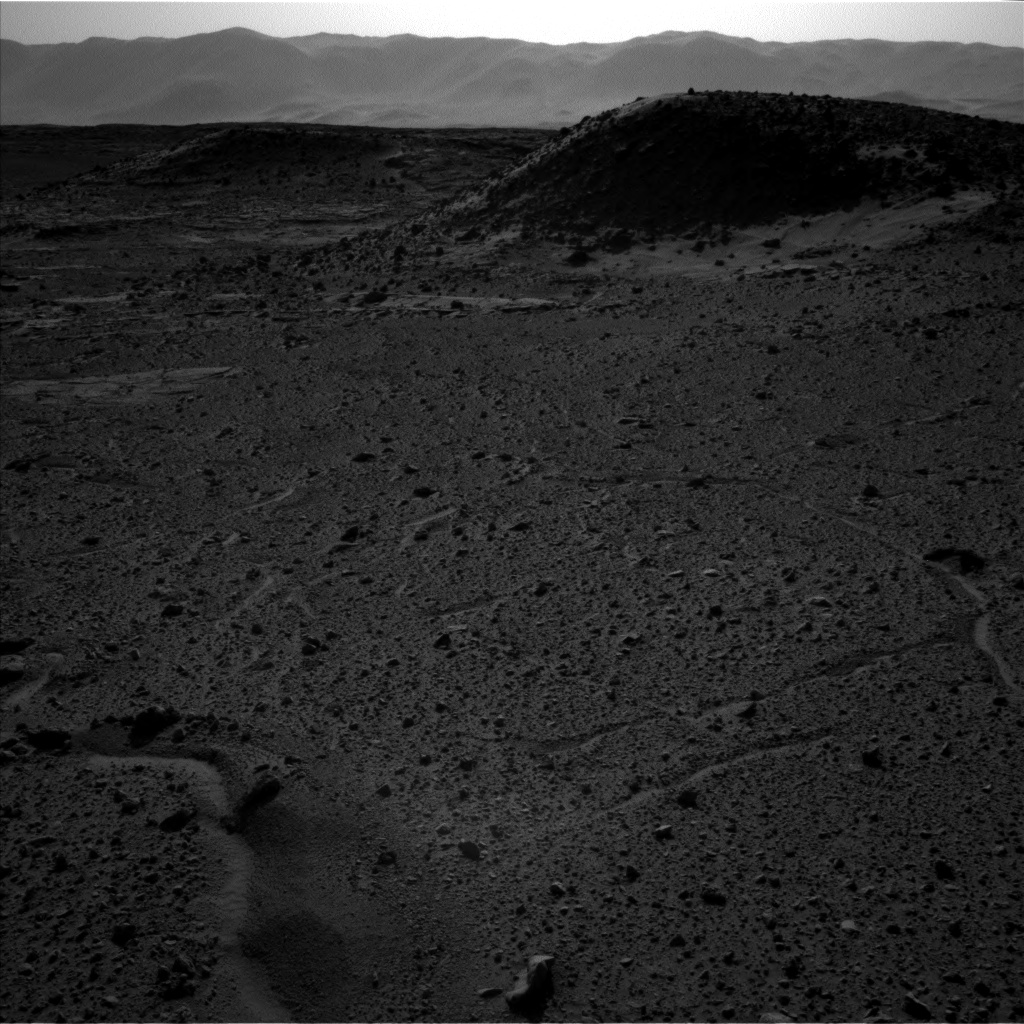 This image was captured with Curiosity’s left-eye camera one second after the right-eye image. (Via NASA. Click for larger image.) Was the bright spot a sudden flash of light that might prove the existence of aliens on Mars if the source location could be pinpointed? Probably not, NASA scientists say. Images taken at around the same time of day from a different location on April 2 yielded similar results (view them here and here), and the afternoon sun is directly behind the rover in all four images, so that “sunlight glinting off of rocks” theory seems pretty sweet. Besides, an intelligent life form wouldn’t emit telling flashes of light in full view of a human space rover, would it? That is, not unless it wanted to be found… Go to full article: Interesting Photo of the Day: Mysterious Bright Light Photographed on Mars |
| Panning Photography: How to Blur the Background without Blurring the Subject (Video) Posted: 14 Apr 2014 12:30 PM PDT The best motion photographs pulse with energy. Action photographers accomplish this using many different techniques. One technique employs lightning fast shutter speeds to freeze motion so that every feather of a bird’s wings is perfectly sharp as the bird twists in flight, or so that every droplet of water sprayed by a swimmer is crisp and visible to the viewer. Sometimes, however, it’s better for photographers to “pan” with subjects to communicate movement and speed by creating intentional background blurriness, as with images of cyclists. In the following video, Maggie Hudson of Photography Hacker breaks down the technicalities of the panning technique, demonstrating both proper and improper form and giving insight into other related factors such as shutter speed: When panning, it’s important not only to use a relatively slow shutter speed, but also to employ the proper movement technique so as to control where blurring happens. To show readers how not to pan, Hudson first uses the wrong method in her video—that is, she physically moves her body—camera and all—to track with the subject. Here’s how her photograph turns out:  Physically moving with the subject results in excess blurring.
How to Keep a Moving Subject Sharp by PanningNext, Hudson models proper panning form. To achieve a sharp subject, you must twist your upper body smoothly to follow the subject. While panning, focus on whatever aspect of the photograph should be clearest, such as the subject’s face. Keep panning to follow the subject as you release the shutter. By keeping her body as still as possible and tracking the subject in the viewfinder, Hudson is able to capture this shot: 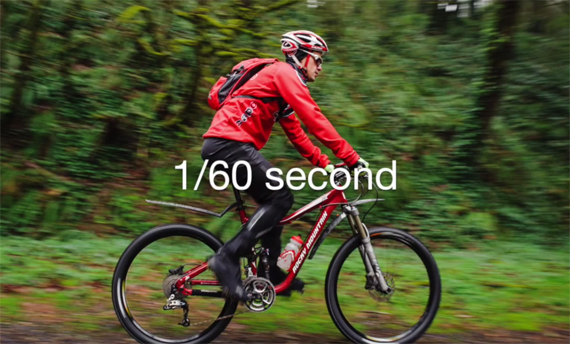 Moving only the camera with the subject creates background motion blur, but a sharp subject. Shutter SpeedA final issue to consider is shutter speed. For successful panning in her natural, diffused light situation, Hudson uses slower shutter speeds between 1/40 to 1/60 to allow for substantial motion blur in the background. Although the actual numbers will vary from situation to situation based on light availability, the principle remains: panning requires setting one’s shutter speed much slower than what it would take to freeze the action with total clarity. It may take some practice to learn how to track with the subject while keeping your body otherwise motionless, but once you master it, the panning technique can add a lot of depth to your images and bring your action photography up to the next level.
Go to full article: Panning Photography: How to Blur the Background without Blurring the Subject (Video) |
| A Simple Way to Improve Architectural Photography (Video) Posted: 14 Apr 2014 11:48 AM PDT Architectural photography is an art form in itself. It takes a photographer with a keen eye to capture the beauty and showcase the architect’s design in a single photo. Photographer Julius Shulman was one of the most well-known architectural photographers. He prided himself in not only creating an incredible image of a building, but also incorporating people into his photographs so the viewer could visually experience the functionality of the architecture. In one of his last interviews, 98-year-old Shulman talked about his enthusiasm for his profession and explained what set him apart from other architectural photographers: Setting Himself Apart As An Architectural PhotographerJulius Shulman photographed modern American architecture for over 70 years, specializing in the development of the greater Los Angeles area. While architectural photography may seem rather mundane, Shulman recognized an untapped angle to shooting architecture that made his photographs stand out from the rest. One of Shulman’s icons is the Edward Kaufman House built by Richard Neutra.
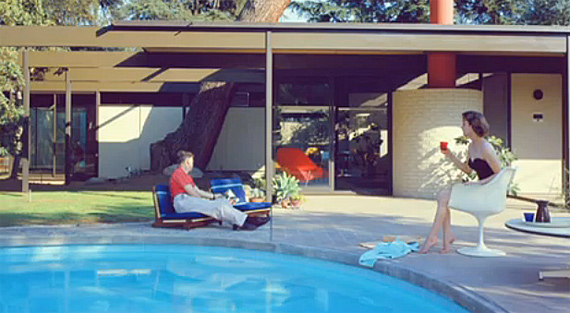
Those were the words spoken by Julius Shulman when photographing Kaufman’s home. Shulman used this thought to develop his signature style of architectural photography–adding people to the scene. He wanted the viewers of his photos to not only see the architecture, but also experience the functionality of the building. By incorporating people into the scene, Shulman added another dimension to the architecture. He showed the architecture from the perspective of the person living or working in it, making the photograph more enticing to the viewer. Shulman recognized that other architectural photographers focused only on the structures; very few incorporated people in their pictures. Once he realized this was an untapped aspect of architectural photography, he embraced it as his own, unique style.
This case study house photograph is one of Shulman’s best pieces. He claimed the success of this picture was due to the fact that he placed people in the scene. Some of the people were very natural in the scene, while others required more specific placement or direction from Shulman.
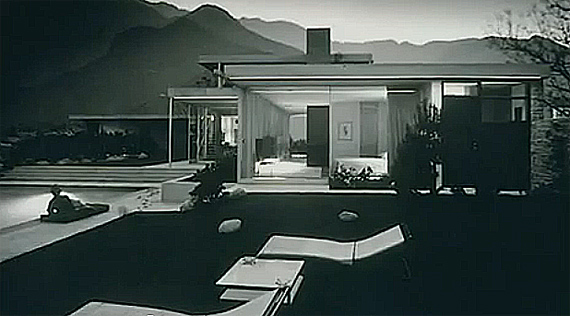
In another case study house in the Hollywood Hills, Shulman planted a man looking out at the view with a pair of binoculars:
He said the addition of that person added to the scale of the scene. The positioning of the man puts the size of the home into perspective, while his use of binoculars focuses the viewer’s attention on the luxurious sights that can be seen from this balcony. Julius Shulman spent 77 years crafting images that could have been simple photographs of homes but became works of art instead. His key was finding an aspect of architectural photography that wasn’t fully explored and using it to mold his signature style. He continued to work until he died at age 98, saying:
Go to full article: A Simple Way to Improve Architectural Photography (Video) |


| You are subscribed to email updates from PictureCorrect Photography Tips To stop receiving these emails, you may unsubscribe now. | Email delivery powered by Google |
| Google Inc., 20 West Kinzie, Chicago IL USA 60610 | |
No comments:
Post a Comment