How to Take Professional Food Photos |  |
- How to Take Professional Food Photos
- How to Use the Puppet Warp Tool in Photoshop (Video)
- Interesting Photo of the Day: Stormy Day Sunset in the Canadian Rockies
- 1939 Footage Marvels at the First Hundred Years of Photography (Video)
| How to Take Professional Food Photos Posted: 08 Jun 2014 10:49 PM PDT Photographing food is a lot more difficult than it seems. Not only do we have to work to get the right composition but we have to use light in a very specific way. We then need to style the look of the food in order to make it appealing. In this article I’ll give you some handy tips for creating tasty and mouthwatering images.  “Homemade Hamburger with Bacon” captured by Daniel Carlbom Helpful Tips for Lighting Your FoodFood photography looks good if the food shows textures. Texture is a vital factor to making food sell. Enhancing texture is done through side lighting. Side lighting reveals texture, as it brings out the brighter areas and shadows on the food to make it more appealing to the viewer.  “Fresh Tomatoes” captured by Jens Cramer A lot of food photos are taken using the soft, diffused light from a window. Window light is subtle light that works to emphasize contrast without really having to do anything overly specialized. Many food photographers use a softbox to create that “clean and white” look, but they never light the front of the food. Don’t Light Food from the Front Beautiful food photography relies upon the angle of light for contrast to create texture. Even the most even surfaced foods, like cheese, need side lighting to generate some appeal. If the food is lit front-on we lose the texture that side lighting offers. Flat light can make food to appear boring and tasteless. Control Light With a Gobo Side lighting, using diffused window or softbox light is a common way to light food; yet sometimes we don’t want light on one part of the food. In this situation we need something to reduce the light on that area. This is where your trusty gobo comes in handy. A gobo is a go-between. It’s a portion of black material or cardboard that reduces the lighting in one section of the image. I use a range of gobos to cut light out of a food image. I have large and small ones that help me do this. These pieces of black cardboard cost me under ten dollars from an office supply shop. Cutting light from food shots using a gobo is commonly used in a rustic type of food image. Food images of country kitchens, wooden benches, and old cutlery are things that come to mind when thinking of darker, dimly lit food photos. Many wholesome food products are photographed this way. Foods such as brown bread on wooden boards, homemade vegetable soups, and pasta and rice are examples of foods used in a country shoot. Add Another Diffused Light Source for Bright Images On the other hand you can use the “bright light, white” technique of shooting, as well. You may have seen brightly lit photos of breakfast cereal like puffed rice, sweet cakes, and biscuits. This approach simply uses side lighting and another light to illuminate the background. Softboxes, white shoot-through umbrellas, and reflectors are utilized in this style of food photography.  “Plate of Raspberries and Blueberries” captured by Craig Food photography is a lot of fun but very demanding work. It’s incredibly meticulous and fastidious at the best of times. If you like still life and paying attention to finer details, food photography might be right for you. About the Author: Go to full article: How to Take Professional Food Photos |
| How to Use the Puppet Warp Tool in Photoshop (Video) Posted: 08 Jun 2014 05:35 PM PDT Photoshop has many tools for altering and manipulating an image; some are subtle manipulations, and some are more dramatic. The Puppet Warp tool can be used to directly and intuitively manipulate an image with radical results, as Bryan O’Neil Hughes explains in the following video: The Puppet Warp tool can be used to drastically alter an image or to make simple improvements. Hughes shows us both methods: Using Puppet Warp for Simple ChangesFor this example, Hughes demonstrates how to straighten the apex of a barn roof. 1. First, create a duplicate of the background layer.  Original Image with Sagging Roof 2. Access the Puppet Warp tool from the Edit menu.  Selecting Puppet Warp mode. 3. Drop pins into the corners of the image to ground it.  Pins dropped into the corners stabilize the selection. 4. Drop pins along the area you want to alter; use Shift+click to select multiple pins.  Selecting multiple pins allows for greater control of manipulation. 5. Manipulate the pins you selected by using the arrow keys on your keyboard or the mouse.  Final result. Using Puppet Warp for Advanced ManipulationFor a more advanced example, Hughes chooses a photograph of a Maasai warrior. To alter the warrior’s figure and pose, he again uses the puppet warp tool, using the following steps: 1. Select the part of the image you wish to alter. Important: Save your selection.  Original image of Maasai warrior. 2. Create a new layer and paste your selection into it.  An additional layer for the selection we wish to change. 3. Select the Puppet Warp tool.  Puppet Warp, again, is accessed via the Edit menu. 4. Drop pins into the image where you wish to manipulate it. Grab pins with the mouse cursor to stretch and rotate the selection.  Manipulate the pins by dragging them with your cursor. 5. Click the check box to exit Puppet Warp mode, and add your background layer back in.  Wait! What happened? 6. Hughes notes that at this point, the background layer and selection layer are overlapping. This is why saving the selection was important in the first step. Hide your selection layer and return to the background layer. Load your previously saved selection into this layer.  Load the original selection back into the image so that it can be deleted. 7. Now you’re going to want to modify your selection so that you can effectively use the Content Aware Fill tool in the next step. Expand the edges of the selection by a bit. Hughes recommends 18 pixels here.  Expanding the edges of the selection. 8. Next, delete the selection. This will prompt the Fill dialog box. Make sure that you have Content-Aware selected, and click “OK”.  Deleting the selection to prompt the Content Aware Fill dialog. 9. Hughes notes that the background fill doesn’t need to be perfect. The original image of the warrior has been removed, so you can now unhide the manipulated selection layer.  Final image. Now that you know how to use Photoshop’s Puppet Warp tool, you can add drama or interest to your own photos by altering and manipulating them within Photoshop. Go to full article: How to Use the Puppet Warp Tool in Photoshop (Video) |
| Interesting Photo of the Day: Stormy Day Sunset in the Canadian Rockies Posted: 08 Jun 2014 02:36 PM PDT It's hard to describe the exact moods evoked by Marc Adamus’s image "Light of the Storm." The dark and menacing is rivaled by a warm and hopeful brightness—a beautiful visual example (and potentially metaphorical representation) of the ending of a storm. The image was captured from the lakeshore’s edge just as setting sun rays broke through storm clouds to illuminate the peak of Mount Inglemaldie in the Canadian Rockies: 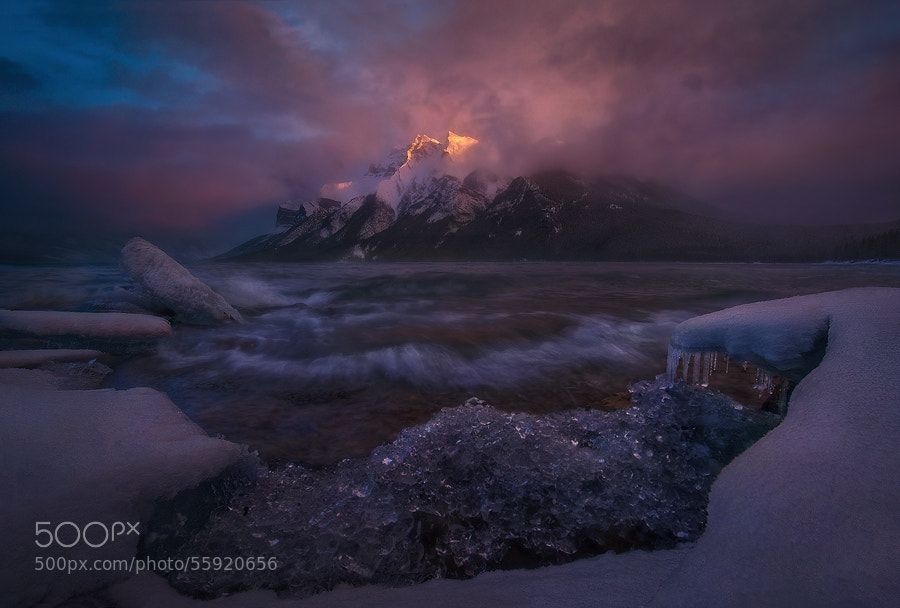 “Light of the Storm” captured by Marc Adamus (Via 500px. Click image to see full size.) After a day filled with consistent snowfall and high winds while on tour, the photograph was certainly a well-deserved and welcomed shot for Adamus. He described the occasion as “a moment of rare and beautiful light that rivaled any attempt at photographing it.” Go to full article: Interesting Photo of the Day: Stormy Day Sunset in the Canadian Rockies |
| 1939 Footage Marvels at the First Hundred Years of Photography (Video) Posted: 08 Jun 2014 11:25 AM PDT Oh, photography! What a wonderful, beautiful thing! The ability to capture a moment in time, ours to enjoy for years, decades, and even centuries. The earliest form of photography, camera obscura and pinhole cameras, can be traced back to the ancient Chinese and Greeks. But it wasn’t until the 1800s that images could be preserved on something tangible. Take a walk through the first hundred years of photographic history with this delightful video from 1939: Everyone can appreciate the wonders of photography, yet its importance in the progression of so much technology—past and present—is often over looked. (Via PetaPixel)  This is an early example of a camera, developed by Englishman Henry Fox Talbot. From documenting noteworthy persons and world events to recording important scientific information in space and on land, the significance of photography was felt from a very early stage. It soon prompted the advancement of mechanics, such as aerial survey tracing, x-ray cameras, and the illustrious moving picture. The radio transmittance of images was a remarkable development that allowed people to share images worldwide.  An important moment in time: the ability to photograph a bullet traveling one thousand feet per second. In 1939, it was exceptional to behold scientific micro-photographs and nature studies on film. And finally humanity could witness the impossible beauty of life in slow motion. It's astounding to think how far photography has come since this film was created, in both technology and accessibility. These days it is not hard to imagine even young children possessing their own digital still and video cameras and sharing the results instantly around the globe. But it is in the alarming rate of technological advancements that we sometimes may forget to stop and marvel at the gift within our grip—our cameras. Take a minute to appreciate the importance of the development of photography and how lucky we are to have this incredible device to document our own special moments, people, and places.
Go to full article: 1939 Footage Marvels at the First Hundred Years of Photography (Video) |
| You are subscribed to email updates from PictureCorrect Photography Tips To stop receiving these emails, you may unsubscribe now. | Email delivery powered by Google |
| Google Inc., 20 West Kinzie, Chicago IL USA 60610 | |
No comments:
Post a Comment