New: How to Shoot Portraits Mixing Natural & Artificial Light |  |
- New: How to Shoot Portraits Mixing Natural & Artificial Light
- Amazing Hubble Telescope Zoom of Spiral Galaxy (Video)
- How to Enhance Eyes in Photoshop (Video)
- Interesting Photo of the Day: Fierce Baby Tiger Attacks Photographer
- Quick Indoor Lighting Fix for Dark Photos (Video)
| New: How to Shoot Portraits Mixing Natural & Artificial Light Posted: 09 Apr 2014 06:41 PM PDT In a perfect world, photographers would find ideal available light at every portrait shoot. In reality, there are situations when the time of day, weather conditions, or poorly-lit locations call for additional light. That’s where this eBook on adding flash to daylight, comes in. We were able to arrange a 30% discount for PictureCorrect readers until the end of this weekend; simply remember to use the code PC2 at checkout. Now available here: Location Flash Portrait Photography eBook 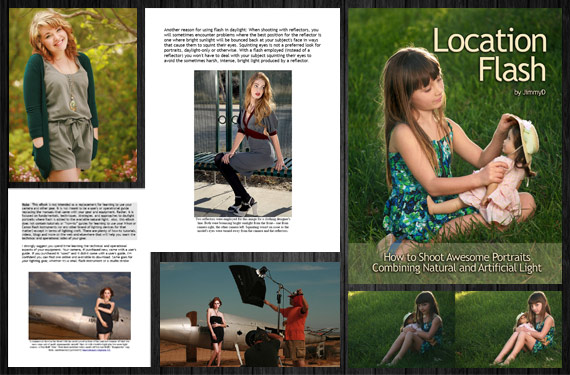 New: Location Flash eBook (Click to Learn More) There are many reasons why photographers choose to add flash to natural light. Flash assists with creating a specific look or style, gives photographers flexibility in changing weather conditions, and fills in unwanted shadows. Flash also allows for freezing motion and creating other artistic motion effects. Whether you want to learn how to shoot memorable natural-light portraits with the help of small flash instruments and the minimum essentials or by using additional gear or more powerful studio strobes, this eBook was designed to guide you through simple and easy-to-employ techniques and strategies that you can quickly integrate into your daylight production workflow. It features plenty of photos and illustrations to underscore its text. Some of the Topics Covered Include (93 pages):
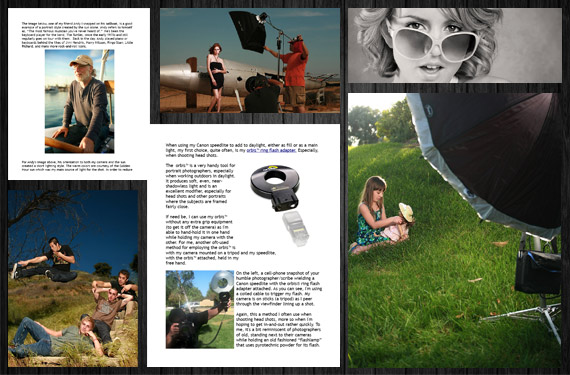 Pages from Location Flash (Click to See More) Covering a wide range of topics–from gear to camera settings to improving upon the existing light to artistic interpretation–this eBook aims to enhance and refine your location flash lighting strategies in a simple format that’s quick to put into practice. Location Flash was written to help you up your portrait-shooting game, guiding you on the road to consistently capturing awesome portraits, whether you shoot weddings, events, babies, kids, families, entertainers, models, or business professionals. How to Get a Discounted Copy:The guide comes in PDF format that can be read on computers, phones and most tablet computers (works great as a mobile reference out in the field). We were able to arrange a 30% discount for PictureCorrect readers until Sunday April 13, simply remember to use the code PC2 at checkout. Found here: Location Flash – How to Shoot Portraits Combining Natural & Artificial Light Go to full article: New: How to Shoot Portraits Mixing Natural & Artificial Light |
| Amazing Hubble Telescope Zoom of Spiral Galaxy (Video) Posted: 09 Apr 2014 03:57 PM PDT NASA releases pretty amazing images for astrophiles to enjoy and study, and the image below of the spiral galaxy ESO 137-001 is one of those gems. In the vertiginous video below, you can watch as the image spins and zooms deep into space, eventually revealing the runaway spiral galaxy which is over 200 million light years away: The image was taken using Hubble’s Wide Field Camera, or WFC3. Since its installation in 2009, the WFC3 has shown great usefulness in the work NASA is doing. WFC3 has greater resolution and a wider angle of view than its predecessor, the Wide Field Planetary Camera 2.
The Wide Field Camera is capable of seeing near-infrared light, visible light, and near-ultraviolet radiation, giving it the potential to be 30 times better than the Wide Field Planetary Camera 2. The video and image you see above were taken with help from the Hubble Space Telescope, a project shared by NASA and the European Space Agency. Go to full article: Amazing Hubble Telescope Zoom of Spiral Galaxy (Video) |
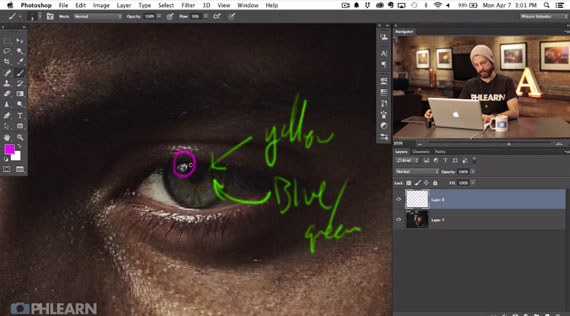
| How to Enhance Eyes in Photoshop (Video) Posted: 09 Apr 2014 01:59 PM PDT They say the eyes are windows to the soul—but in photography, those windows usually have blinds covering them. When eyes pop, people notice, and it can mean the difference between a good shot and a great one. In this video, the guys at Phlearn take us through an innovative way to bump up eye colors in Photoshop without losing realism: It’s a long video, but the process is fairly simple. Start by finding the part of the eye that’s being hit by the light. (There’ll be a white reflection in the eyeball revealing this.) Then identify the eye’s natural colors. In this example, the natural colors are green and yellow, while the light is coming in from the top-lefthand side of the frame:
You want to edit on the opposite side of the light, which, in this case, is the bottom-right. Use the eyedropper to grab the exact color of the eye, then choose a more extreme color—browns should be oranges, greens become lime, etc. Scribble in the side opposite the reflection with the paintbrush tool in a small pattern, like so:
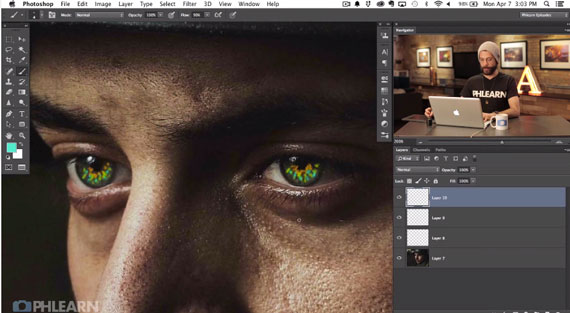
Each color can have its own layer, so you can adjust the opacity of each. When you’re finished, switch the layers to “overlay” and add a slight gaussian blur. It should look a little rough, but still slightly more natural. Then create two mask layers to adjust the curves and affect the brightness of the colors.
Lastly, sharpen the colors and around the inner eyes, eyelashes, and eyelids to draw them out a bit. If it still looks too strong you can turn down the opacity.  Before Photoshop…  …And after Photoshop. The final product should look enhanced, but still natural—a sort of hyper-realistic portrait that transforms the eyes from just another facial feature to the main draw of the image itself. Go to full article: How to Enhance Eyes in Photoshop (Video) |
| Interesting Photo of the Day: Fierce Baby Tiger Attacks Photographer Posted: 09 Apr 2014 12:10 PM PDT As the internet often proves, baby animals are just impossibly irresistible. Even when they are doing not-so-nice things, like lunging toward photographers. On closer examination, the photographer, who doesn’t necessarily appear to be in any particular hurry to get away from the tiger while photographing it in an enclosure, is taking the term, “anything to get the shot” to an all new level:  Too bad we don’t get to see the photographer’s shot. (Via Imgur. Click for larger size.) Despite his juvenile stature, the young tiger could still cause serious injury to the photographer. Just ask anyone who has ever been “playfully” mauled by an innocent looking kitten of the domesticated house cat variety. Even their tiny little claws and teeth can inflict serious pain. Being on the receiving end of a baby tiger lunge is almost certainly more painful—not to mention horrifying—than our initial reaction to this photos inherent cuteness may lead us to believe. Go to full article: Interesting Photo of the Day: Fierce Baby Tiger Attacks Photographer |
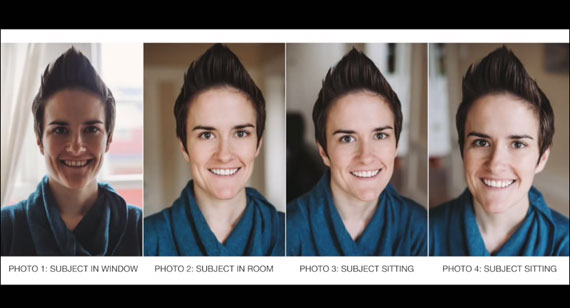
| Quick Indoor Lighting Fix for Dark Photos (Video) Posted: 09 Apr 2014 10:25 AM PDT If you’re just starting out as a photographer, you may not have a firm concept of lighting yet. That’s okay—practice makes perfect photos, after all. When taking shots indoors, you’ll want to shoot near a window during daytime if you want that pleasantly soft natural light. In this video, Maggie Hudson shows us a simple fix for dark indoor shots: It’s very easy. Instead of having your subject face away from the light of a window, have them facing the window itself—that way, the light will shine onto the person’s face, instead of casting awkward rim lighting. Here are some quick photos showing the right and wrong ways to handle this:  The wrong way, with the subject’s back to the light.  The right way, with the subject’s face lit up. Finally, Hudson recommends trying out a few different positions to see what works for your subject: have them sit and stand, and turn their faces so the light hits them in different ways.
Go to full article: Quick Indoor Lighting Fix for Dark Photos (Video) |


| You are subscribed to email updates from PictureCorrect Photography Tips To stop receiving these emails, you may unsubscribe now. | Email delivery powered by Google |
| Google Inc., 20 West Kinzie, Chicago IL USA 60610 | |
No comments:
Post a Comment